Getting Started
Welcome to Destino Magento 1.9.3.4 Theme!
Firstly, a huge thanks for purchasing this theme, your support is truly appreciated!
This document covers the installation and use of this theme, reveals some answers to common problems and issues. We encourage you to read throughout this document if you are experiencing any difficulties. If you have any questions that are beyond the scope of document, please feel free to contact us via our Support Tickets System
Compatible with Magento:
Please click here to view the document for SM Destino Magento Ver 2.1.x.
Magento Information
To install this theme you must have a working version of Magento already installed. If you need help installing Magento, follow below sites and tutorials from magento.com, hope everything that you need are there.
- System Requirements - Required system credentials for your magento installation.
- Online Magento 1 guide - Online magento documentation that describes about magento 1 in detail.
- Magento Forum - Magento forum site.
- stackoverflow.com - You can also get some useful articles from stackoverflow.
Installation
Prepare Installation
There are two ways to install a Magento Theme:
- Quickstart Installation: Suitable if you have your first installation and want to get a whole new fresh site as our Demo.
- Manual Installation (including Theme Installation): Suitable if your store is full with content that you don't want to overwrite.
Quickstart Installation
Magentech provides SM Quickstart package for each theme which aims to ease the installation for users. If you plan to start your site from the beginning, it will help you save much time of installing and configuring.
Please follow steps below:- Step 1: Download the quickstart package
- Step 2: Upload and Extract the whole Quickstart package to your server. In Quickstart folder you will see the extracted folder that include all sample data
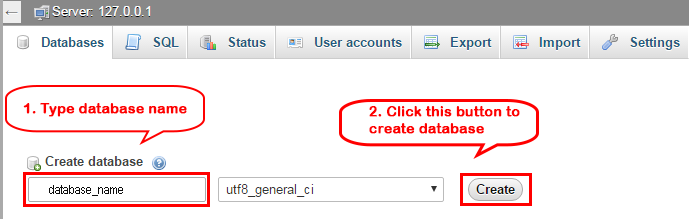
- Step 3: Create a Database for your Magento site
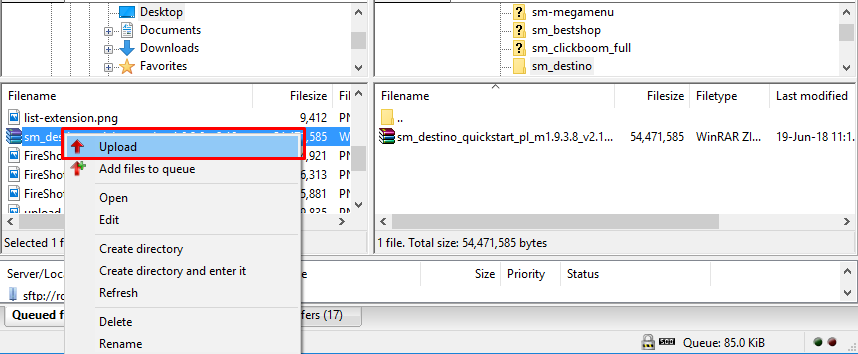
Important: You can extract package by this command:
unzip file.zip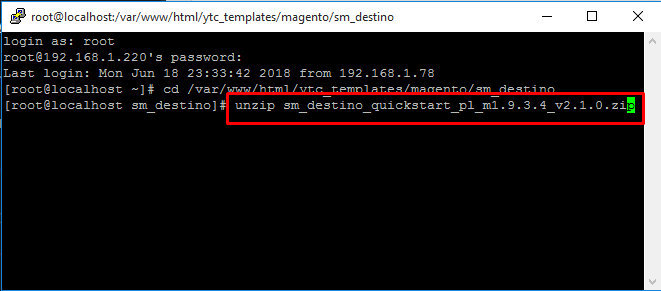
Important!
Sometimes your site is broken, after run this command, it's because of you ran this command with the incorrect user. If your site was broken, it's very important to set the file's permissions and ownership correctly, after run this command line. You can refer this commandchown -R <owner>:<group> <magento root directory path>.Typical examples:
chown -R apache:apache /var/www/html/sm_market1938
Note: You need to remember the database name to use in the next steps
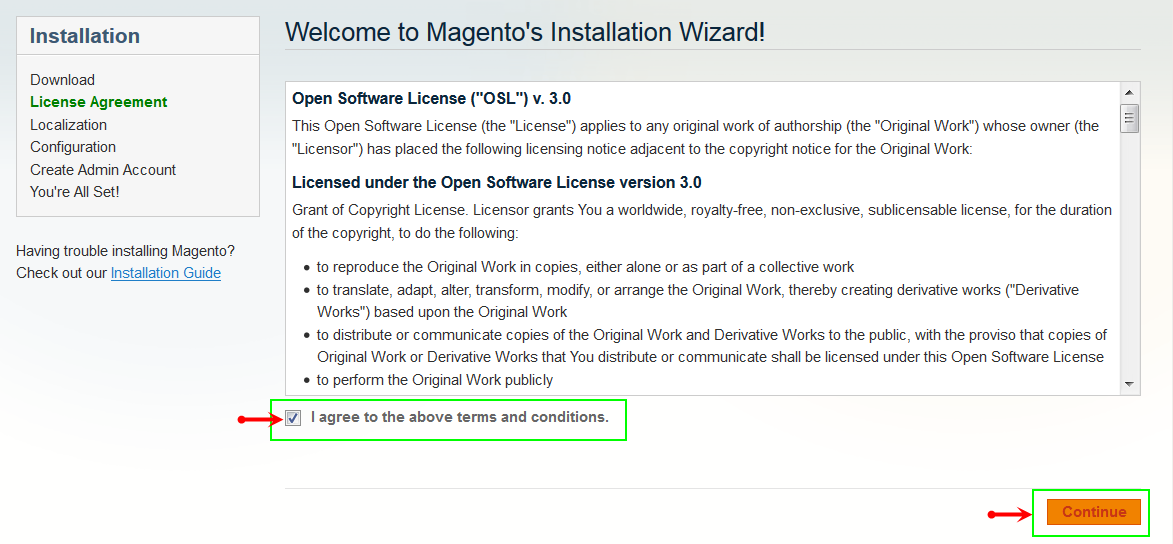
- Step 4: Start installation by opening browser and navigate to your URL (where the Quickstart uploaded) to load default Magento installer. Please follow each step of the Installer so that the installation process can be set.
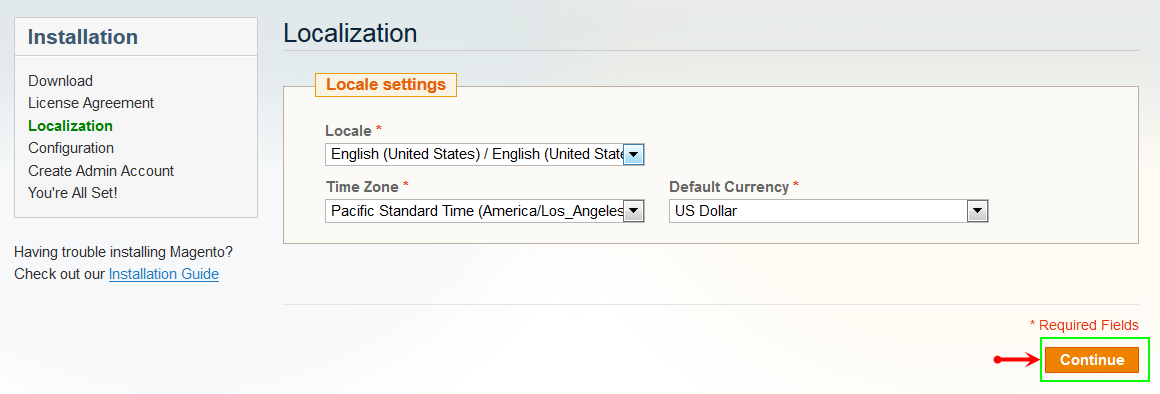
- Step 5: Locale Settings. Please fill fully into Required Fields ("Locale; Time Zone and Default Currency".)
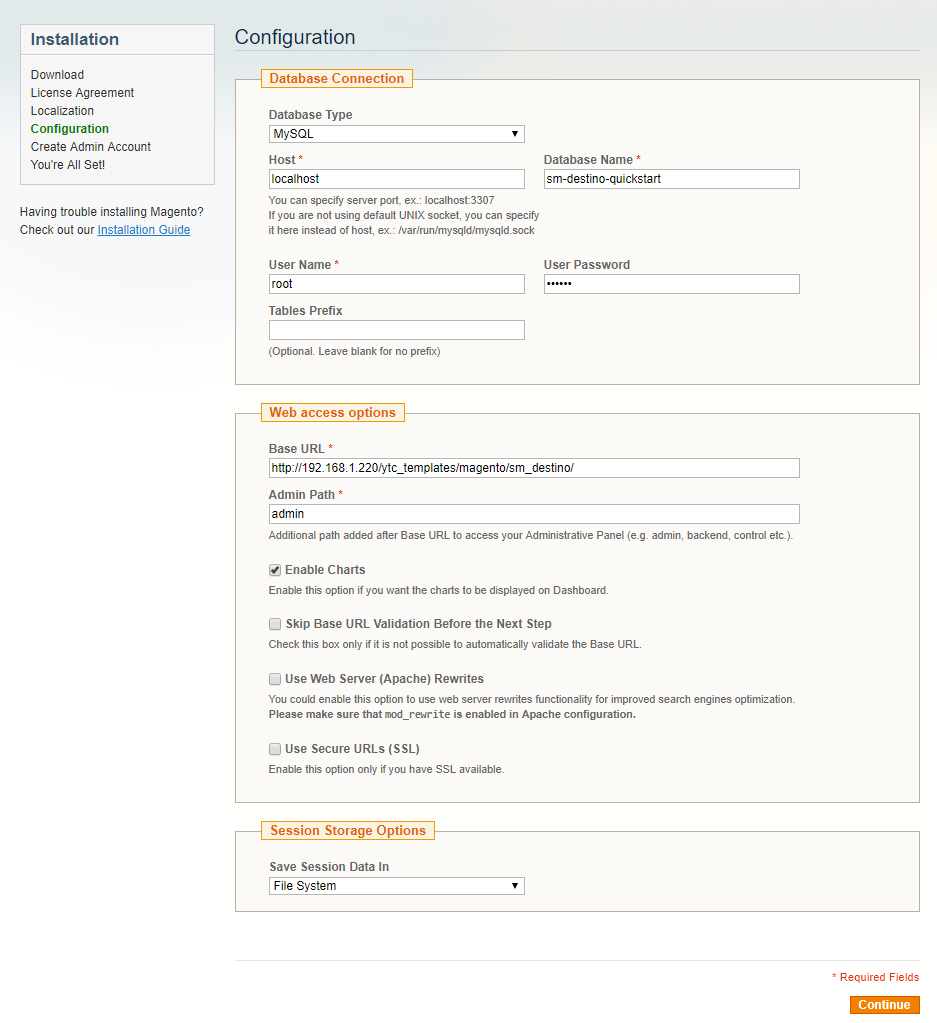
- Step 6: In the Configuration step, input the required fields as below.
- Database Name: sm-destino-quickstart( It must be the exact name of database you have just created)
- User name: Enter "User name"
- User password: Enter "User password"
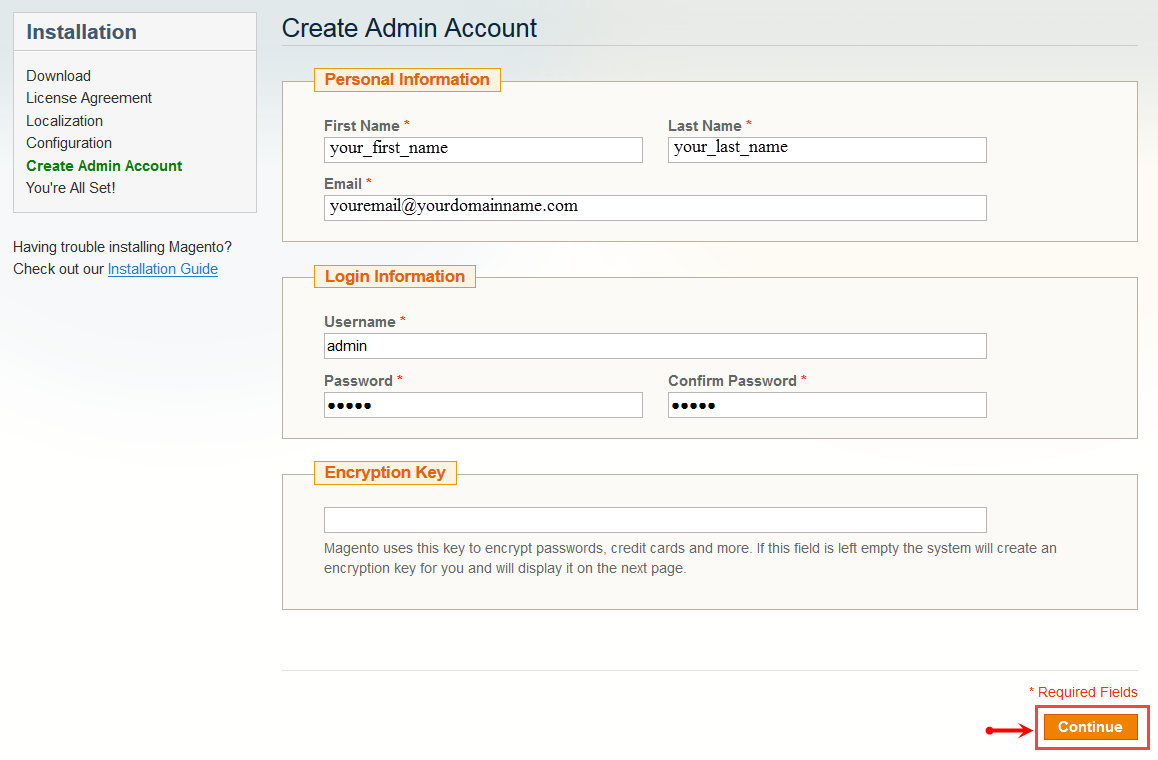
- Step 7: Create Admin Account. Please fill out Required Fields ("First Name; Last Name; Email; Username; password and confirm password" completely.)
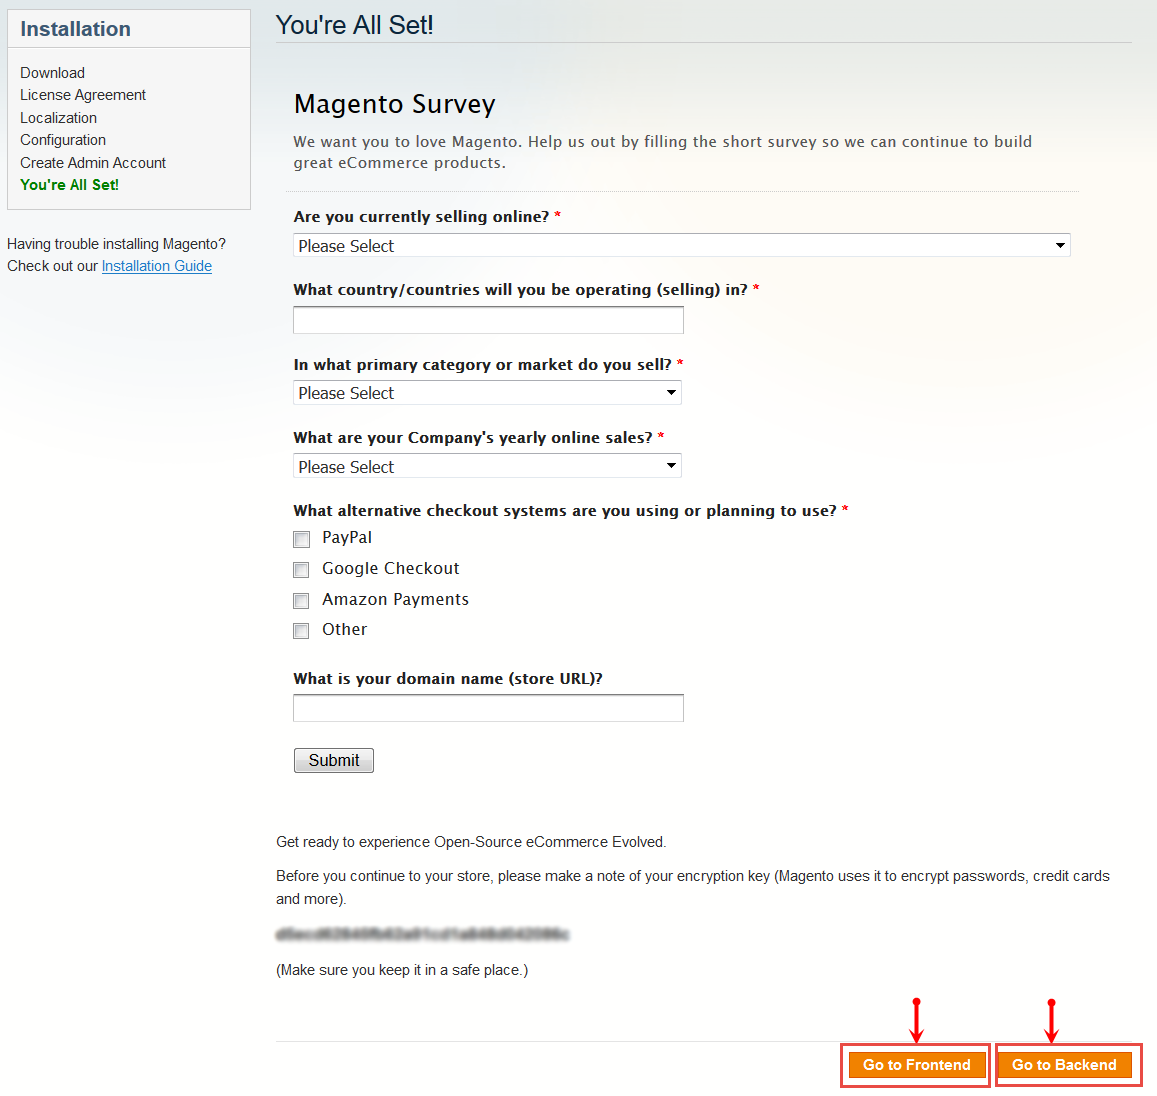
- Step 8: Finish Installation and now you can click Go to Frontend to open Homepage or click Go to Backend to open Admin Panel.
Manual Installation
- Step 1: Please unzip 'sm_destino_theme_m1.9.x_v2.1.0' file and upload folders skin; media; lib; js; app from the theme package to the root of your magento site folder on your server.
- Step 2:
Log in to your Admin Panel (e.g. http://yourdomain/index.php/admin/)
Note: If you are using the Admin Panel when copying folders in step 1, you need to log out and log in back.
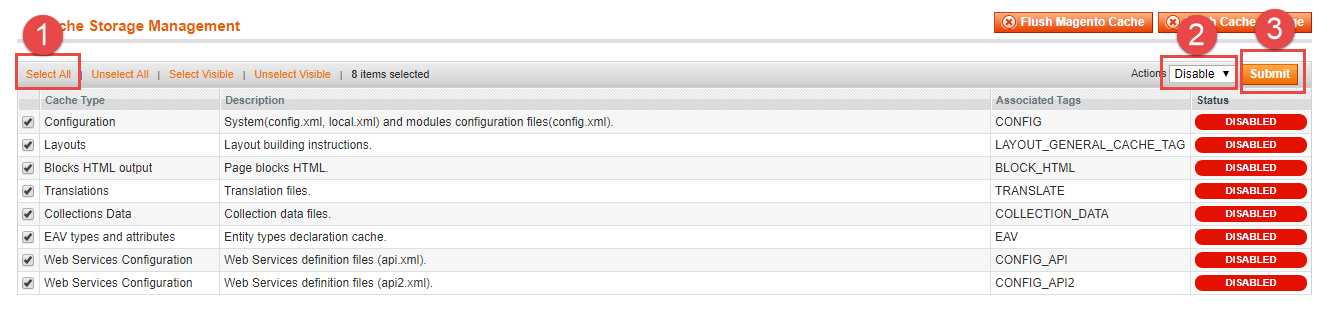
- Step 3: Disable Cache: Go to System >> Cache Management, click 'Sellect All' button, then choose 'Disable' and click 'Submit' button to complete the action.
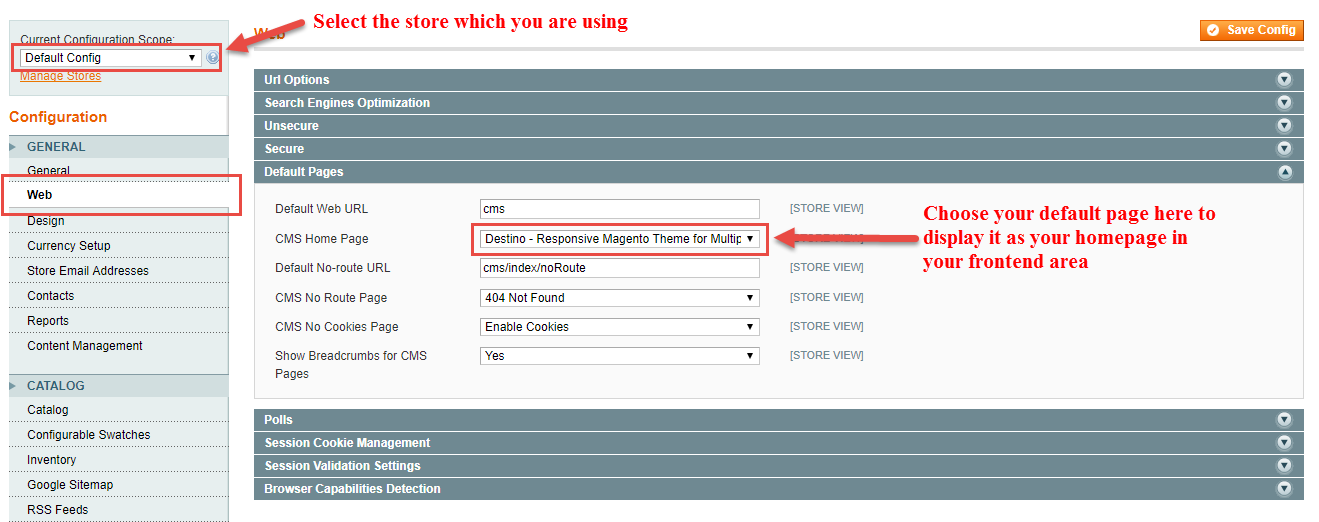
- Step 4: Navigate to System >> Configuration >> Web as the image below.
- Step 5: Continue navigating to Design tab below Web tab and save your changes as the image below.
- Step 6: Finally, Click button "Save Config" to save your configuration
Note: In Default pages, select the page as the homepage for your store, pay attention that: In "Current Configuration Scope", select your store before completing other parameters.
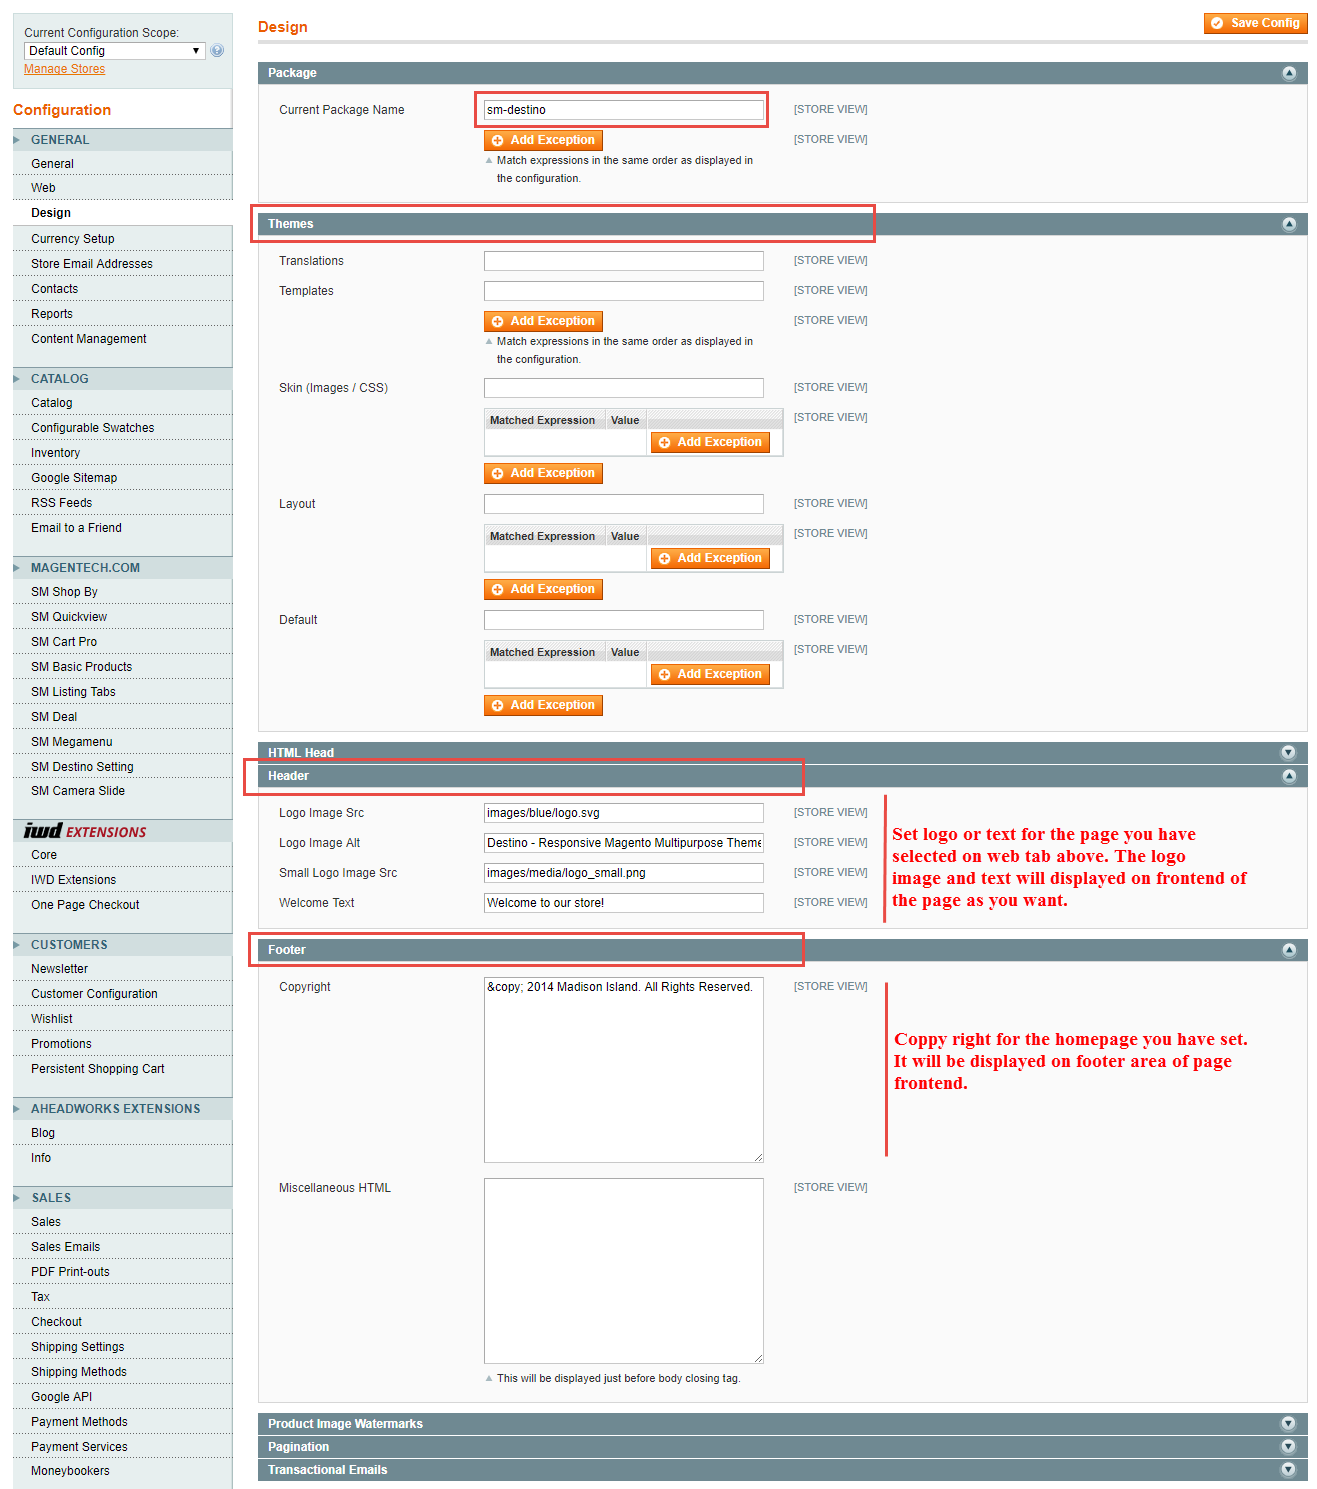
Note: You can configure the header with Logo ( image, text for logo, text for welcome symbol), and configure the Footer with Copy Right
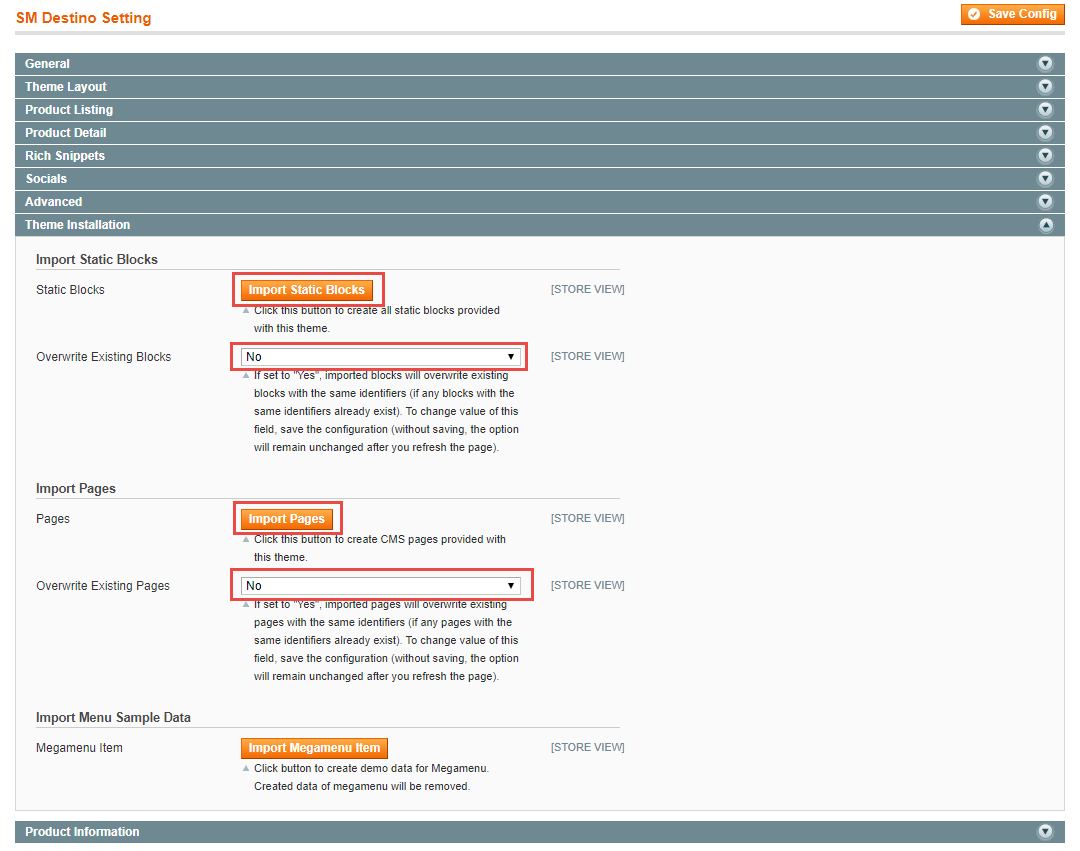
Important: In order to do demo installation, you should import Static Blocks, CMS Pages in SM Destino Setting>> Theme Installation.
1. Press the buttons named 'Static CMS Blocks' and 'Pages' to import all default blocks and pages.
2. Please remember that: If you have imported these Static Blocks, Pages successfully, you would have all blocks and pages provided with this theme and you do not need to create any static blocks or pages manually as the following instruction of this document.
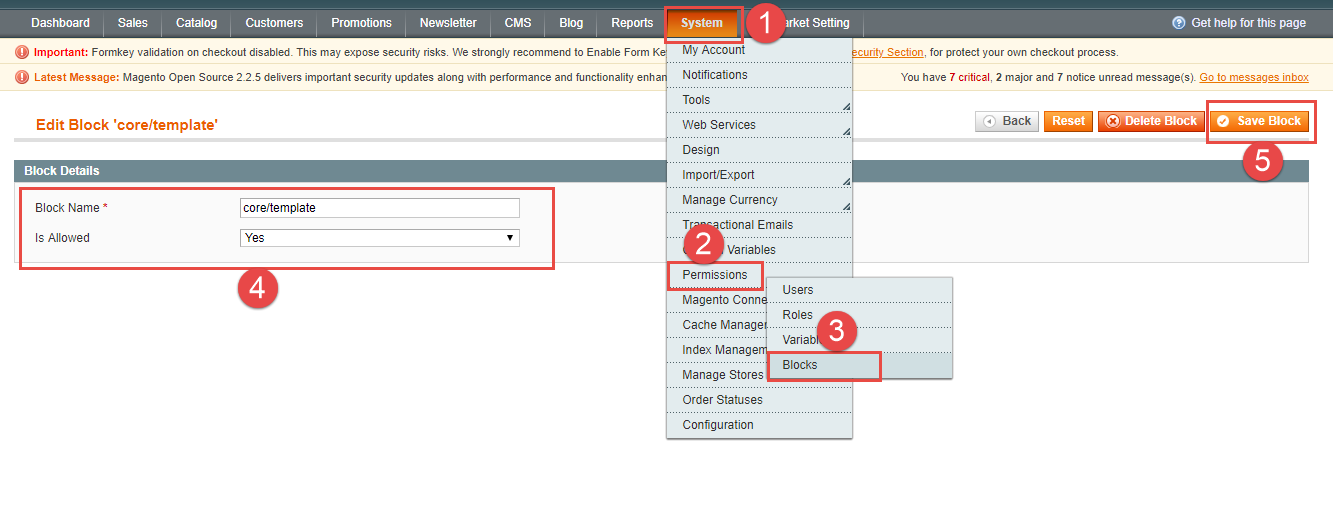
3. You need to give the permission for your block.
Go to System >> Permissions >> Blocks. Click "add new block" button to add all blocks as image here and isAllowed -> Yes
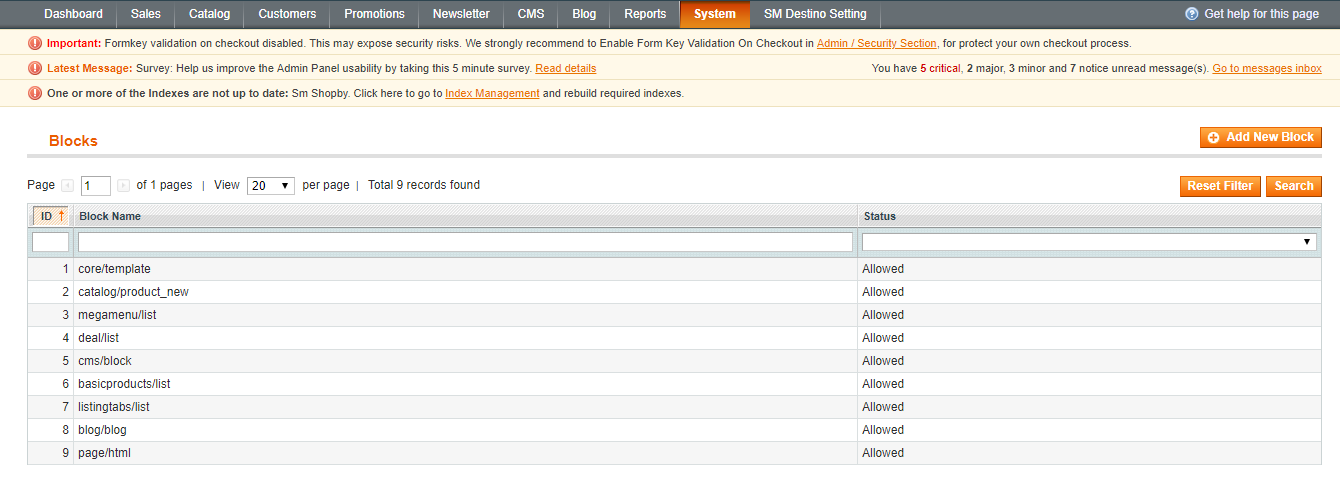
Now click "Save Block" and Clear cache.
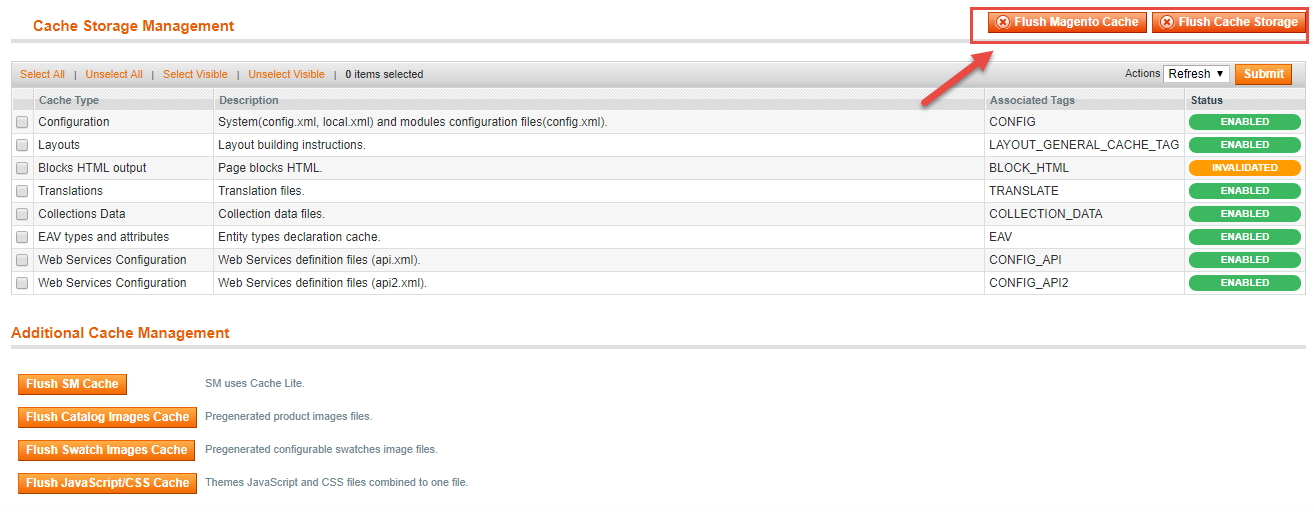
4. Flush Cache: After successfully import your demo, you could go to System >> Cache Management, click 'Flush Cache Storage' button to flush all the cache.
Layout Position
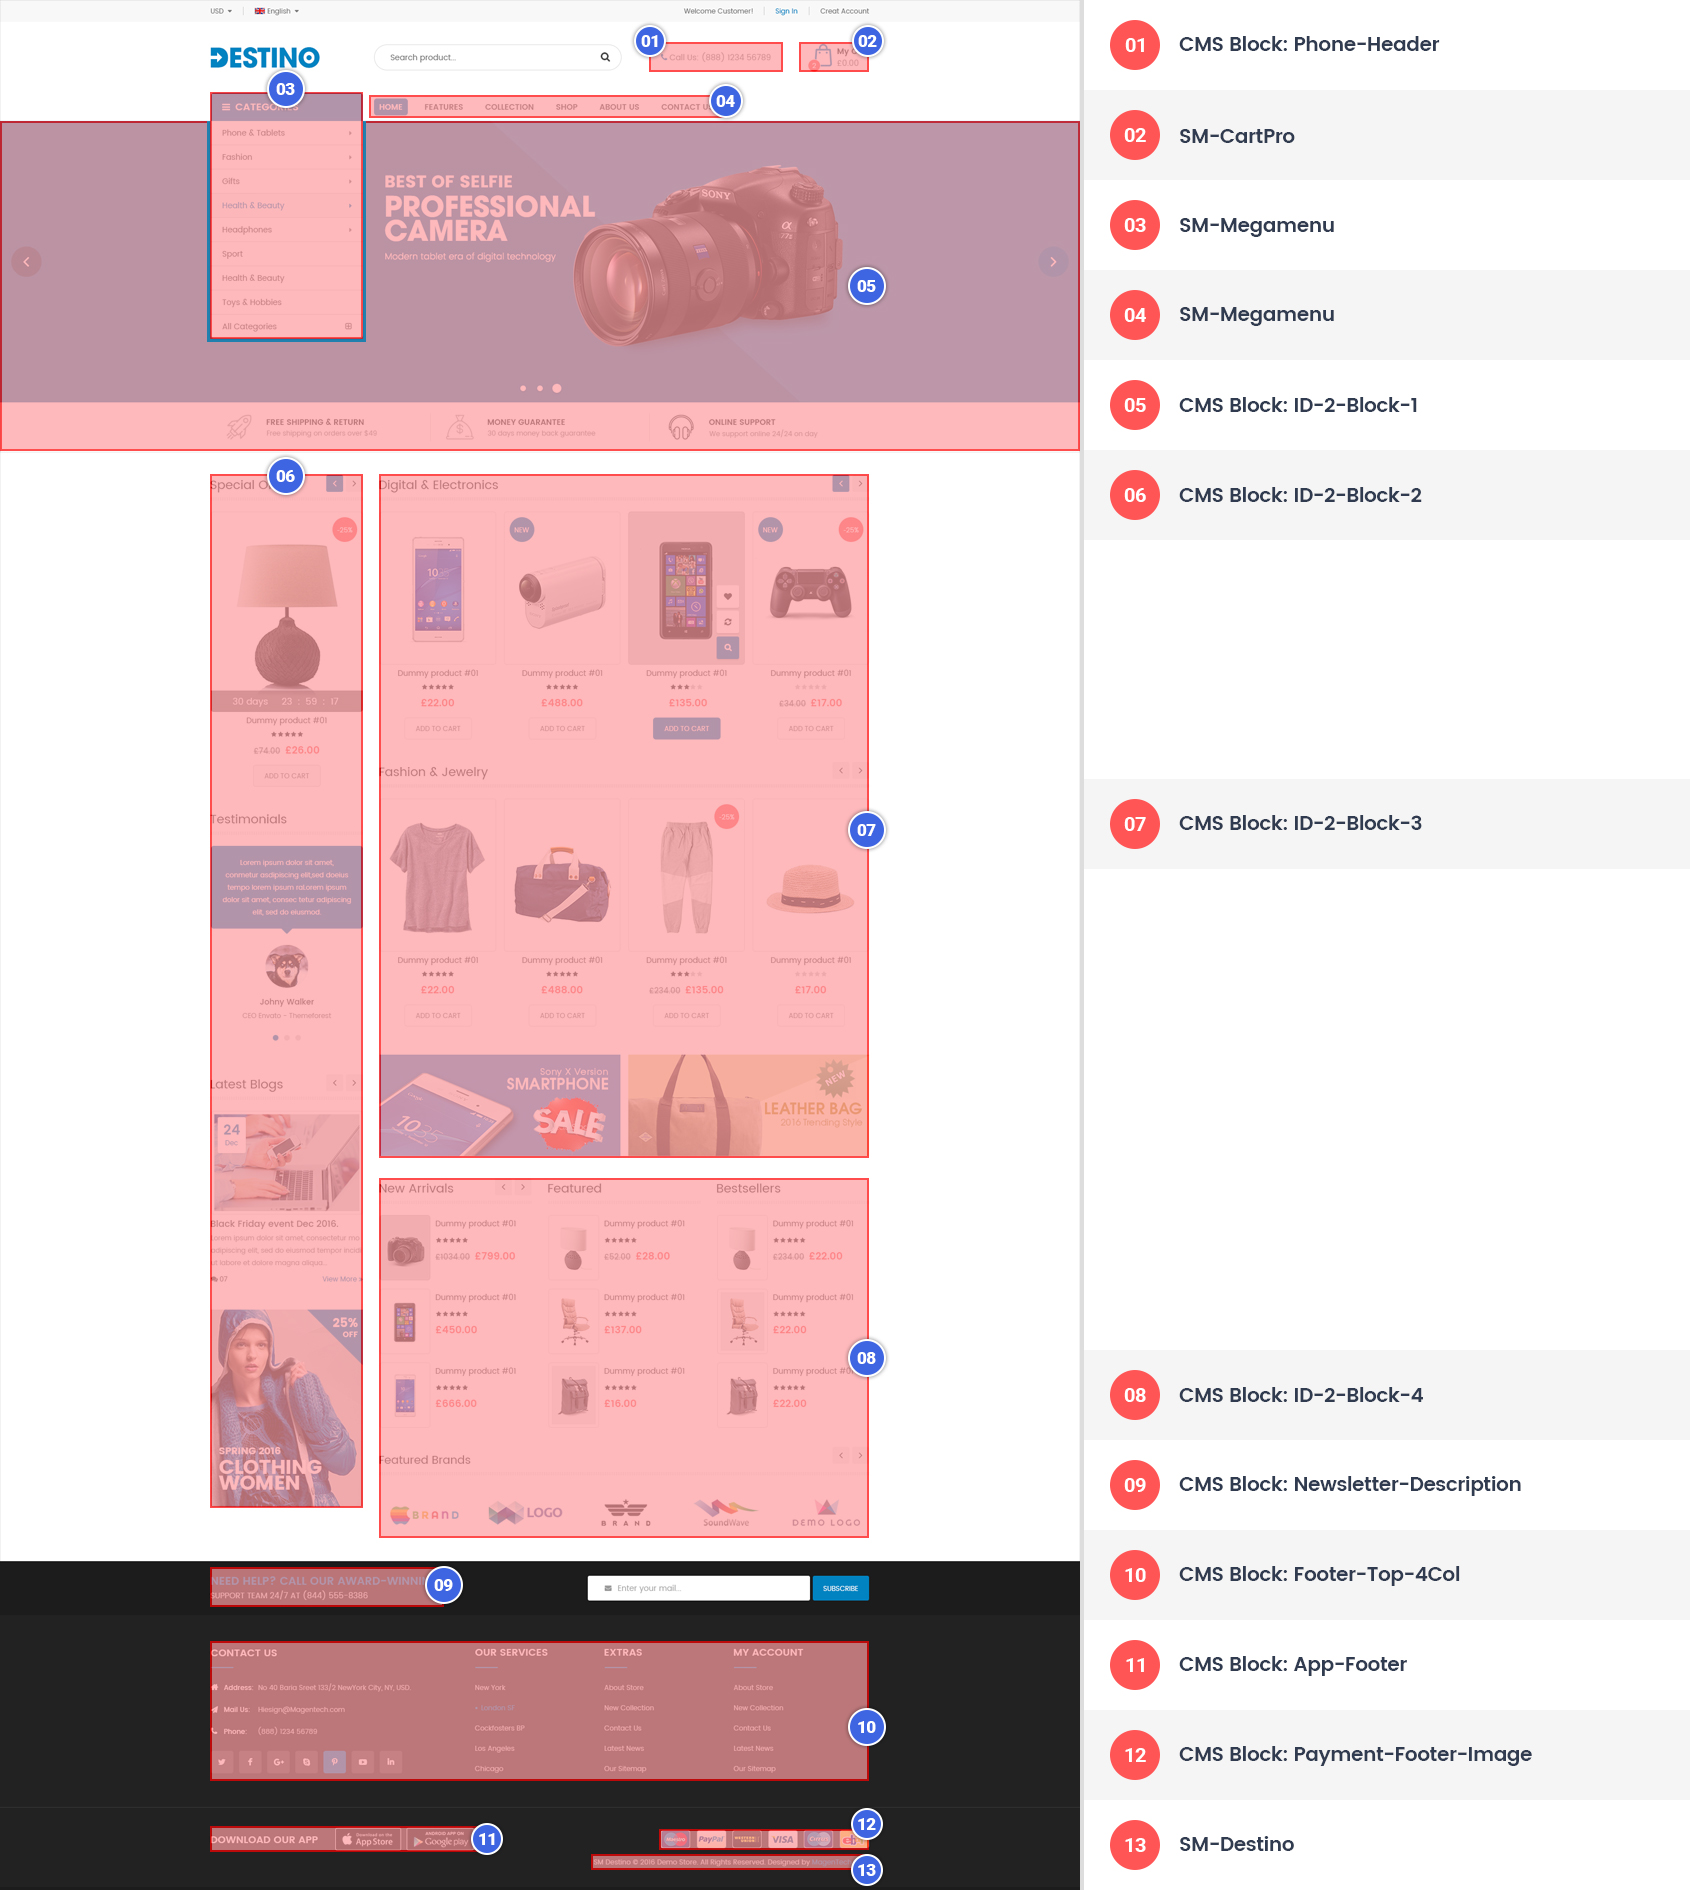
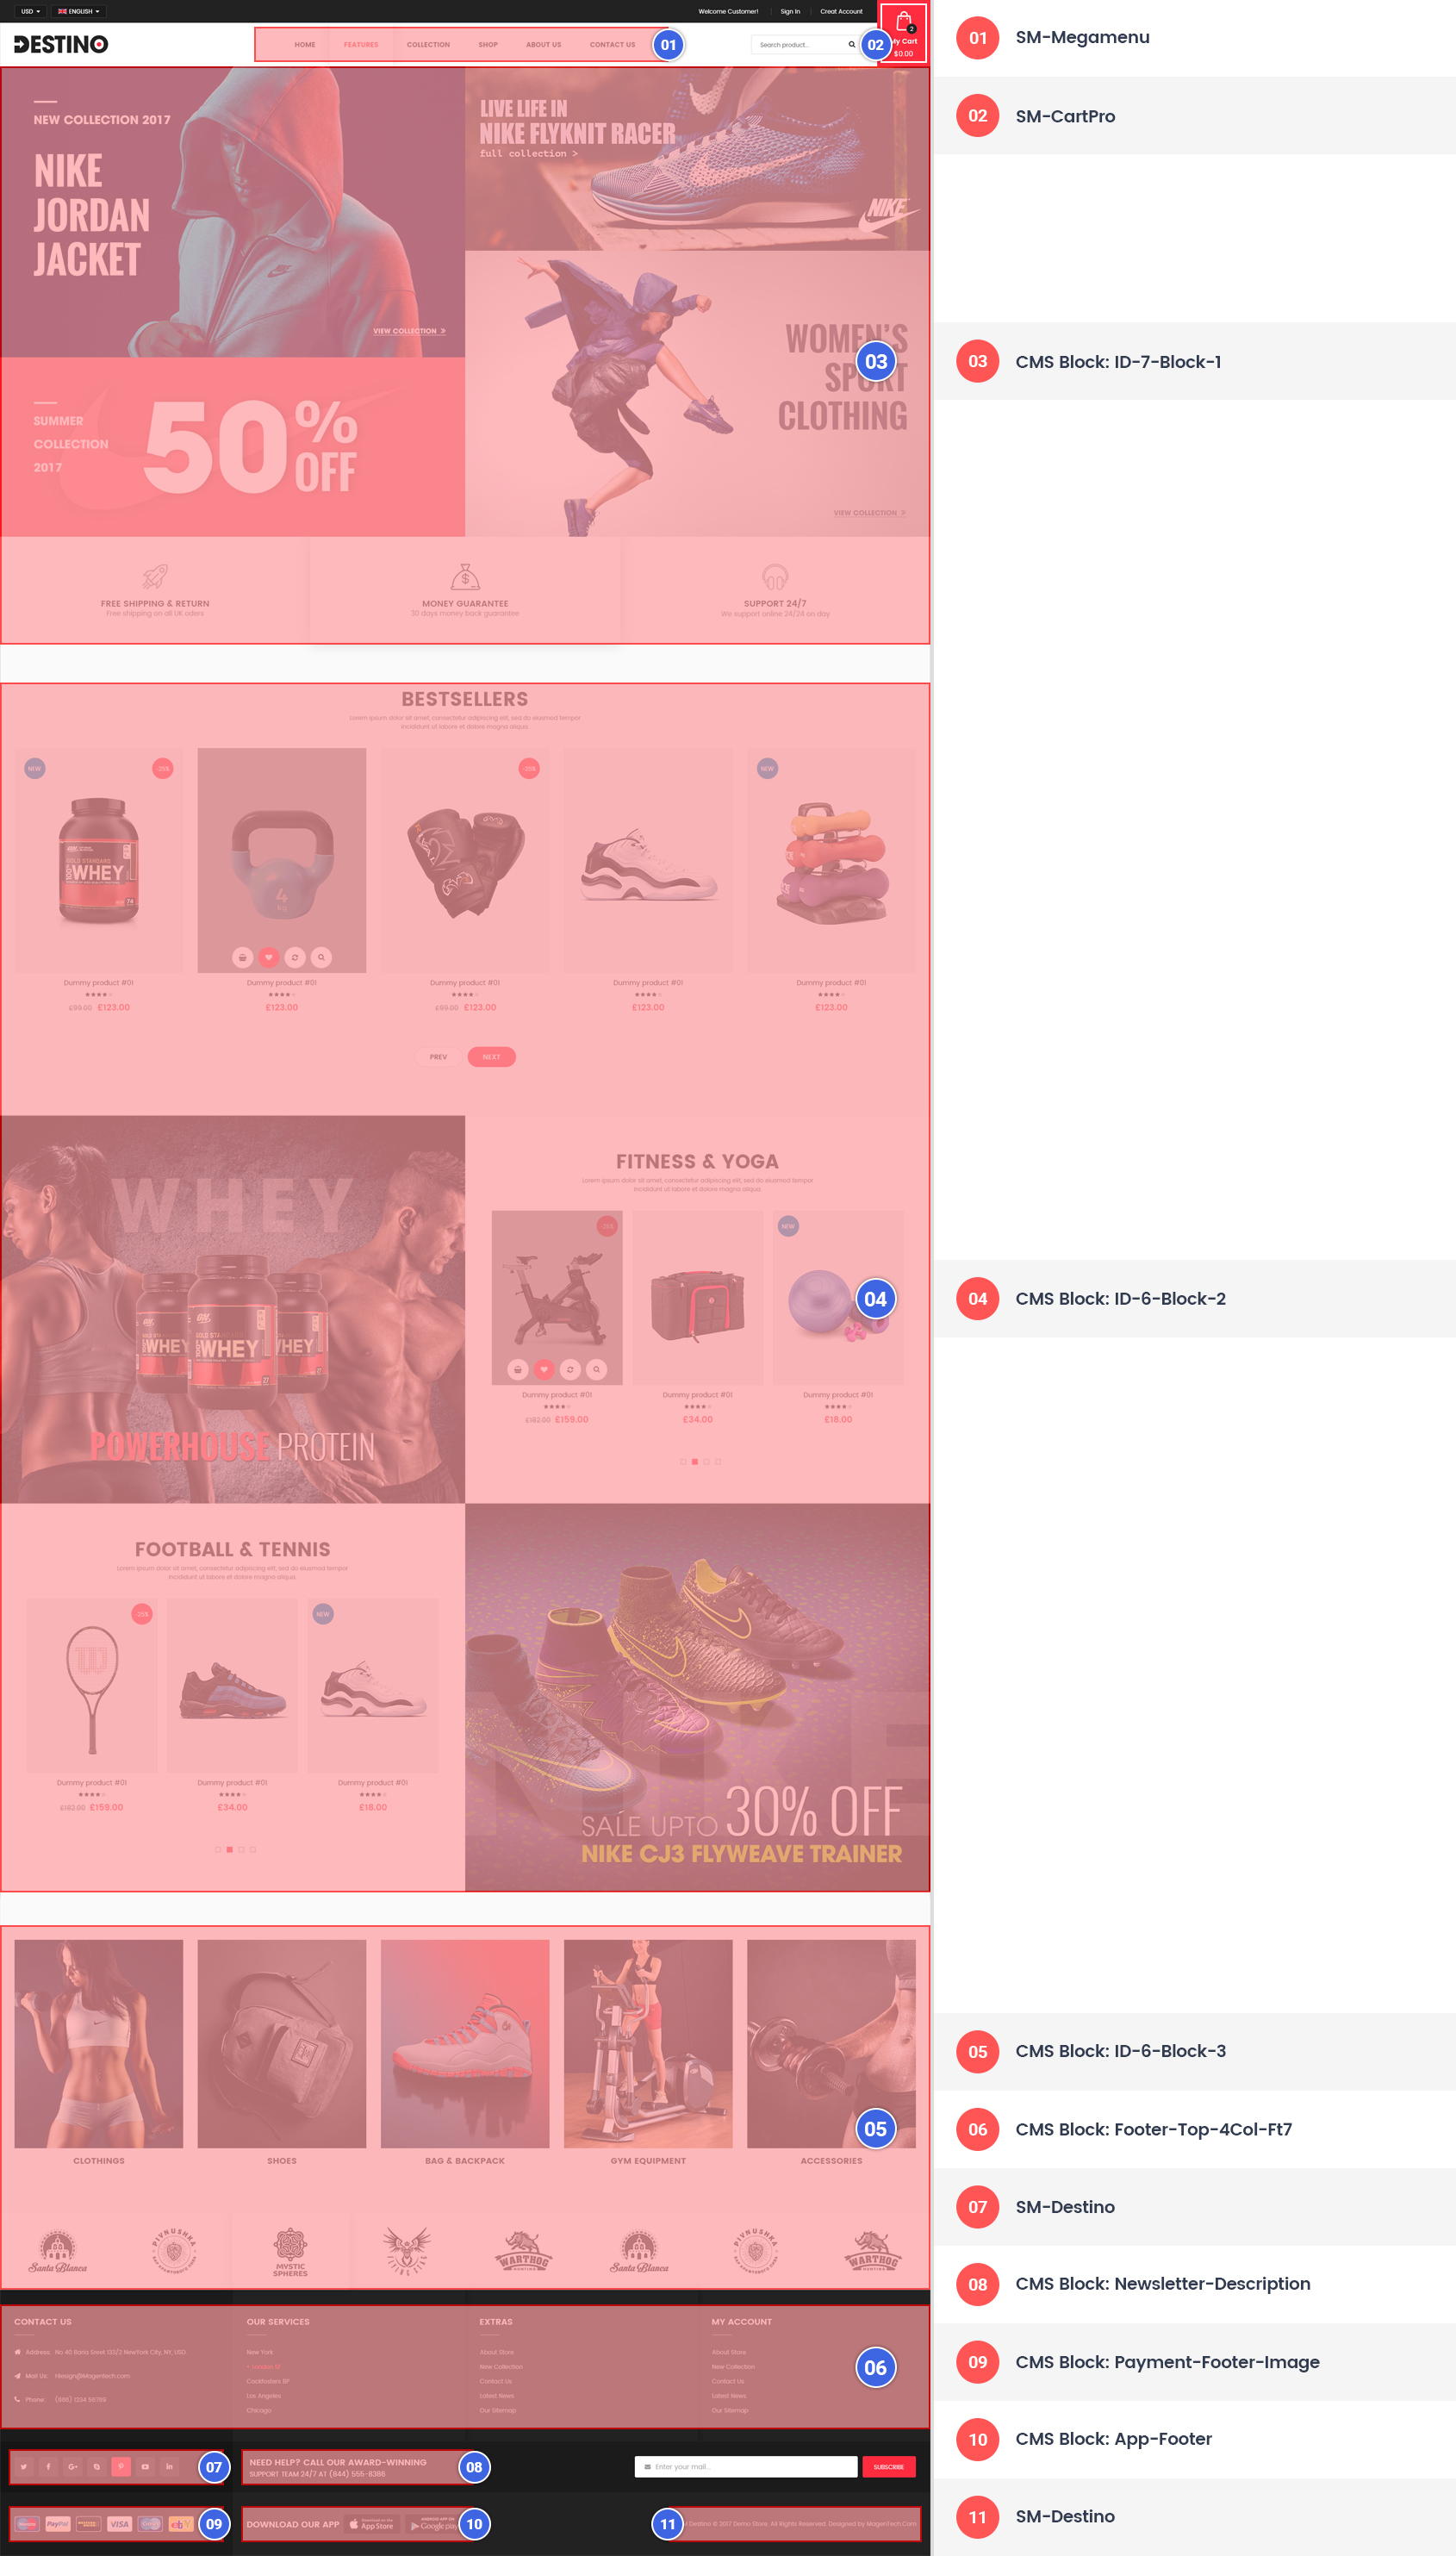
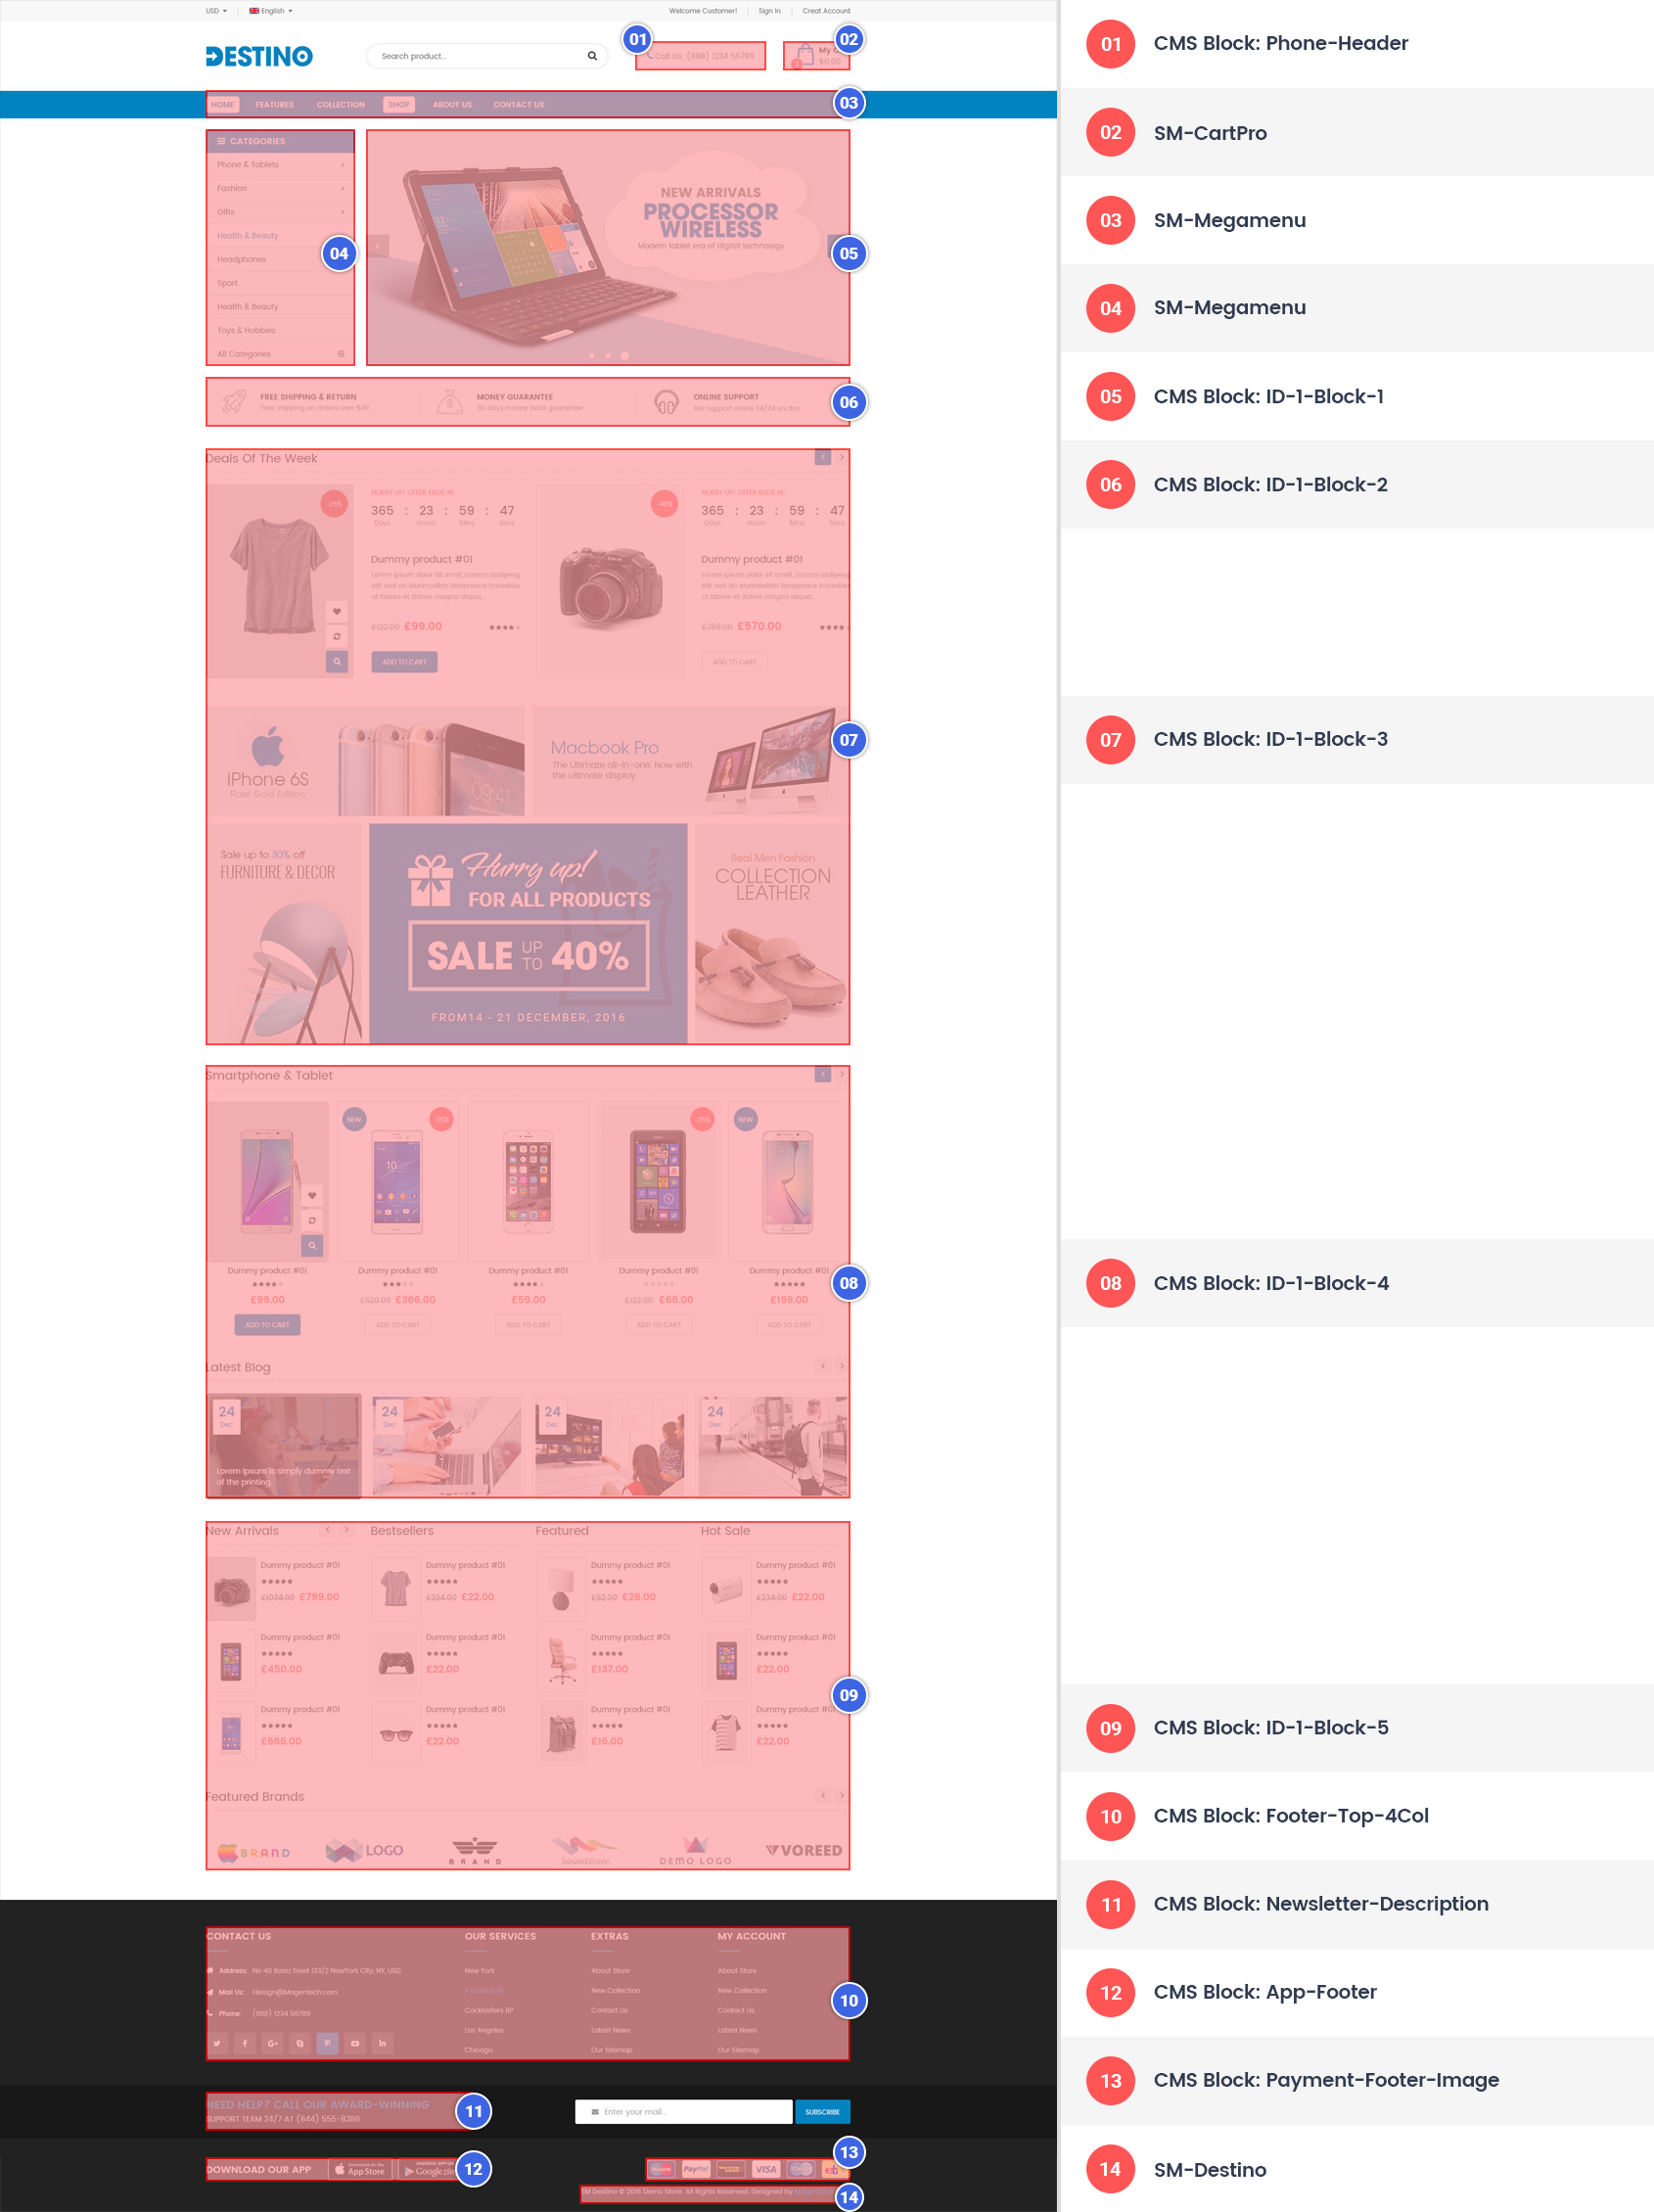 Home Style 1
 Home Style 2
 Home Style 3
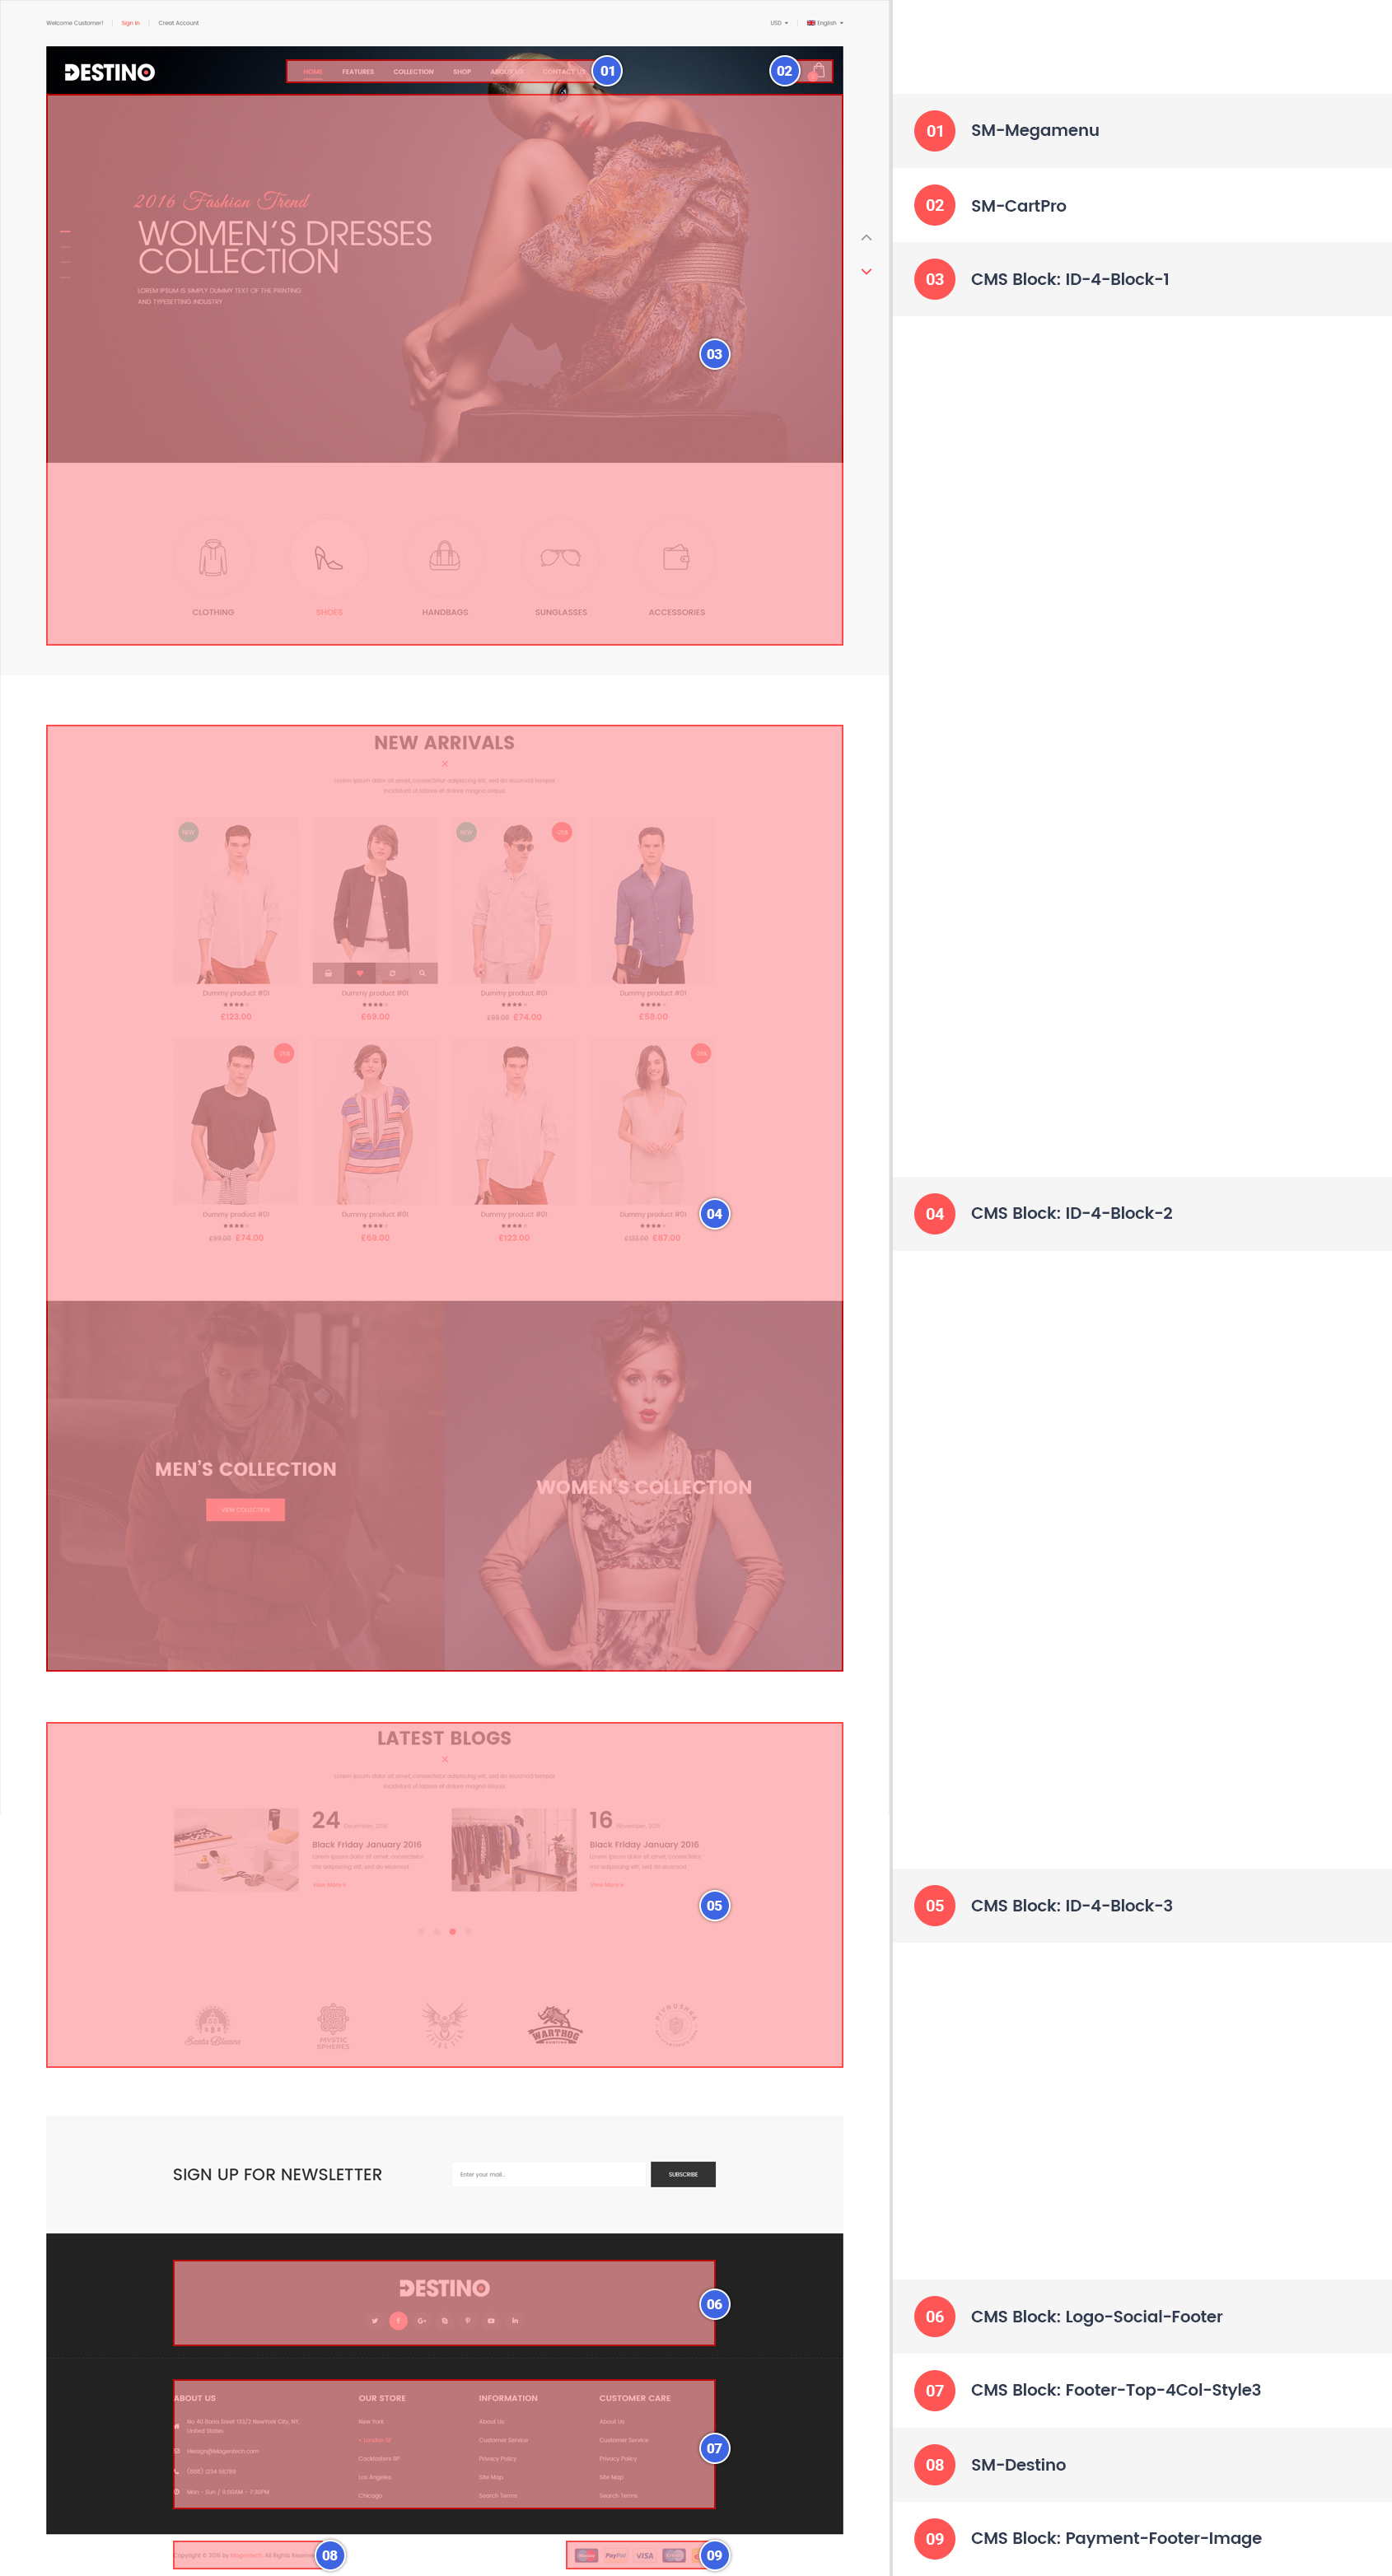 Home Style 4
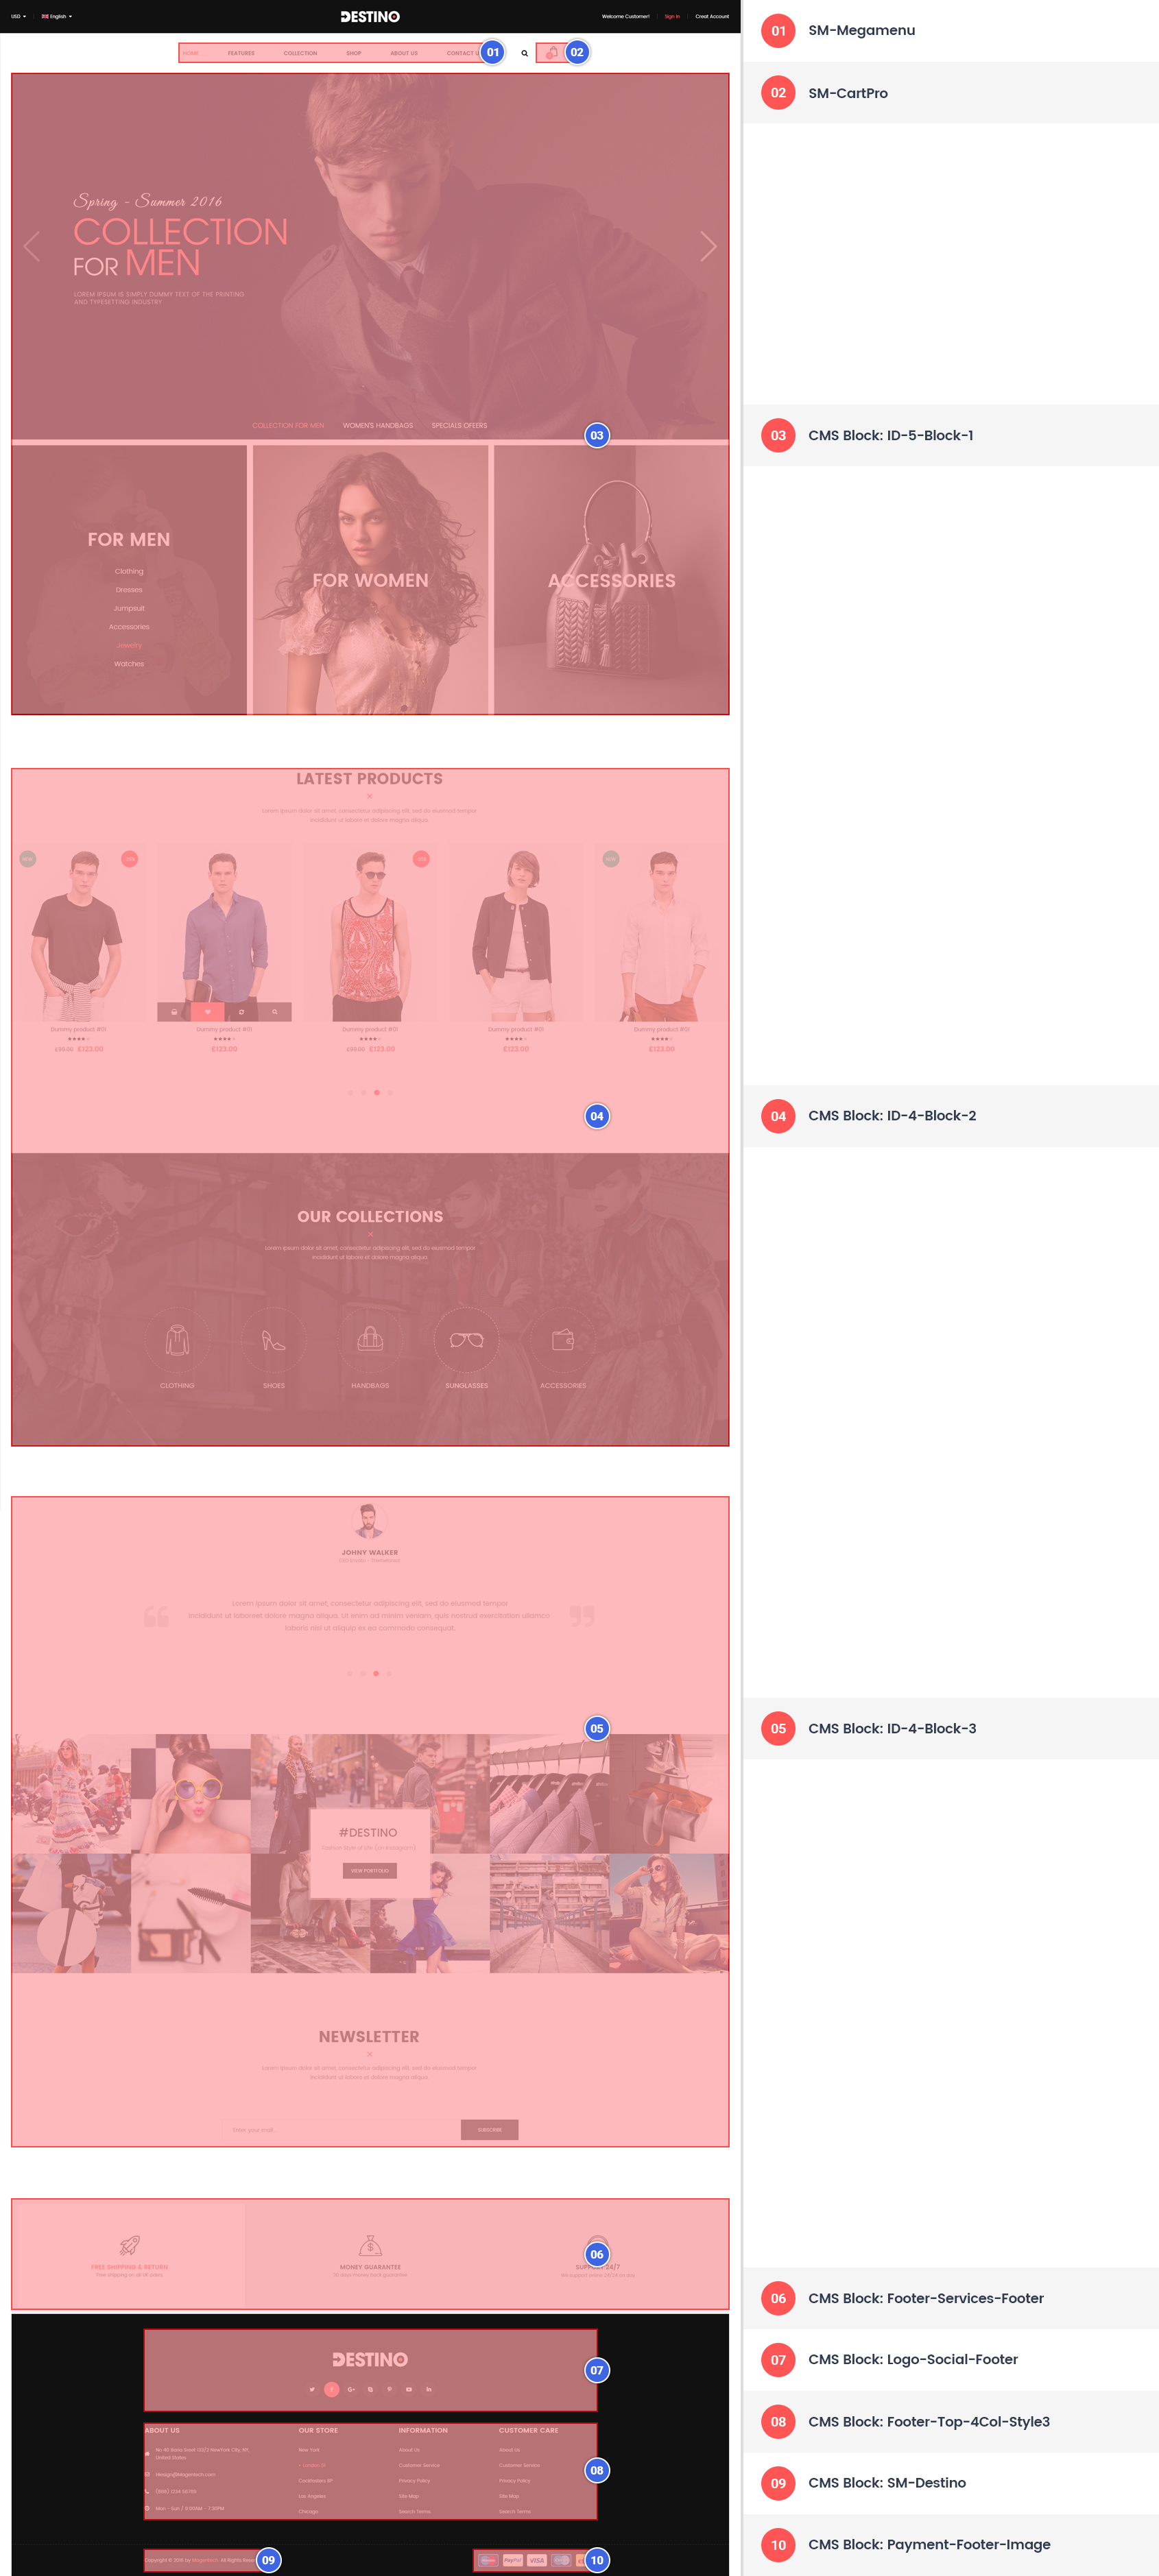 Home Style 5
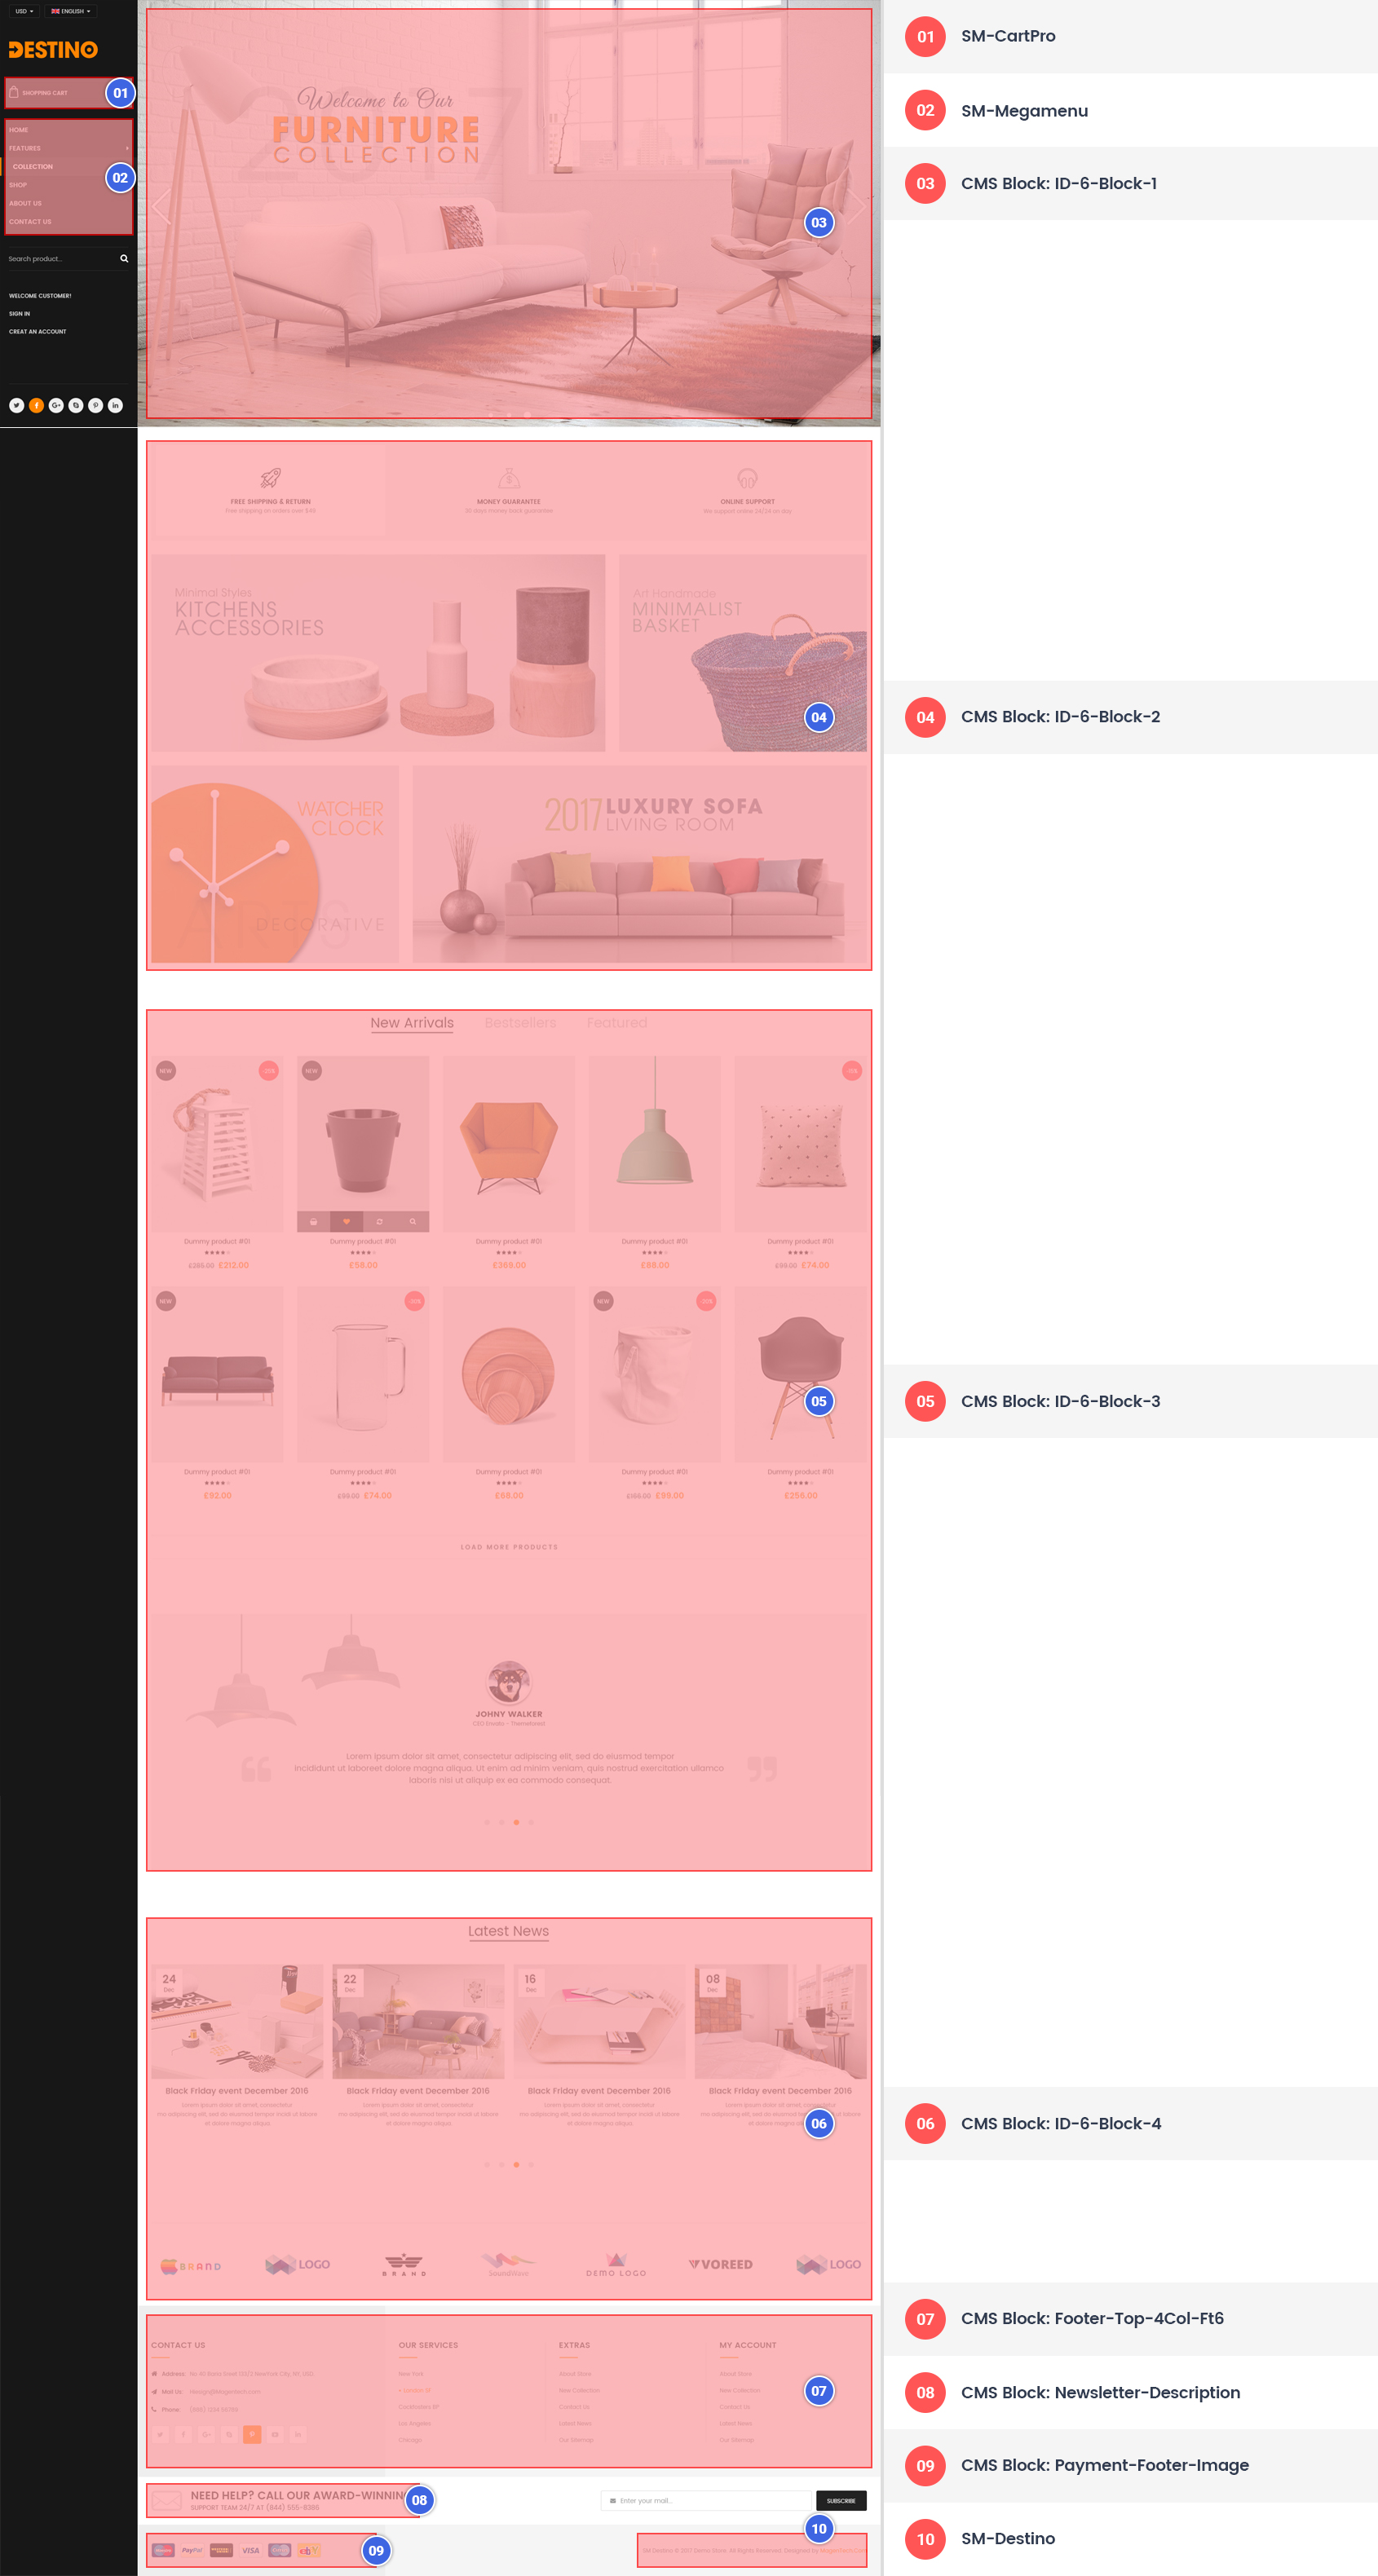 Home Style 6
 Home Style 7
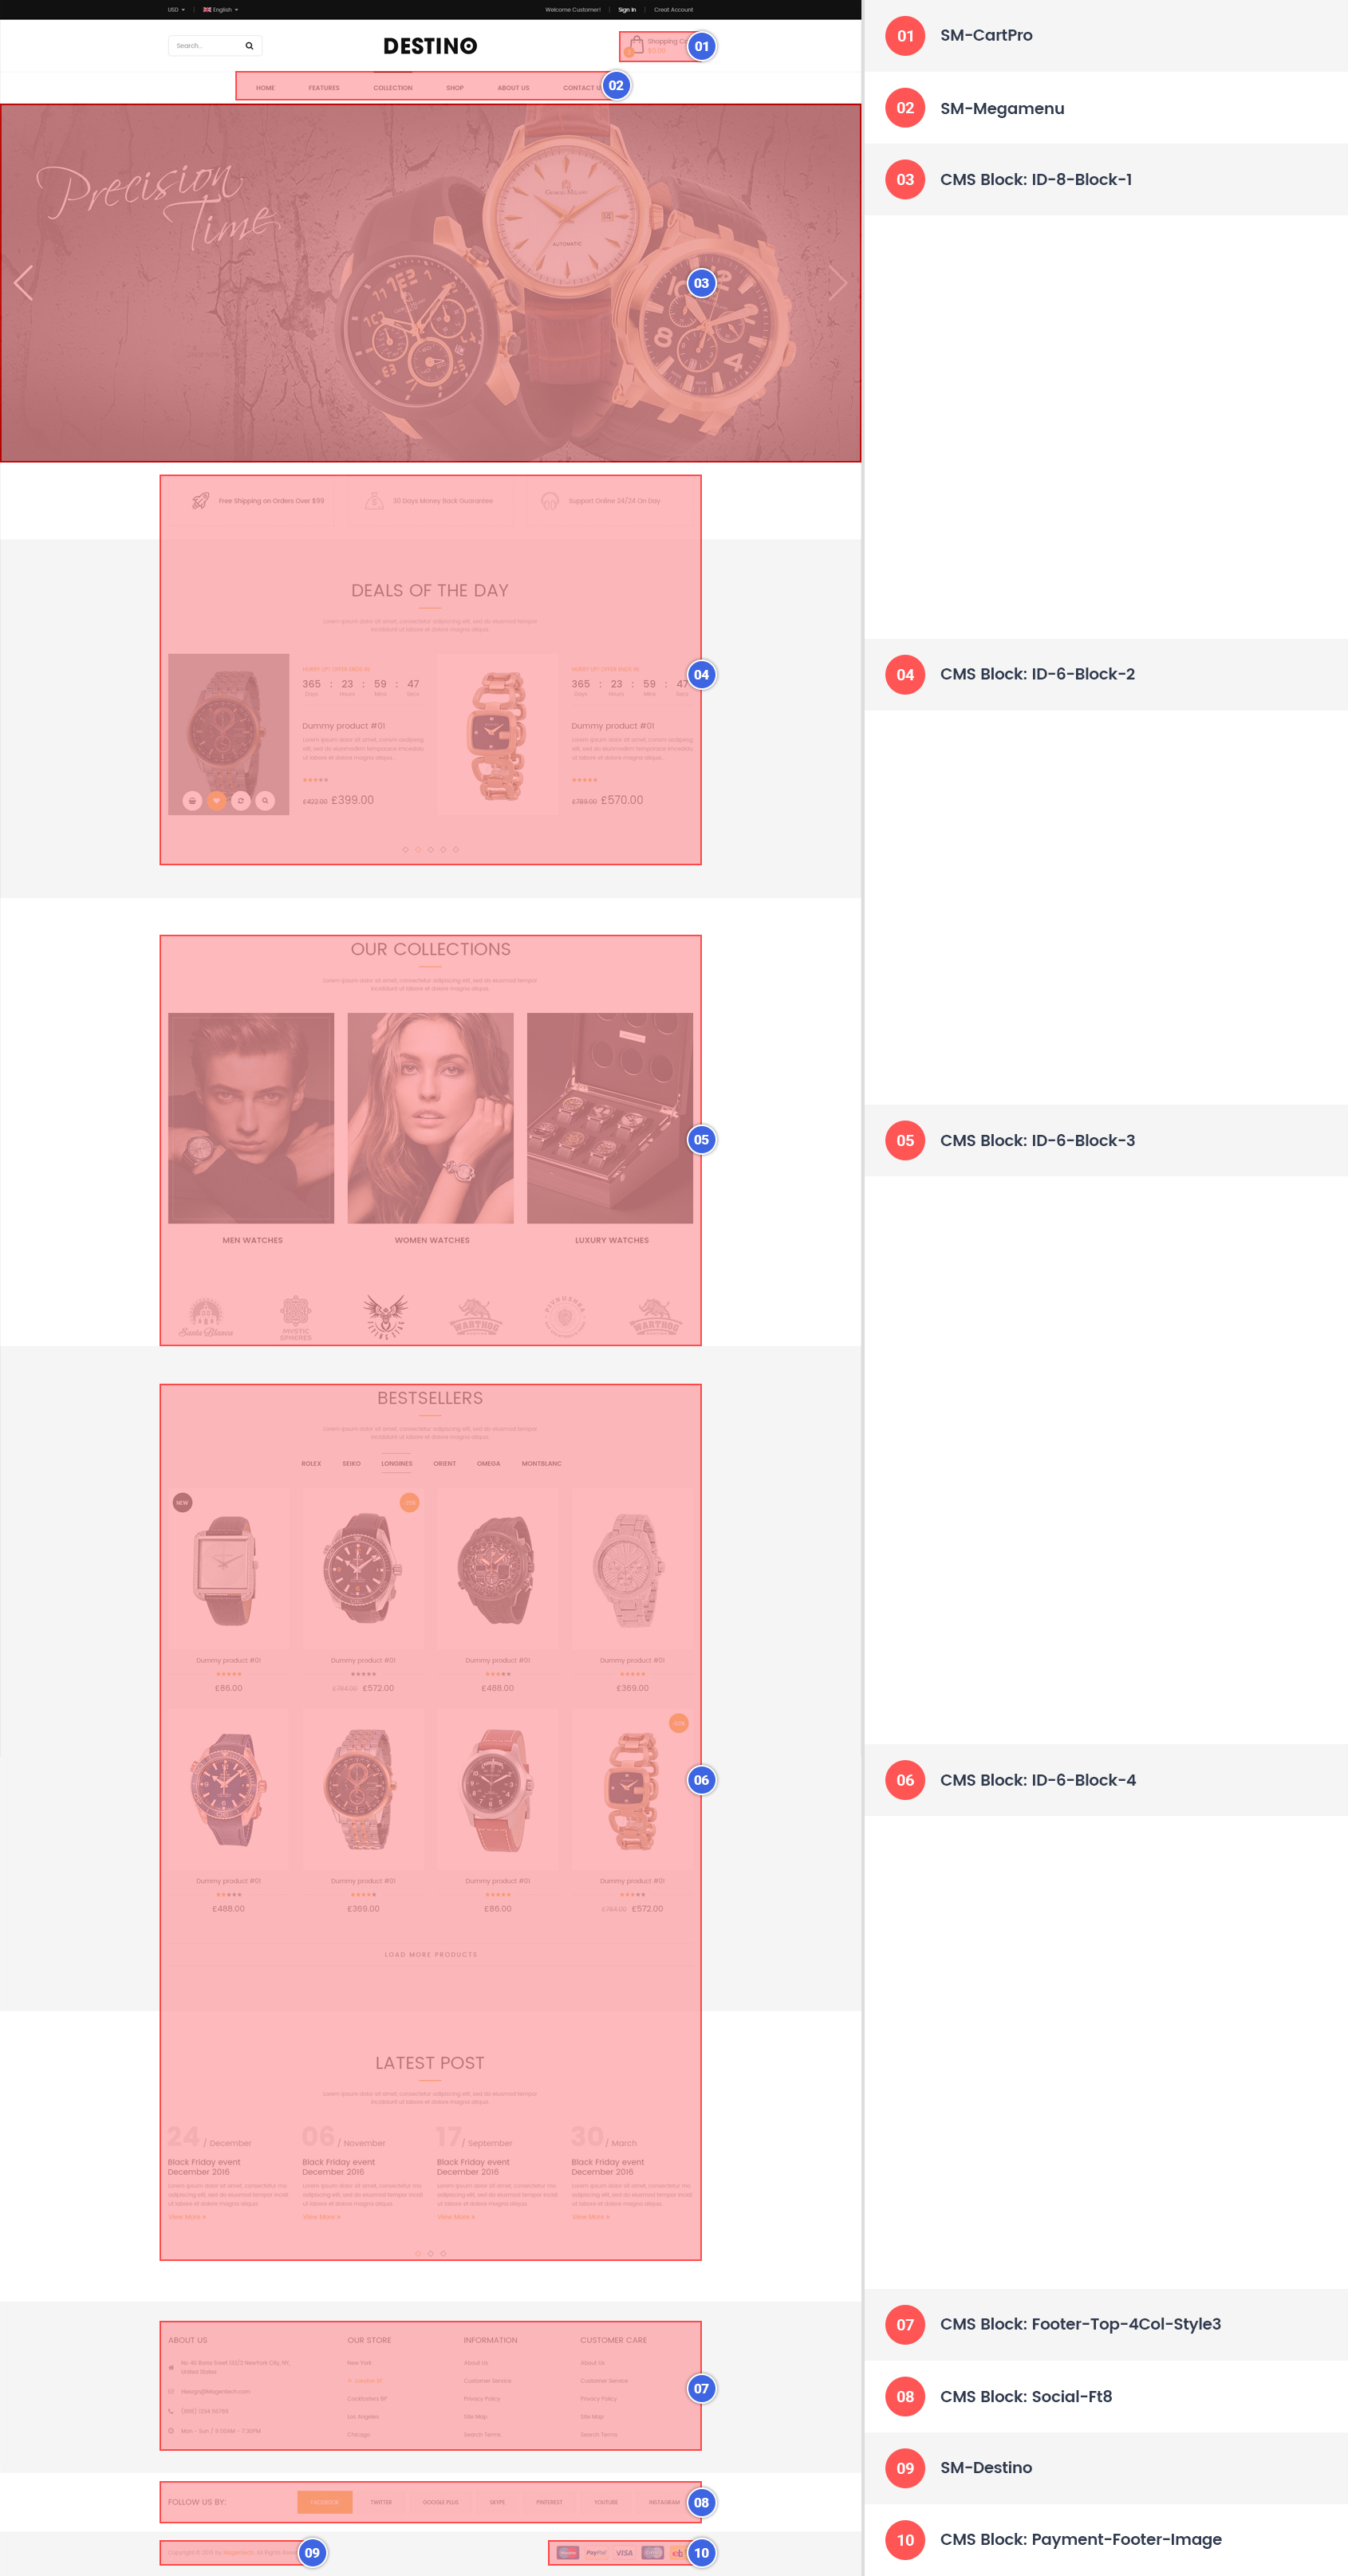 Home Style 8
Homepage Configuration
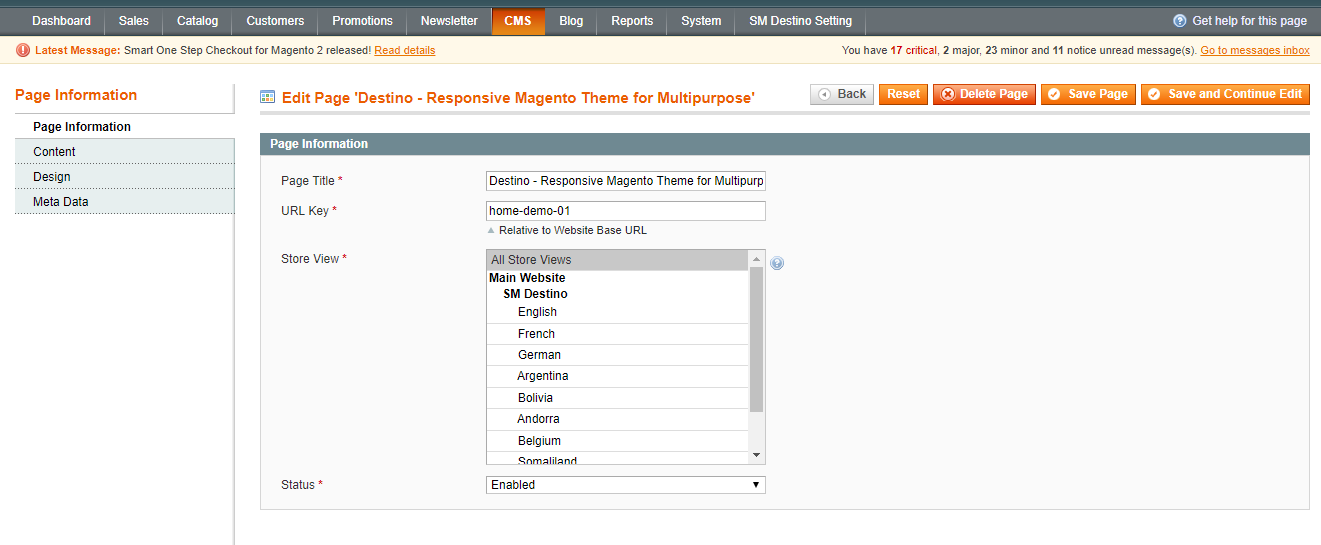
- To configure the default home page for your store, please go to System >> Configuration >> General >> Web >> Default Pages tab, select the desired page in the CMS Home Page field and save configuration.
- You need to change to the website / store view that you want to change (the dropdown menu in the upper left corner). You will probably have to create a new CMS page if you want to have something different from your default home page.
From the top menu, please select CMS >> Pages. Here you can find all the store pages that you have imported, so you don't need to add them. You only need to update the pages HTML and XML content as you wish.
- Step 1. Open any of them in order to get the access to the content.
- Step 2. Edit the content as you desire
- Page Information Tab: Please click to see the Backend Settings.
- Content Tab: Please click to see the Backend Settings. Copy and paste the following code into the Content field::

<div class="home-default homestyle1">
	{{block type="cms/block" block_id="id-1-block-1"}}

	{{block type="cms/block" block_id="id-1-block-2"}}

	{{block type="cms/block" block_id="id-1-block-3"}}

	{{block type="cms/block" block_id="id-1-block-4"}}
</div>

Please try to use below example code in your cms contents.
<div class="row">
<div class="col-lg-3 col-md-12 hidden-sm hidden-xs wrapper-megamenu-vertical">
{{block type="megamenu/list" template="sm/megamenu/megamenu-vertical.phtml" title="Categories" theme="2" group_id="5"}}
</div>
<div class="col-lg-9 col-md-12">
<div class="slidershow-content">
<div class="owl-carousel slidershow">
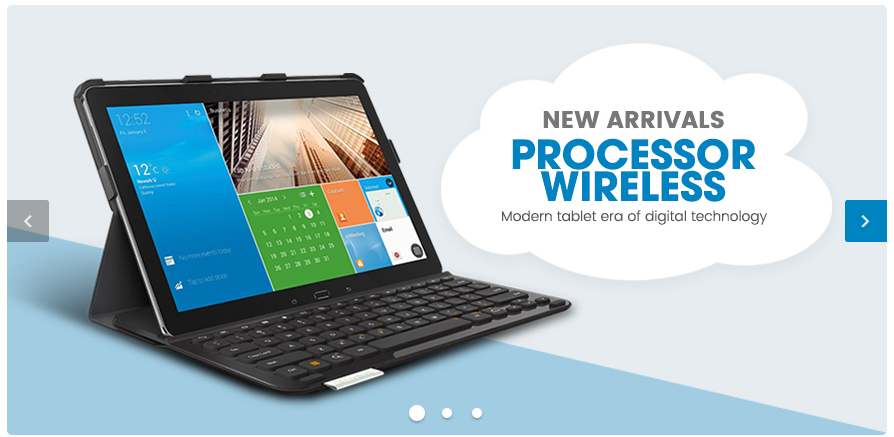
<div class="item">
<a href="#" title="Slider Image"><img src="{{media url="wysiwyg/slider-home/home-1/item-1.jpg"}}" alt="Static Image" /></a>
</div>
<div class="item">
<a style="border: 1px solid #ddd; border-radius: 5px; line-height: 0; overflow: hidden; display: block;" href="#" title="Slider Image"><img src="{{media url="wysiwyg/slider-home/home-1/item-2.jpg"}}" alt="Static Image" /></a>
</div>
<div class="item">
<a href="#" title="Slider Image"><img src="{{media url="wysiwyg/slider-home/home-1/item-3.jpg"}}" alt="Static Image" /></a>
</div>
</div>
<script>
jQuery(document).ready(function($) {
$(".slidershow").owlCarousel({
responsive:{
0:{
items:1
},
480:{
items:1
},
768:{
items:1
},
992:{
items:1
},
1200:{
items:1
}
},
autoplay:true,
loop:true,
nav : true,
dots: true,
autoplaySpeed : 500,
navSpeed : 500,
dotsSpeed : 500,
autoplayHoverPause: true,
margin:0,
});
});
</script>
</div>
</div>
</div>
{{block type="cms/block" block_id="id-1-block-1"}}
Please try to use below example code in your cms contents.
<div class="services-inline">
		<ul>
			<li>
				<div class="box-icon"><img src="{{media url="wysiwyg/icon/icon-1.png"}}" alt="Shipping" /></div>
				<div class="service-info">
				<h2>Free Shipping & Return</h2>
				<p>Free shipping on orders over $49</p>
				</div>
			</li>

			<li>
				<div class="box-icon"><img src="{{media url="wysiwyg/icon/icon-2.png"}}" alt="Money Guarantee" /></div>
				<div class="service-info">
				<h2>Money Guarantee</h2>
				<p>30 days money back guarantee</p>
				</div>
			</li>

			<li>
				<div class="box-icon"><img src="{{media url="wysiwyg/icon/icon-3.png"}}" alt="Online Support" /></div>
				<div class="service-info">
				<h2>Online Support</h2>
				<p>We support online 24 hours a day</p>
				</div>
			</li>
		</ul>
	</div>
{{block type="cms/block" block_id="id-1-block-1"}}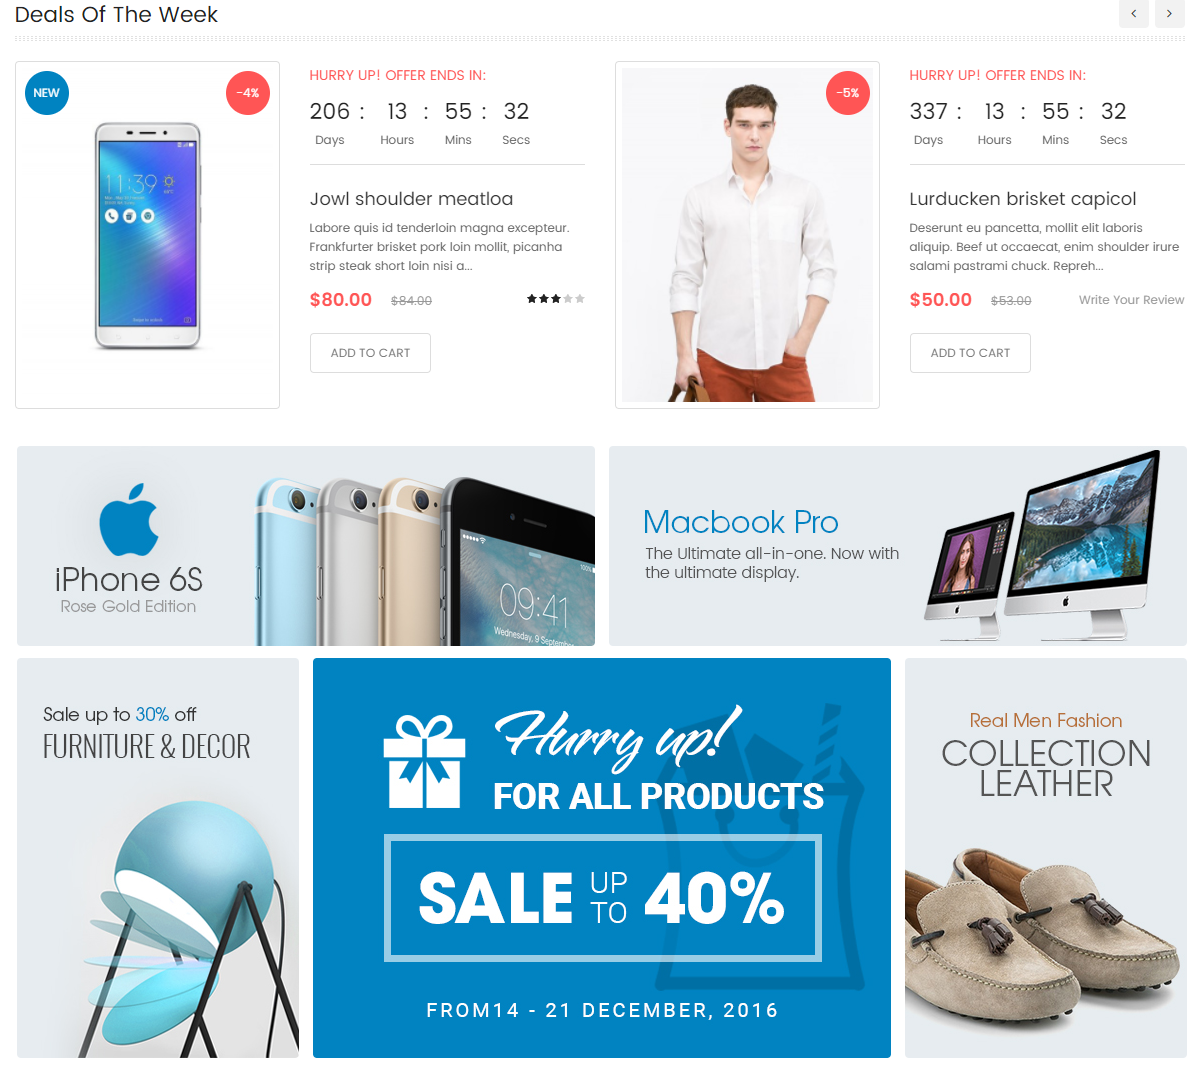
Please try to use below example code in your cms contents.
<div class="deal-products">
		{{block type="deal/list" template="sm/deal/default.phtml" deal_title_text="Deals Of The Week" product_source="catalog" product_category="61,69,89" child_category_products="1" max_depth="10" product_featured="0" product_order_by="best_sales" product_order_dir="ASC" product_limitation="4"}}

		<script type="text/javascript">
			jQuery(document).ready(function($) {
				$(".deal-products .deal-slider").owlCarousel({
					responsive:{
						0:{
							items:1
						},
						480:{
							items:1
						},
						768:{
							items:1
						},
						992:{
							items:2
						},
						1200:{
							items:2
						}
					},

					autoplay:false,
					loop:false,
					nav : true,
					dots: false,
					autoplaySpeed : 500,
					navSpeed : 500,
					dotsSpeed : 500,
					autoplayHoverPause: true,
					margin:30,
				});
			});
		</script>
	</div>

	<div class="banner-home-wrapper">
		<div class="row row-1">
		<div class="col-lg-6 col-md-6 col-sm-6">
		<div class="banner-home lef-banner banner-image"><a title="Banner Image" href="#"> <img src="{{media url="wysiwyg/banner-image/banner-home-1.jpg"}}" alt="Banner Image" /> </a></div>
		</div>
		<div class="col-lg-6 col-md-6 col-sm-6">
		<div class="banner-home right-banner banner-image"><a title="Banner Image" href="#"> <img src="{{media url="wysiwyg/banner-image/banner-home-2.jpg"}}" alt="Banner Image" /> </a></div>
		</div>
		</div>
		<div class="row row-2">
		<div class="col-lg-3 col-md-3 col-sm-3">
		<div class="banner-home lef-banner banner-image"><a title="Banner Image" href="#"> <img src="{{media url="wysiwyg/banner-image/banner-home-3.jpg"}}" alt="Banner Image" /> </a></div>
		</div>
		<div class="col-lg-6 col-md-6 col-sm-6">
		<div class="banner-home center-banner banner-image"><a title="Banner Image" href="#"> <img src="{{media url="wysiwyg/banner-image/banner-home-4.jpg"}}" alt="Banner Image" /> </a></div>
		</div>
		<div class="col-lg-3 col-md-3 col-sm-3">
		<div class="banner-home right-banner banner-image"><a title="Banner Image" href="#"> <img src="{{media url="wysiwyg/banner-image/banner-home-5.jpg"}}" alt="Banner Image" /> </a></div>
		</div>
		</div>
	</div>
{{block type="cms/block" block_id="id-1-block-2"}}
Please try to use below example code in your cms contents.
<div class="slider-product-home slider-single-1">
		{{block type="basicproducts/list" template="sm/basicproducts/default-grid.phtml" basicproducts_title_text="Smartphone & Tablet" product_source="catalog" product_category="201" product_order_by="lastest_product" product_order_dir="ASC" product_limitation="8"}}

		<script type="text/javascript">
			jQuery(document).ready(function($) {
				$(".slider-single-1 .product-slider").owlCarousel({
					responsive:{
						0:{
							items:1
						},
						480:{
							items:3
						},
						768:{
							items:4
						},
						992:{
							items:4
						},
						1200:{
							items:5
						}
					},

					autoplay:false,
					loop:false,
					nav : true,
					dots: false,
					autoplaySpeed : 500,
					navSpeed : 500,
					dotsSpeed : 500,
					autoplayHoverPause: true,
					margin:20,
				});
			});
		</script>
	</div>

	<div class="latest-post-wrapper">
		{{block type="blog/blog" template="aw_blog/latest-post.phtml"}}

		<script type="text/javascript">
			jQuery(document).ready(function($) {
				$(".latest-post-wrapper .slider-post").owlCarousel({
					responsive:{
						0:{
							items:1
						},
						480:{
							items:2
						},
						768:{
							items:3
						},
						992:{
							items:4
						},
						1200:{
							items:4
						}
					},

					autoplay:false,
					loop:false,
					nav : true,
					dots: false,
					autoplaySpeed : 500,
					navSpeed : 500,
					dotsSpeed : 500,
					autoplayHoverPause: true,
					margin:20,
				});
			});
		</script>
	</div>
{{block type="cms/block" block_id="id-1-block-3"}}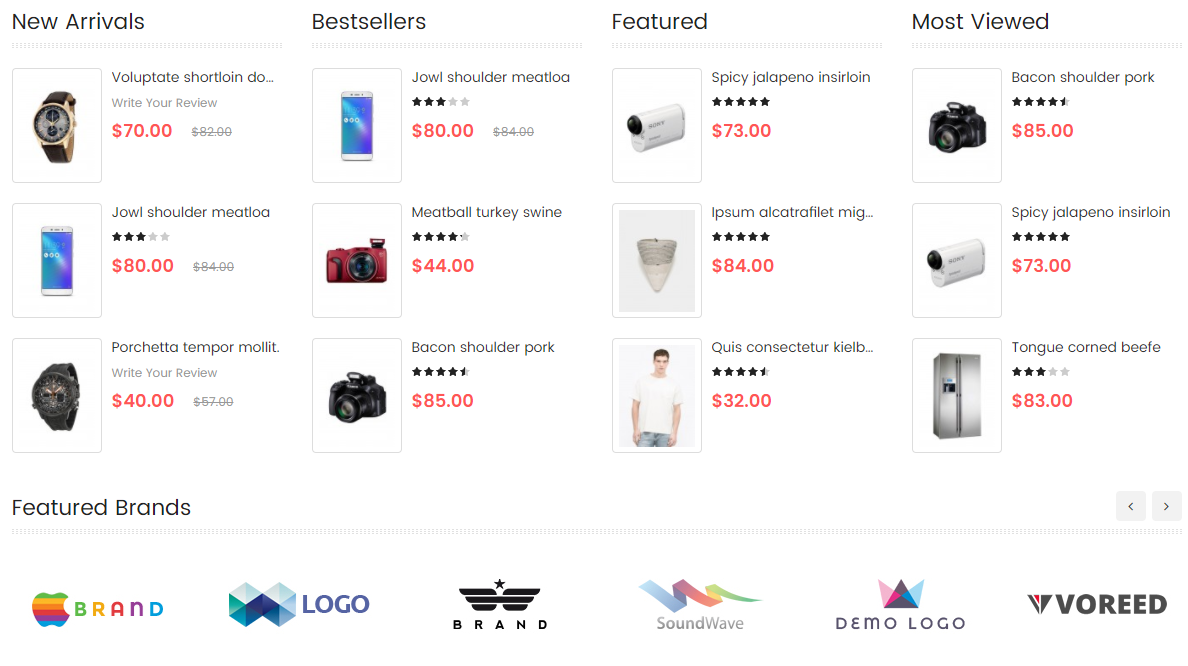
Please try to use below example code in your cms contents.
<div class="row">
		<div class="col-lg-3 col-md-6 col-sm-6">
			<div class="column-product">
				{{block type="basicproducts/list" template="sm/basicproducts/default-list.phtml" basicproducts_title_text="New Arrivals" product_source="catalog" product_category="61,69,89" product_order_by="lastest_product" product_order_dir="ASC" product_limitation="3"}}
			</div>
		</div>

		<div class="col-lg-3 col-md-6 col-sm-6">
			<div class="column-product">
				{{block type="basicproducts/list" template="sm/basicproducts/default-list.phtml" basicproducts_title_text="Bestsellers" product_source="catalog" product_category="61,69,89" product_order_by="best_sales" product_order_dir="ASC" product_limitation="3"}}
			</div>
		</div>

		<div class="col-lg-3 col-md-6 col-sm-6">
			<div class="column-product">
				{{block type="basicproducts/list" template="sm/basicproducts/default-list.phtml" basicproducts_title_text="Featured" product_source="catalog" product_category="61,69,89" product_order_by="top_rating" product_order_dir="ASC" product_limitation="3"}}
			</div>
		</div>

		<div class="col-lg-3 col-md-6 col-sm-6">
			<div class="column-product">
				{{block type="basicproducts/list" template="sm/basicproducts/default-list.phtml" basicproducts_title_text="Most Viewed" product_source="catalog" product_category="61,69,89" product_order_by="most_reviewed" product_order_dir="ASC" product_limitation="3"}}
			</div>
		</div>
	</div>

	<div class="slider-brand-wrapper">
		<div class="primary-title">
		<h2>Featured Brands</h2>
		</div>
		<div class="owl-carousel slider-brand">
		<div class="item"><a title="Brand Item" href="#"><img src="{{media url="wysiwyg/brand-slider/item-1.jpg"}}" alt="Slider Brand" /></a></div>
		<div class="item"><a title="Brand Item" href="#"><img src="{{media url="wysiwyg/brand-slider/item-2.jpg"}}" alt="Slider Brand" /></a></div>
		<div class="item"><a title="Brand Item" href="#"><img src="{{media url="wysiwyg/brand-slider/item-3.jpg"}}" alt="Slider Brand" /></a></div>
		<div class="item"><a title="Brand Item" href="#"><img src="{{media url="wysiwyg/brand-slider/item-4.jpg"}}" alt="Slider Brand" /></a></div>
		<div class="item"><a title="Brand Item" href="#"><img src="{{media url="wysiwyg/brand-slider/item-5.jpg"}}" alt="Slider Brand" /></a></div>
		<div class="item"><a title="Brand Item" href="#"><img src="{{media url="wysiwyg/brand-slider/item-6.jpg"}}" alt="Slider Brand" /></a></div>
		<div class="item"><a title="Brand Item" href="#"><img src="{{media url="wysiwyg/brand-slider/item-1.jpg"}}" alt="Slider Brand" /></a></div>
		<div class="item"><a title="Brand Item" href="#"><img src="{{media url="wysiwyg/brand-slider/item-2.jpg"}}" alt="Slider Brand" /></a></div>
		</div>
		<script type="text/javascript">
			jQuery(document).ready(function($) {
				$(".slider-brand").owlCarousel({
					responsive:{
						0:{
							items:2
						},
						480:{
							items:3
						},
						768:{
							items:5
						},
						992:{
							items:6
						},
						1200:{
							items:6
						}
					},

					autoplay:false,
					loop:true,
					nav : true,
					dots: false,
					autoplaySpeed : 500,
					navSpeed : 500,
					dotsSpeed : 500,
					autoplayHoverPause: true,
					margin:30,
				});
			});
		</script>
	</div>
{{block type="cms/block" block_id="id-1-block-4"}}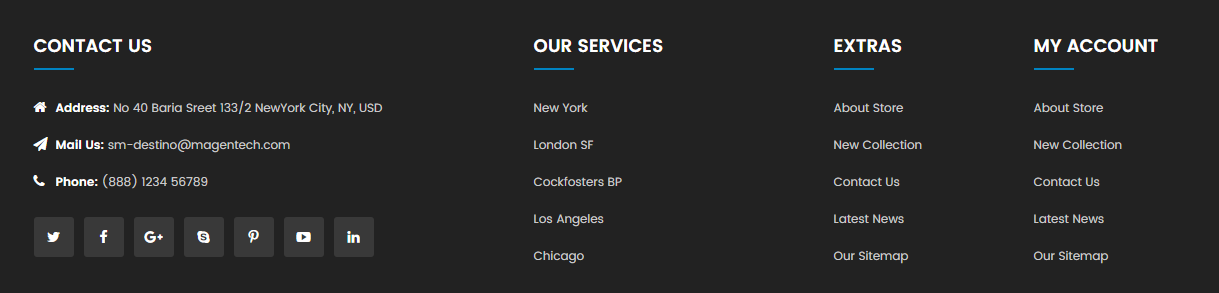
Please try to use below example code in your cms contents.
<div class="row">
                    <div class="col-lg-5 col-md-5">
                        <div class="block-footer block-footer-contact">
                            <h4 class="title-footer">Contact Us</h4>
                            <ul>
                                <li><span><em class="fa fa-home"></em><b>Address:</b></span> No 40 Baria Sreet 133/2 NewYork City, NY, USD</li>
                                <li><span><em class="fa fa-paper-plane"></em><b>Mail Us:</b></span> sm-destino@magentech.com</li>
                                <li><span><em class="fa fa-phone"></em><b>Phone:</b></span> (888) 1234 56789</li>
                            </ul>
                        </div>

						{{block type="page/html" name="social_info" as="social_info" template="page/html/social.phtml"}}
                    </div>

                    <div class="col-lg-3 col-md-3">
                        <div class="block-footer">
                            <h4 class="title-footer">Our Services</h4>
                            <ul>
                                <li><a title="New York" href="#">New York</a></li>
                                <li><a title="London SF" href="#">London SF</a></li>
                                <li><a title="Cockfosters BP" href="#">Cockfosters BP</a></li>
                                <li><a title="Los Angeles" href="#">Los Angeles</a></li>
                                <li><a title="Chicago" href="#">Chicago</a></li>
                            </ul>
                        </div>
                    </div>

                    <div class="col-lg-2 col-md-2">
                        <div class="block-footer">
                            <h4 class="title-footer">Extras</h4>
                            <ul>
                                <li><a title="About Store" href="#">About Store</a></li>
                                <li><a title="New Collection" href="#">New Collection</a></li>
                                <li><a title="Contact Us" href="#">Contact Us</a></li>
                                <li><a title="Latest News" href="#">Latest News</a></li>
                                <li><a title="Our Sitemap" href="#">Our Sitemap</a></li>
                            </ul>
                        </div>
                    </div>

                    <div class="col-lg-2 col-md-2">
                        <div class="block-footer">
                            <h4 class="title-footer">My account</h4>
                            <ul>
                                <li><a title="About Store" href="#">About Store</a></li>
                                <li><a title="New Collection" href="#">New Collection</a></li>
                                <li><a title="Contact Us" href="#">Contact Us</a></li>
                                <li><a title="Latest News" href="#">Latest News</a></li>
                                <li><a title="Our Sitemap" href="#">Our Sitemap</a></li>
                            </ul>
                        </div>
                    </div>
                </div>
Theme Setting
In Magento admin panel, navigate to SM Destino Setting and configure its settings as you want.
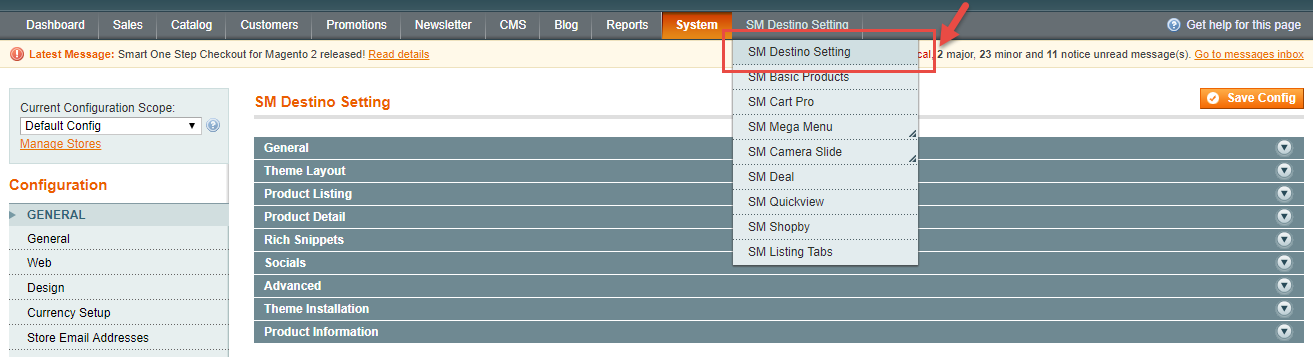
Please click Here to view the theme settings.
Set Below options
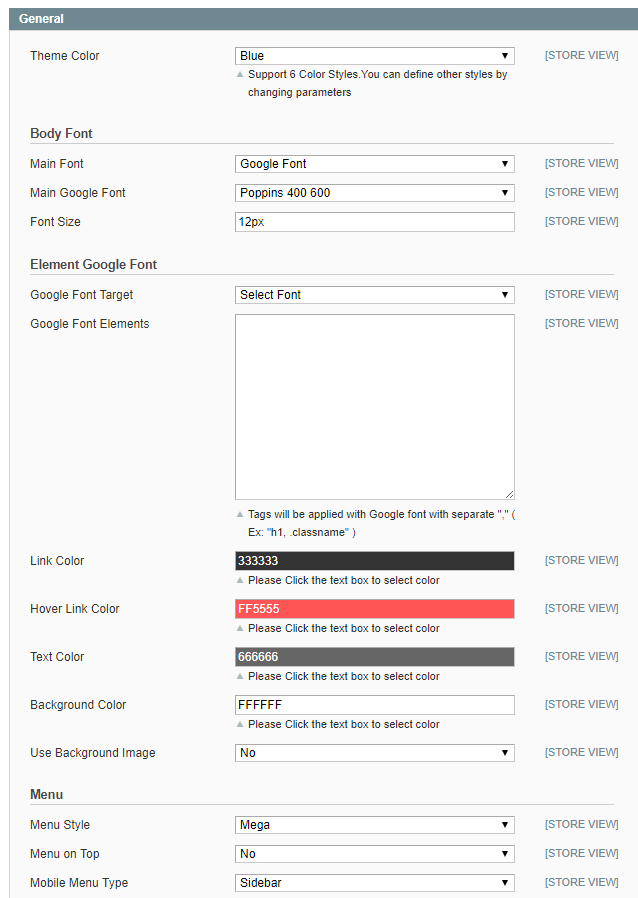
Theme Color
Support 6 Color Styles.You can define other styles by changing parameters.
Body Font, Element Google Font
In these options, you can change main font, font weight, font size, link color, etc.
Menu
Menu Style: This param support 2 types: css and mega.
Menu on top: Choose "Yes" to turn on "Sticky Menu" feature, the menu will be fixed on top when scroll down the page.
Mobile Menu Type: This param support 3 types: sidebar, selectbox, collapse.
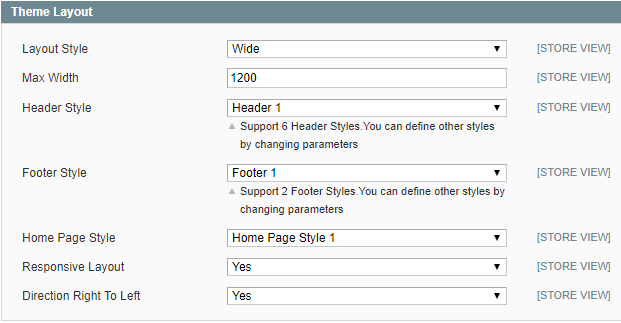
Theme Layout
Layout Style: This theme support wide, boxed and full width layout. You can select a layout style that you want.
Max Width: You can change page's width.
Responsive Layout: Choose "Yes" to show responsive layout for each type of devices.
Direction Right To Left: This theme support right to left layout. Choose "Yes" to view.
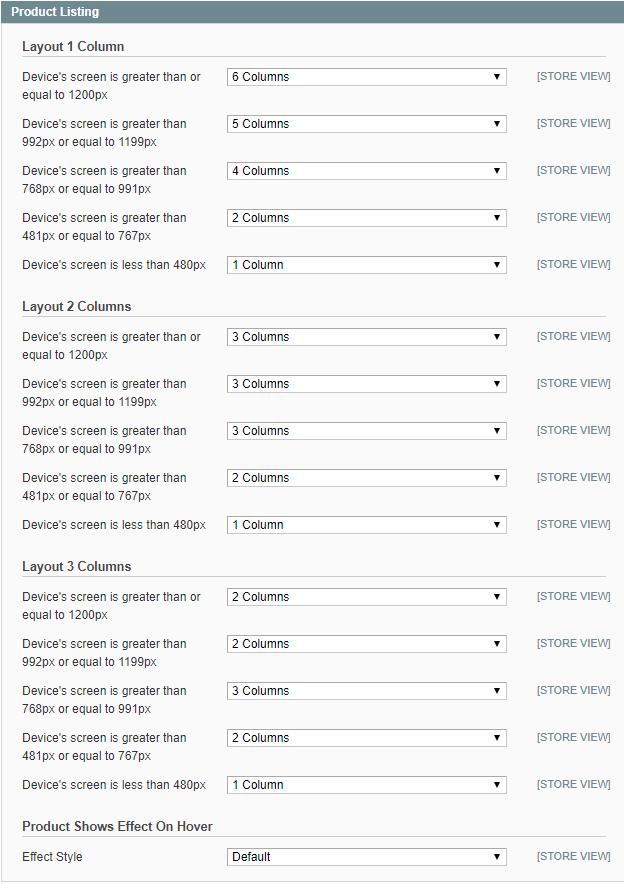
We provides flexible grid system includes: layout 1 column, layout 2 columns, layout 3 columns. You can change product's quantity per row to fit each screen.
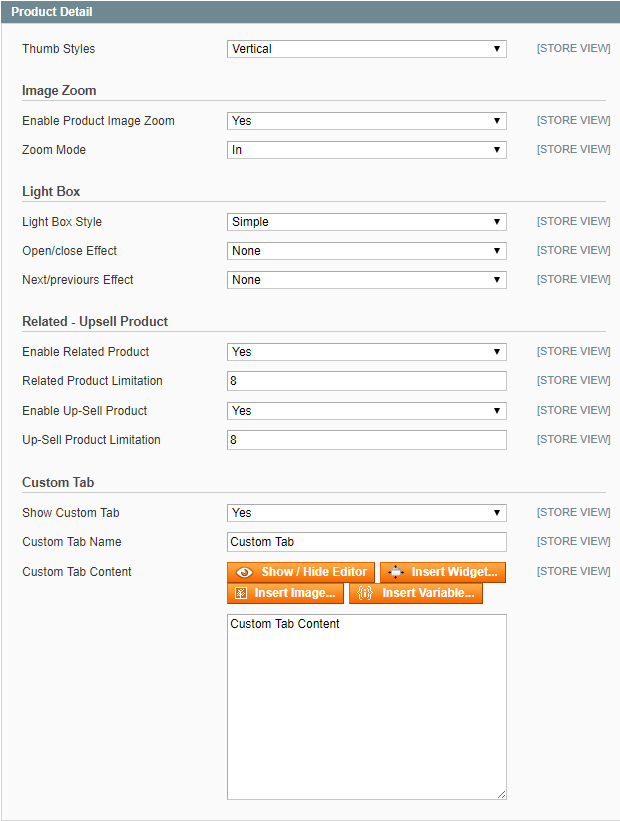
Thumbs Styles: This option allow you choose thumb style types that you want.
Image Zoom
Enable Product Image Zoom: Choose "Yes/No" to "Allow/Not Allow" show product image zoom when you mouse hover on the product image.
Related - Upsell Product
In these options, you can choose "Yes/No" to "Show/Hide" and set limit quantity for related and upsell products.
Custom Tab
Choose "Yes", you can change name and add content for Custom Tab.
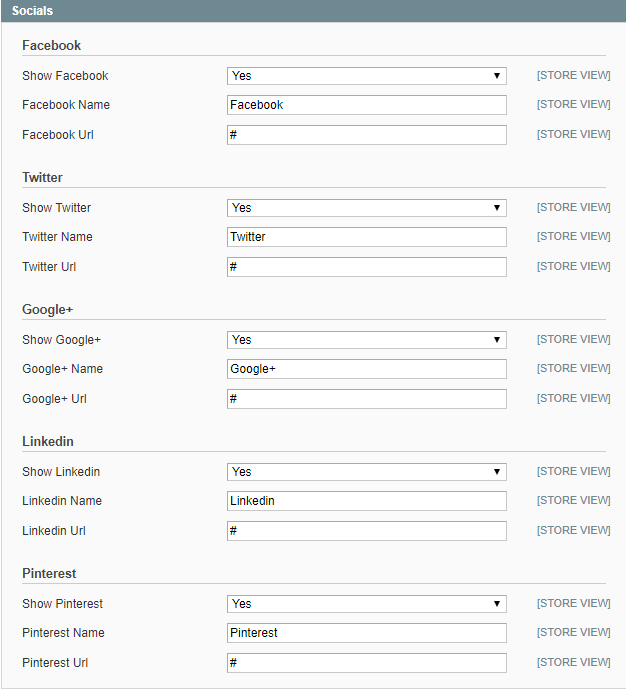
Choose "Yes" to show socials. When you choose "Yes", you can change name and link of socials.
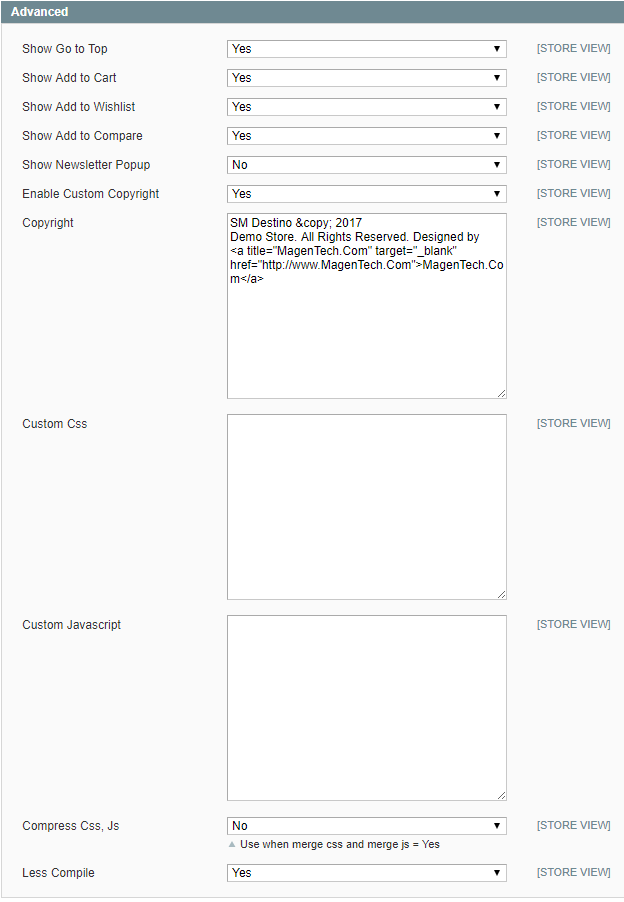
Advanced
Choose "Yes/No" to "Show/Hide" Go to Top, Add to Cart, Add to Wishlist, Add to Compare, Newsletter Popup, Copyright.
Custom Css, Javascript: To custom Css or Javascript.
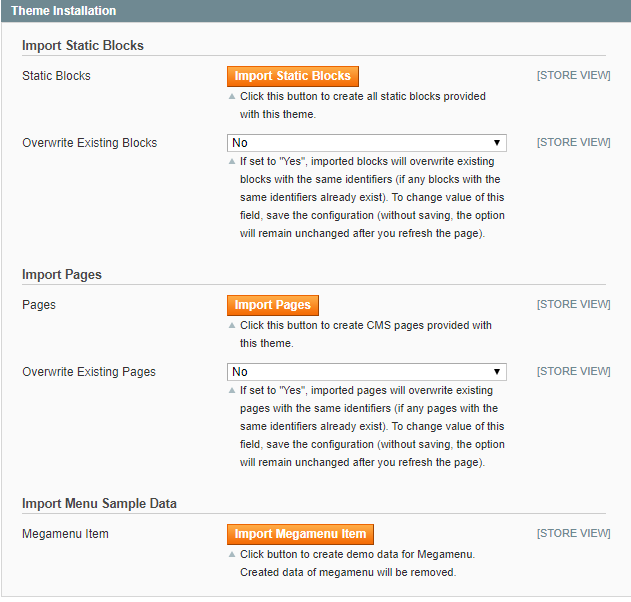
Import Static Blocks
By clicking this button, you can import all static blocks that are used for our demo site.
Import Pages
By clicking this button, you can import all pages that are used for our demo site.
Import Menu Sample Data
Click button to create demo data for Megamenu.
Extensions
Magentech Extensions
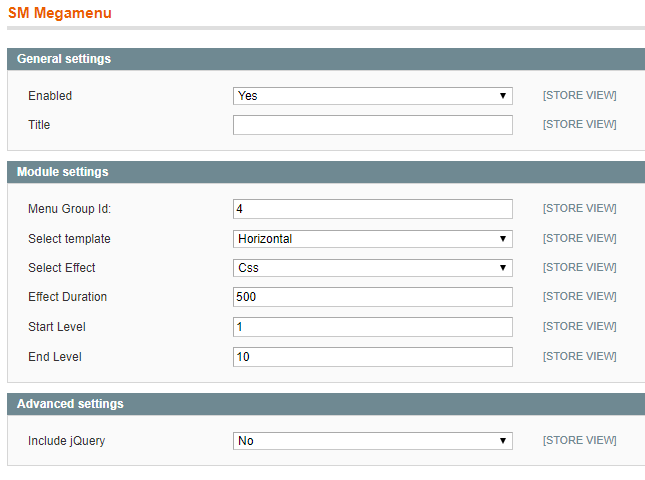
General Settings
Enable: Allow to enable/disable the module. If choose "Disable", magento's default menu style will be applied.
Title: Enter the title of the module.
Module Settings
Menu Group Id: Enter menu group id.Select Template: This module support 2 templates for presenting of menu (Horizontal and Vertical).
Select Effect: We support effects for Mega menu (CSS/Animation)
Effect Duration: Enter effect duration
Start Level: Start level of menu
End Level: End level of menu
How to create list Menu Items for your menu?
Note: To enable Vertical Megamenu on the frontend, please go to CMS >> Static Blocks and create a static block with Identifier: “megamenu-vertical” Please click Here to view the configuration of this static block.
{{block type="megamenu/list" template="sm/megamenu/megamenu-vertical.phtml" title="Categories" theme="2" group_id="5"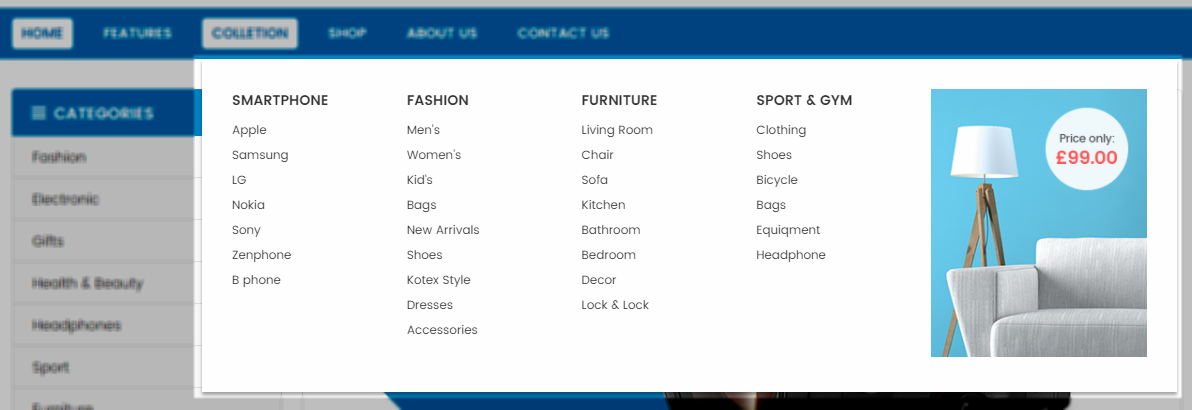
- Sortable Categories Items: Please click Here to view.
- Backend Settings: Please click Here to view.
Click here to view documentation of SM Quickview module.
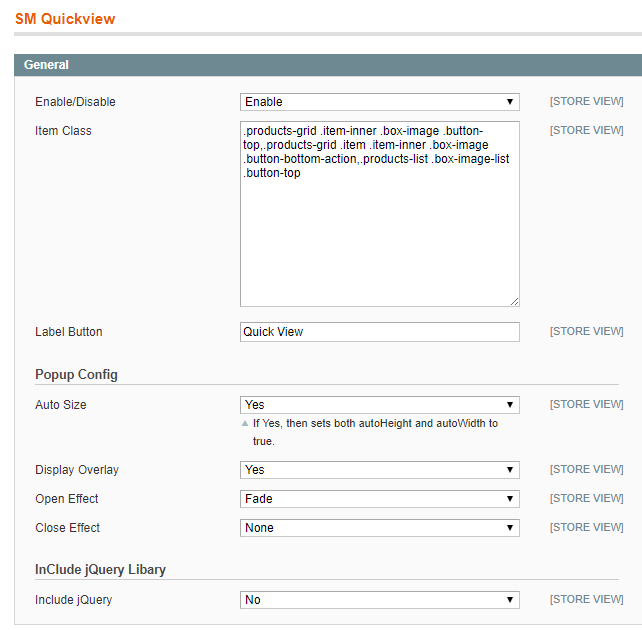
General
Enabled/Disable : Enable or disable the module displaying on Frontend area.
Item Class: Allow to input class item
Lable Button: Allow to enter label button
Popup Config
Auto Size: Allow to select auto size. If you select “Yes” then it will set both auto-height and auto-width
Display Overlay: Allow to select overlay OR not
Open Effect: Allow to open effect with: Elastic, Fade, None
Close Effect: Allow to close effect with: Elastic, Fade, None
Include jQuery Libary
Include jQuery: Include jQuery OR not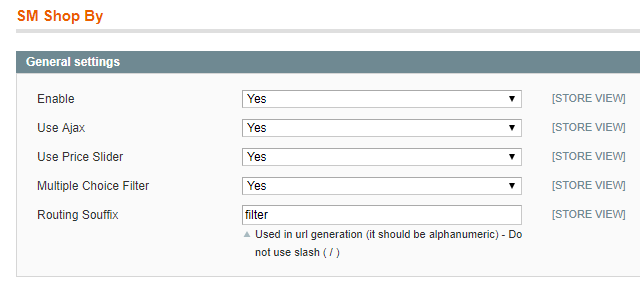
Enable : Enable or Disable this extension.
Use Ajax: Choose "Yes" to use ajax.
Use Price Slider: Choose "Yes" to use price Slider.
Multiple Choice Filter: Choose "Yes" multiple choice filter.
Click here to view documentation of SM Cart Pro module.
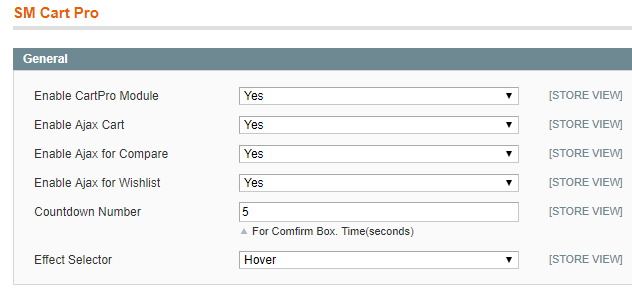
General Options
Enabled CartPro Module: Enable or disable the module displaying on Frontend area.
Enable Ajax Cart: To Display Ajax cart for the module or not.
Enable Ajax for Compare: Enable or disable the Ajax box for Compare button.
Enable Ajax for Wishlist: Enable or disable the Ajax box for Wishlist button.
Countdown Number: The time of ajax box displaying on the screen.
Effect Selector: User can “Click” or ” Hover” when selecting.
Click here to view documentation of SM Basic Product module.
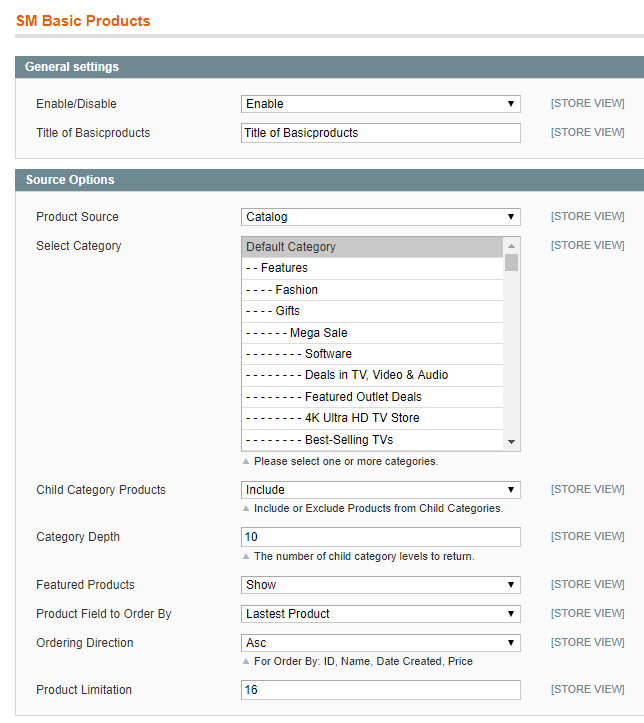
General Settings
Enabled/Disable: Allow to enable/disable the module.
Title of Basicproducts: You can enter title of module here.
Source Options
Product Source: Allow you to select product source.
Select Category: Allow you to select Category.
Child Category Products: Include or Exclude Products from Child Categories.
Category Depth: Allow to select the number of child category levels to return.
Featured Products: Allow to Show/Hide/Only Featured Products.
Product Field Order By: Set Product Field to Order By.
Ordering Direction: Allow to order ascending/descending direction.
Product Limitation: Allow to set product limitation.
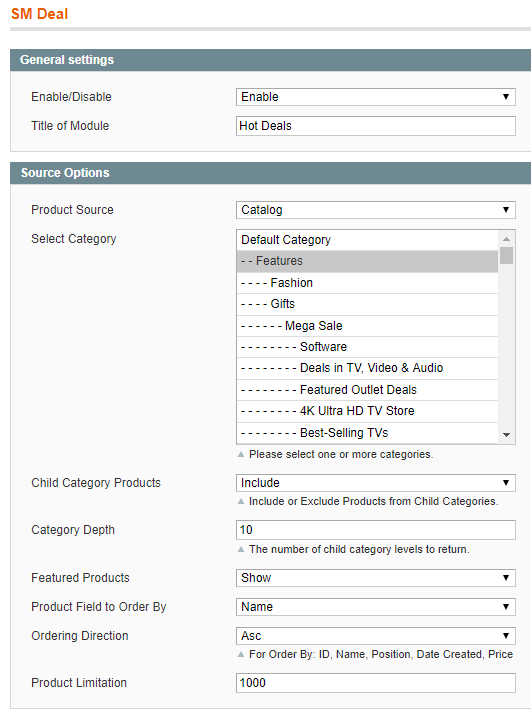
General Settings
Enabled/Disable: Allow to enable/disable the module.
Title of Module: Enter the title of the module.
Source Options
Product Source: Allow you to select Catalog or Product IDs.
Select Category: Allow you to select Category.
Child Category Products: Include or Exclude Products from Child Categories.
Category Depth: Allow to choose the number of child category levels to return.
Featured Products: Allow to Show/Hide/Only Featured Products.
Product Field to Order By: Set Product Field to Order By.
Ordering Direction: Allow to order ascending/descending direction.
Product Limitation: Allow to set product limitation.
Click here to view documentation of SM Listing Tabs module.

General Settings
Enabled/Disable: Allow to enable/disable the module.
Title of Tab Listing: You can enter title of module here.
Link Target: Target to open links: New window (Open the link in the new window/tab), Same window (Open the link in the same window/tab), Popup window (Open links in new pop-up window).
Column: Set column for devices.
Source Options
Filter Type: Allow you to Type of Filter.
Select Category: Allow you to select Category.
Field Preload : Allow to preload category.
Child Category Products: Include or Exclude Products from Child Categories.
Category Depth: Allow to select the number of child category levels to return.
Featured Products: Allow to Show/Hide/Only Featured Products.
Product Field Order By: Set Product Field to Order By.
Ordering Direction: Allow to order ascending/descending direction.
Product Limitation: Allow to set product limitation.
Tabs Options
Tab All Display: Allow you display all tabs or NOT.
Category title max length: Allow to set the max length of title.
Category Order By : Set Categories Order By: Name/Position/Random .
Category Ordering Direction : Allow to order ASC(ascending)/ DESC(descending) direction.
Display Icon : Allow to display icon or NOT.
Get Image from Category Image :
Category Image: Allow to display Image of Category or NOT.
Get Image from Category Image Thumbnail Image :
Category Image Thumbnail: Allow to display Image Thumbnail of Category or NOT.
Get Image from Category Description :
Category Description: Allow to display description of Category or NOT.
Order to Get: Allow to order to get image with options such as category_image, category_thumbnail, category_description.
Resize: Allow you resize category image or NOT.
Image Width: Allow to set image width.
Image Height: Allow to set image height.
Constrain Only: If the “constrainOnly” parameter is set to true, in this case the images which are smaller than specified value will be not enlarged by Magento. Only border of such images will increase.
Keep Aspect Ratio: Allow to keep aspect ratio. If the “keepAspectRatio” parameter is set to true, in this case the proportions of the image will not be modified.
Keep Frame: The “keepFrame” parameter guarantees that the image will be not cropped. When “keepAspectRatio” is false the “keepFrame” will not work.
Keep Transparency: The “keepTransparency” parameter keep the transparent background of the images.
Background Color: Allow to set background color.
Placeholder: If items do not have image, it will get image nophoto.
Effect Options
Select Effect: Allow to select effect.
Speed: Allow to set speed of slide.
Interval: Allow to set interval timer.
Advanced Options
Include jQuery: Use jQuery from this module or not.
Other
Support
SUPPORT - If you have any questions that are beyond the scope of this help file, please feel free to send us via: Support Tickets System
FAQs - Go to Here to view more the Frequently Asked Questions.


Change Log
Compatible with Magento 2.1.4
Release