This guide will help you install SM Social Login.
1COMPATIBLE WITH MAGENTO
This module is fully compatible with Magento Community Edition version 2.1.x, 2.2.x.
2REQUIREMENT
To install this module you must have a working version of Magento already installed. If you need help installing Magento, follow below sites and tutorials from magento.com, hope everything that you need are there.
- System Requirements – Required system credentials for your magento installation.
- Installation Guide – Installation guide that describes how to install magento2.
- Online Magento 2 guide – Online magento documentation that describes about magento2 in detail.
- Magento Forum – Magento forum site.
- stackoverflow.com – You can also get some useful articles from stackoverflow.
3INSTALLATION
- Step 1: Download and extract the extension’s package on your computer and navigate inside the folder.
- Step 2: Upload the folder named as app and lib from the package to the root of your Magento site on your server
- Step 3: To active SM Social Login, open command line in folder root of magento and run commands via ssh using putty or others
- 1. Please type the following command into the dialog to clear the compiled code and cache:
1php bin\magento setup:upgrade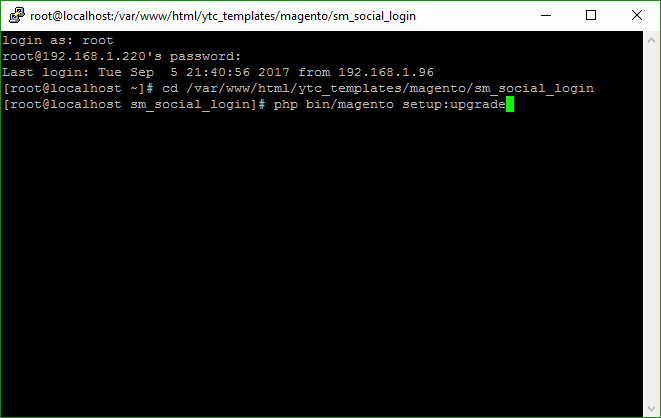
- 2. After running successfully the first command, type the following command into the dialog to flush cache on our Magento store
1php bin/magento cache:flush
- 1. Please type the following command into the dialog to clear the compiled code and cache:
- Step 4: Go to Administration page to configure the extension
- After installing extension, you should logout first and then login Admin Panel to ensure all functions work normally.
- You should disable all caches in cache management in the installation and configuration process.
Important Note:
4CONFIGURATION
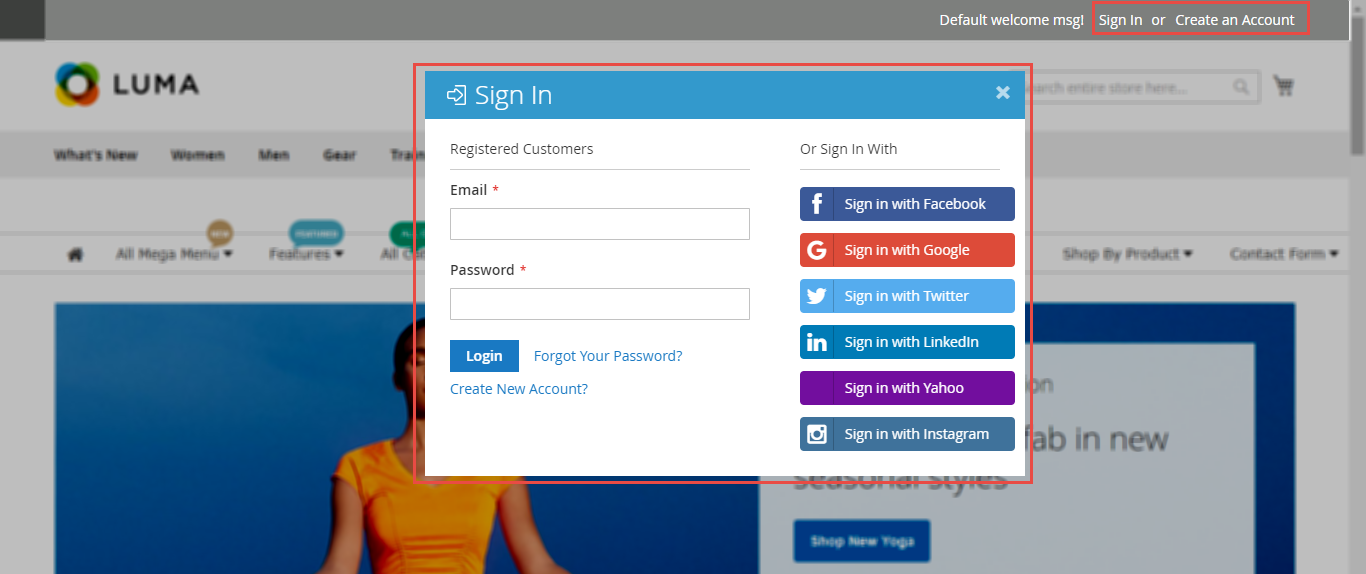
4.1 Layout Demo
You could see the appearance of SM Social Login module as following:
4.2 Backend
Note: We used the images of module’s installtion on Magento 2.1.x to illustrate
In the Administrator Page, navigate to Stores -> Settings -> Configuration and find SM Social Login to configure.
Let’s look at the parameter in detail:
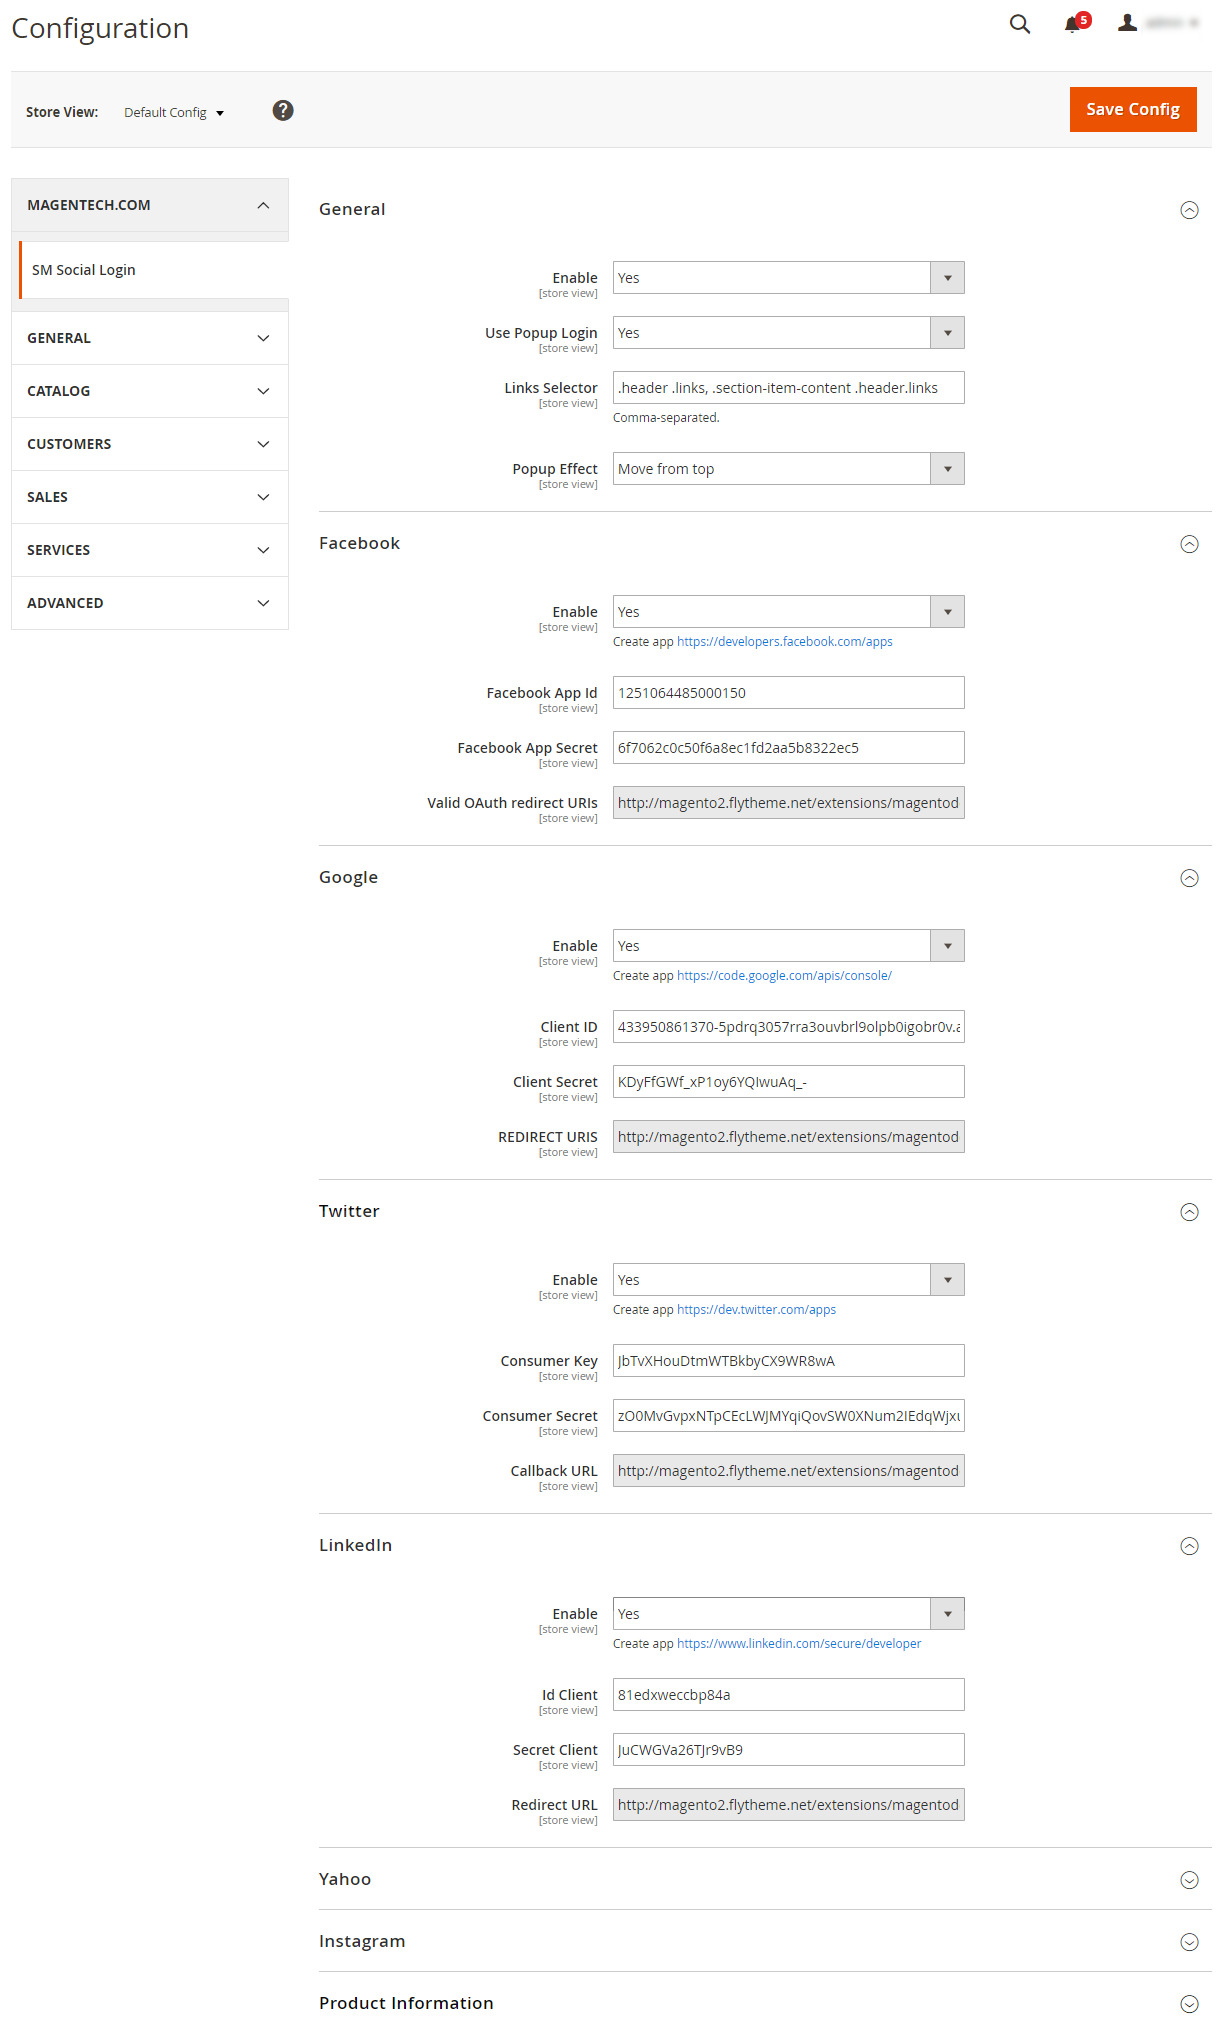
General
- Enable: Enable or disable the module displaying on Frontend area.
- Use Popup Login: Select “Yes” to use login popup. All of available social buttons are shown on Login popup.
- Links Selector: This is position to show social.
- Popup Effect: Effects of popup.
Facebook, Google, Twitter, LinkedIn, Instagram, Yahoo.
4.3 How to configuration social button.
4.3.1 How do I get the Facebook application ID and application secret?
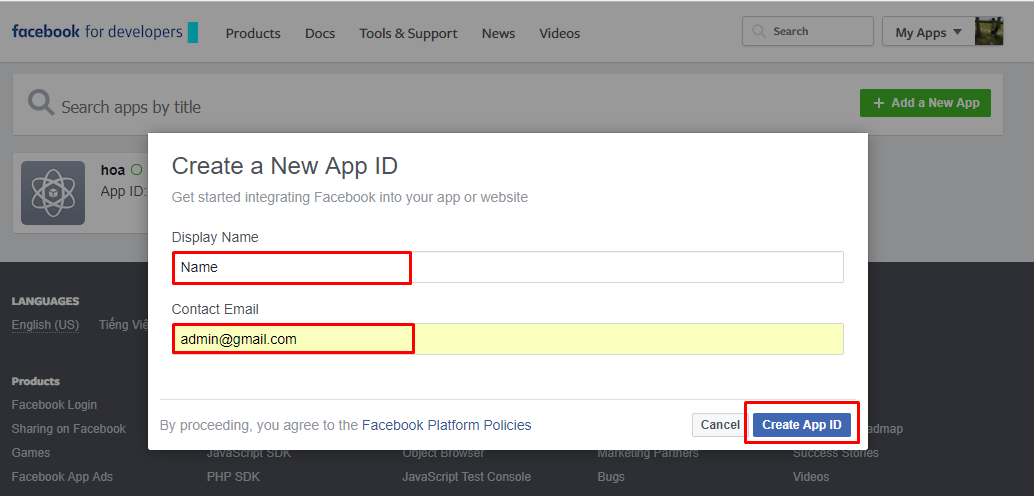
Step 1: Go to page: https://developers.facebook.com/apps and then choose “Add a New app”. After that, you need to fill in your display name and contact email. Remember to click “Create App ID”.
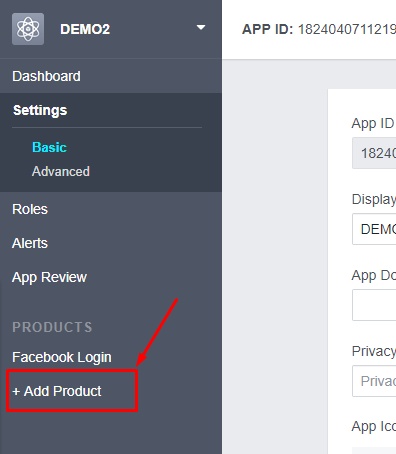
Step 2: At the bottom of the left hand menu click “Add Product link”.
Step 3: In “Facebook login”, Click “Setup” button.

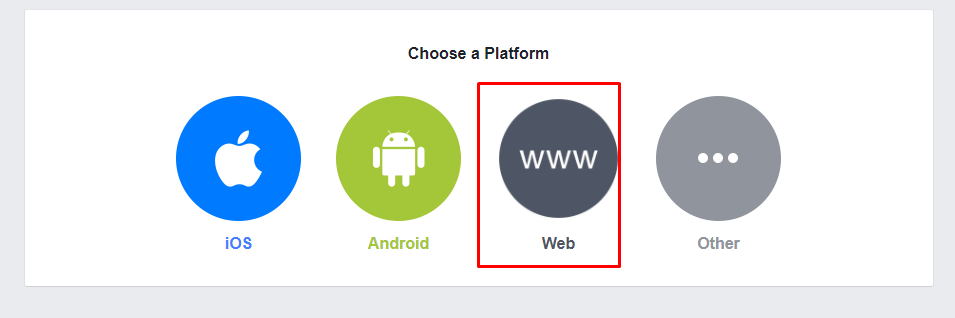
Step 4: Select “Web”.
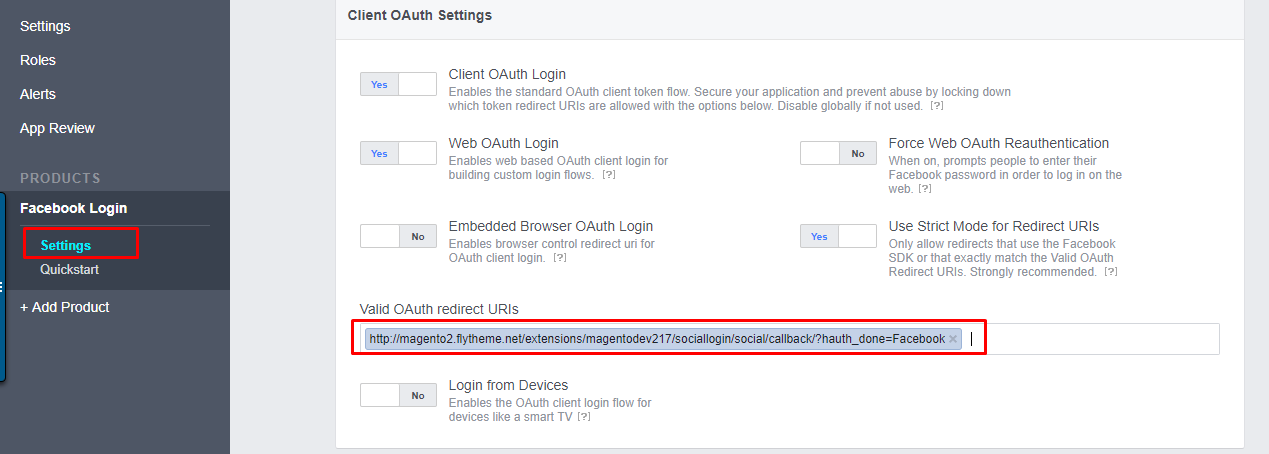
Step 5: Enter your Site URL and hit save. Hit Continue then keep clicking Next, ignoring all the code, until you get to Step 5.

Step 6: In the left hand menu you should now see Facebook Login, click the “Settings” menu item underneath it.
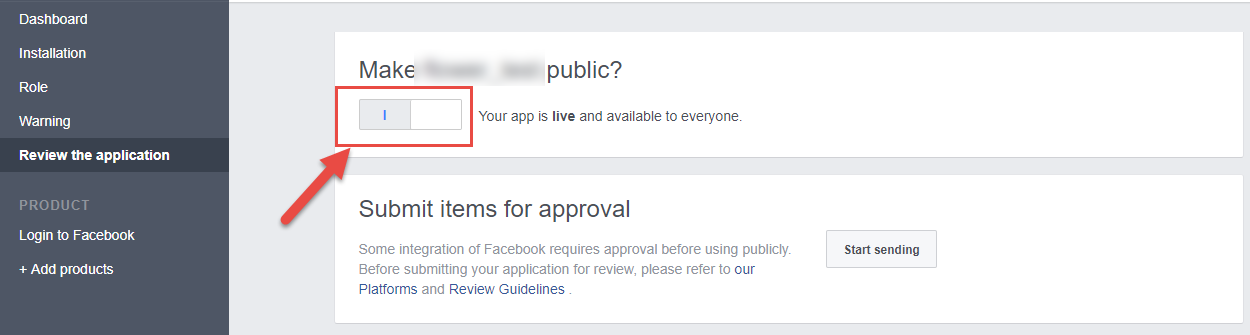
Step 7: In this step, go to “Review the application”, select “public” to Your app is live and available to everyone..
Step 8: Now, go to “Installation >> Basic Information” to get App ID and App Secret
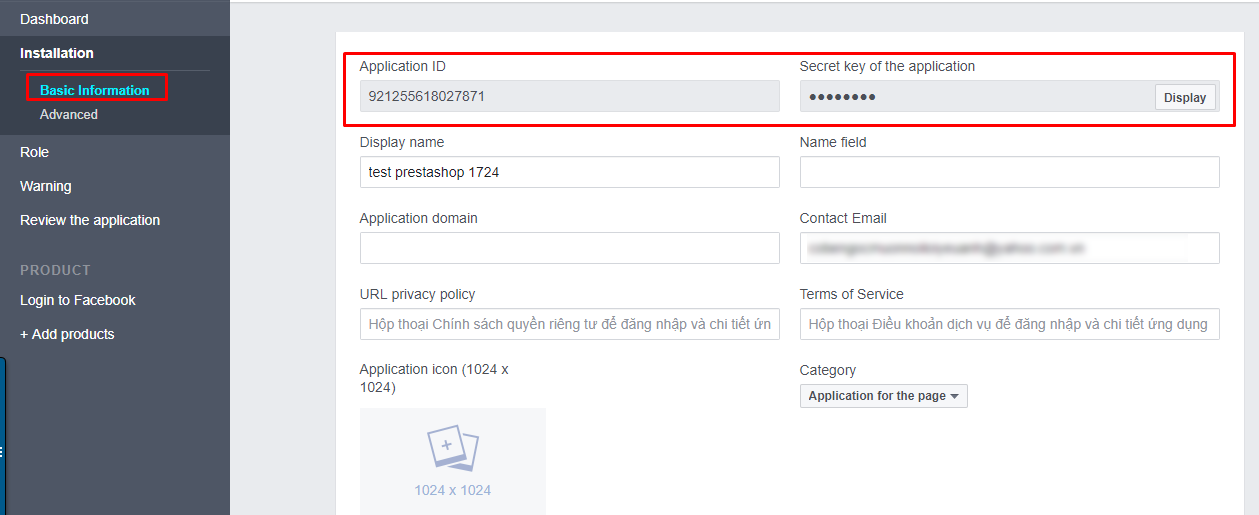
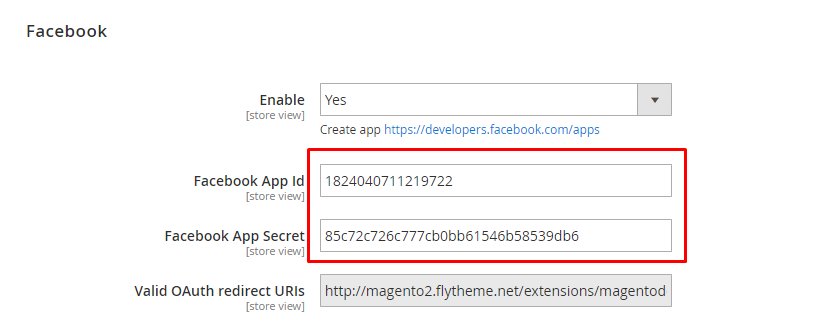
Step 9: After finishing, let’s come back to Admin page to enter your App ID and App Secret.
4.3.2 How do I get the Google client ID and client Secret?
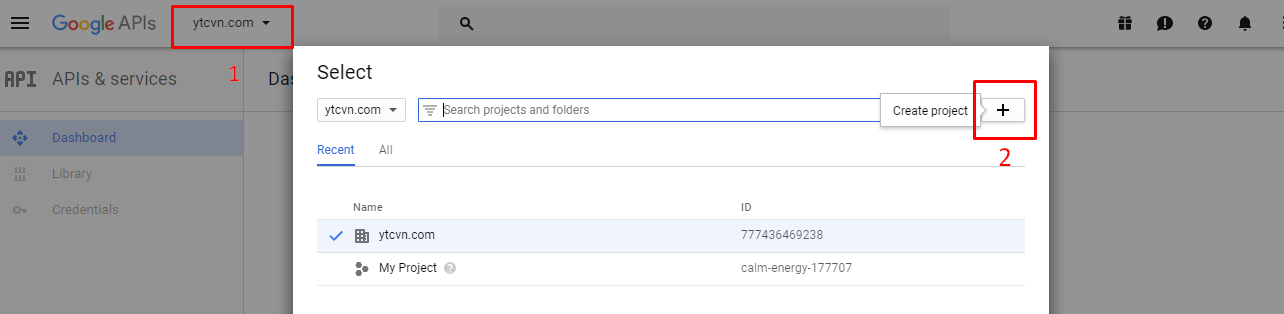
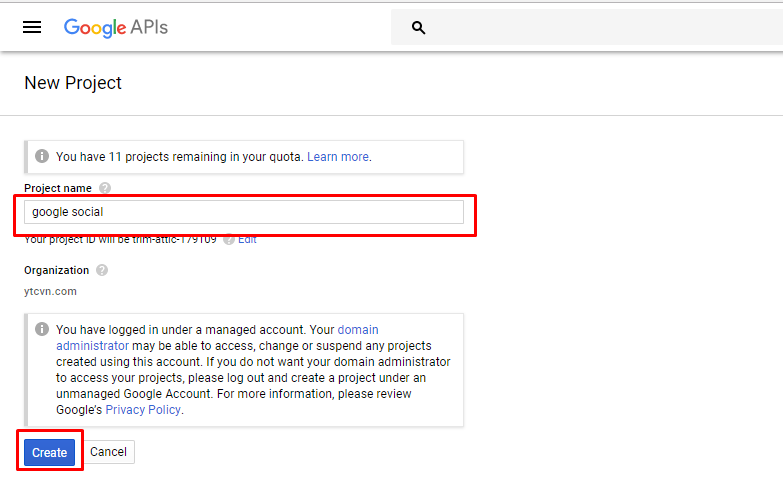
Step 1: Go to page: https://code.google.com/apis/console/ and then click “Create Project”.
After that, fill in your Project Name and then click Create:
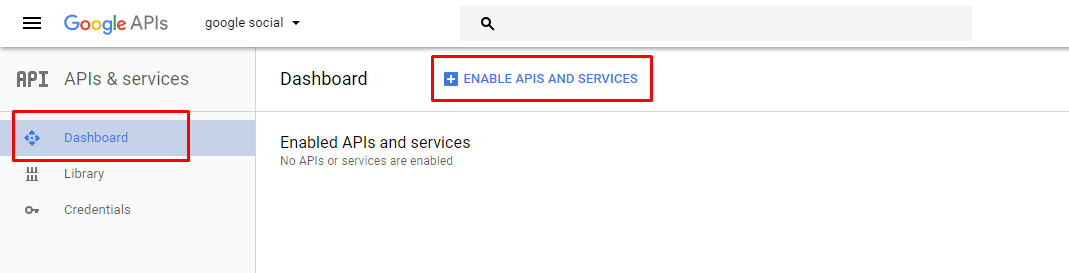
Step 2: Step 2: Come to Dashboard and click “Enable APIS And Servies”.
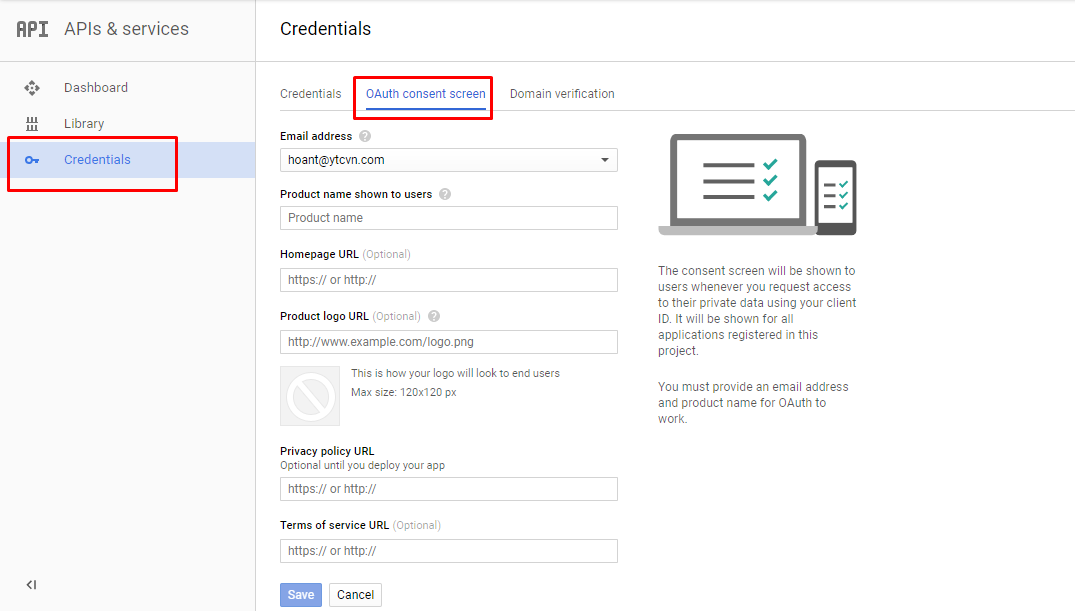
Step 3: Click “Credentials” tab and you will see 3 subtitles as demonstrated below. Please click “OAuth consent screen” tab on which you need to fill in your Product name shown to users and then click Save.
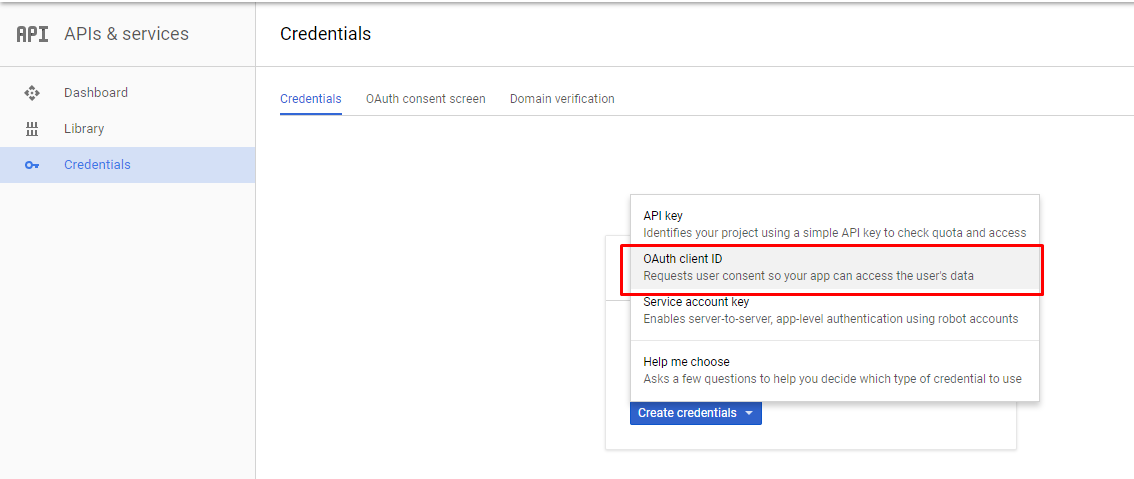
Step 4: Back to the “Credential” tab, after clicking “add credentials” button, you will see several choices. Please Choose “OAuth client ID” and “Web application” afterwards.
Then, fill in all information required.
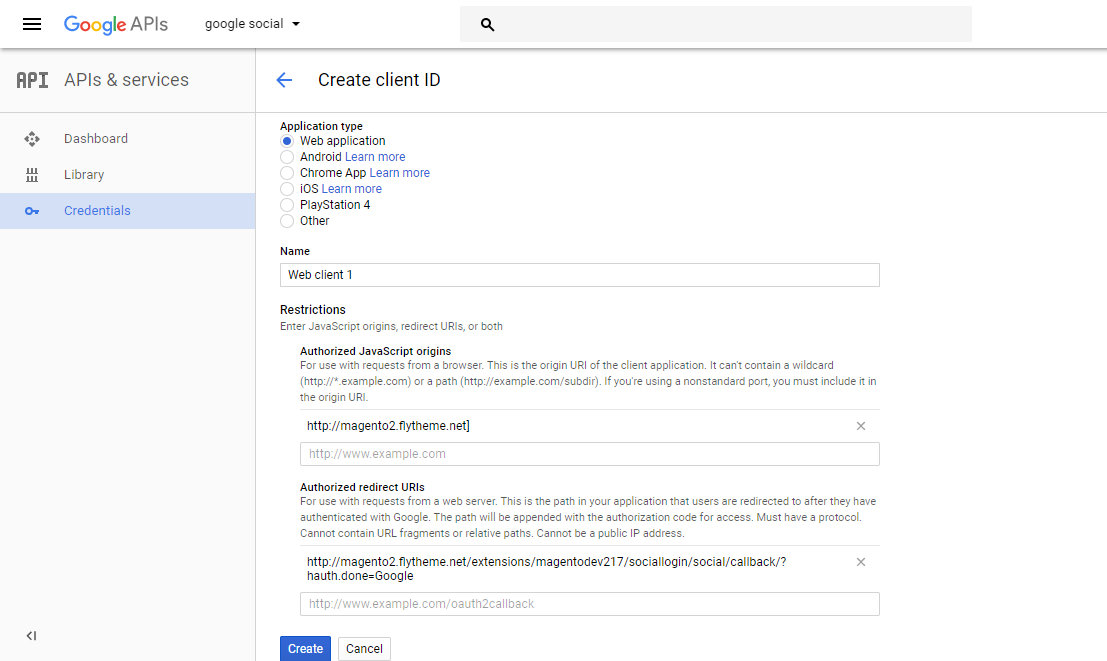
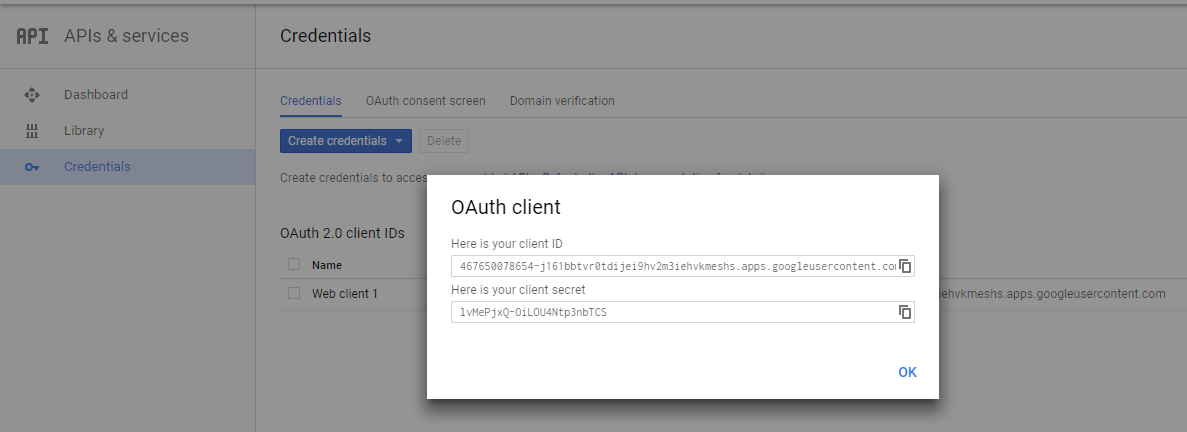
Step 5: Get your Client IP and Client Secret
4.3.3 How do I get the Twitter Consumer Key and Consumer Secret?
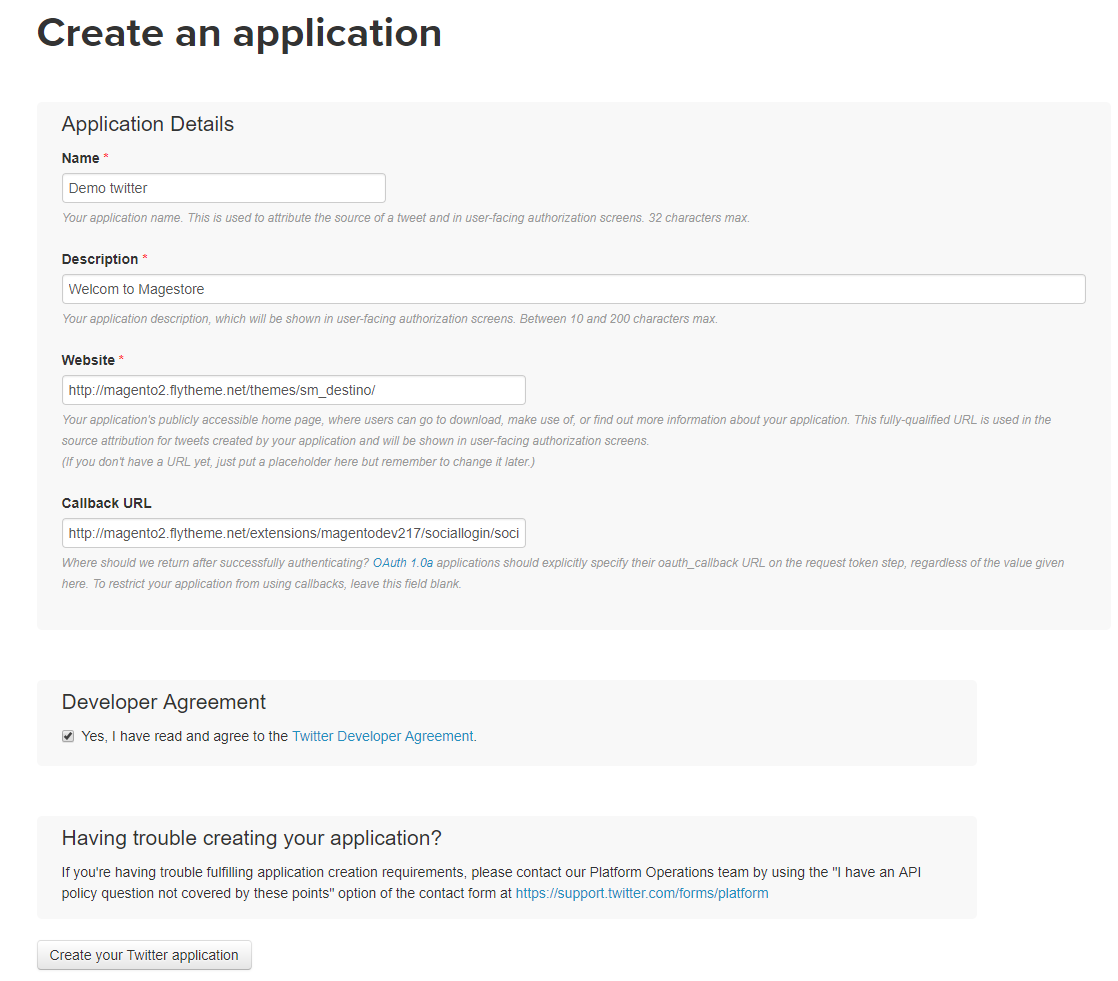
Step 1: Go to page: https://dev.twitter.com/apps and then choose “Add a New app”. After that, you need to fill in your name, description, website, calback URL. Remember to click “Create your Twitter application”.
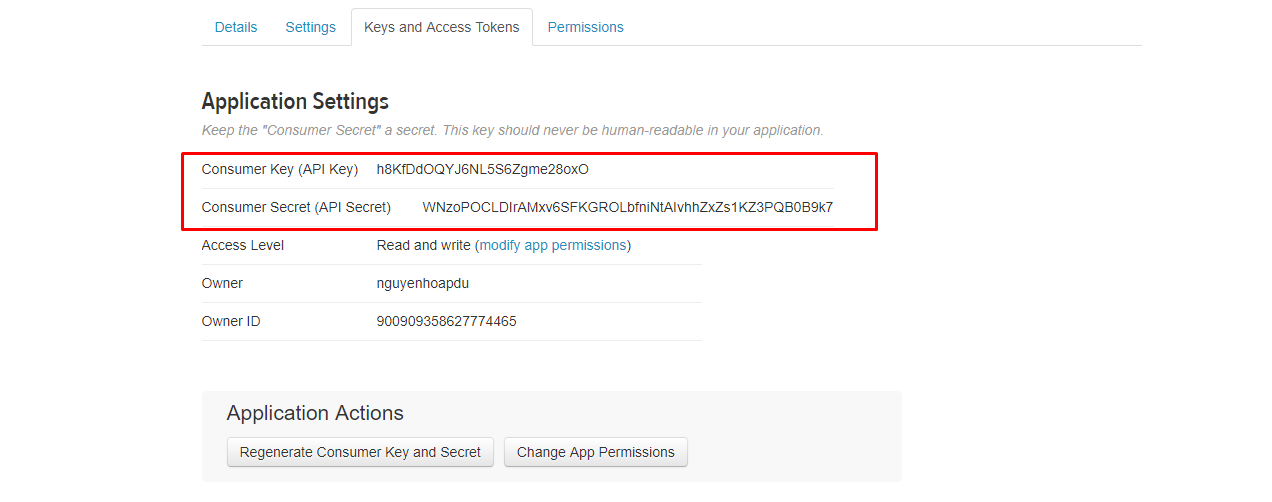
Step 2: Step 2: Click “Keys and Access Tokens” tab to get Consumer Key and Consumer Secret
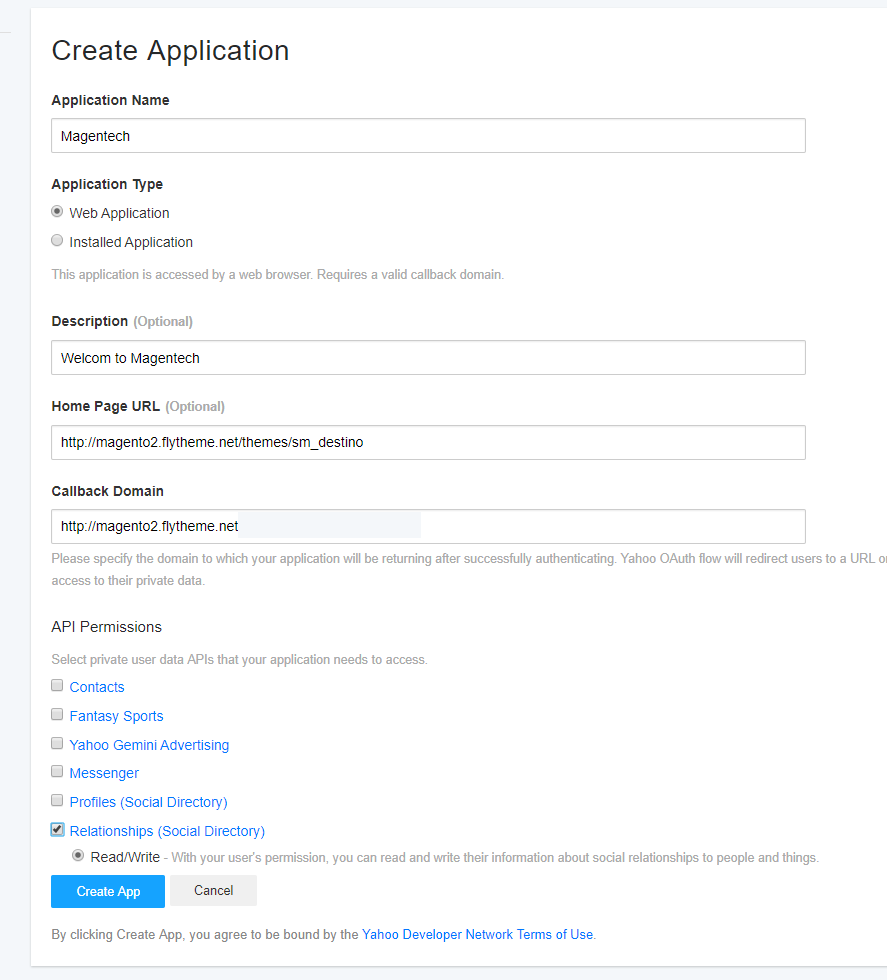
4.3.4 How do I get the LinkedIn Client ID and Client Secret?
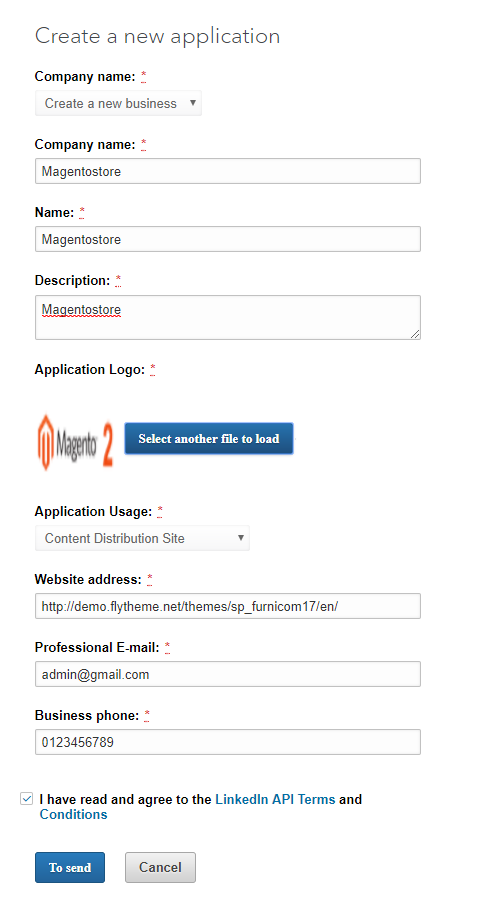
Step 1: Go to page: https://www.linkedin.com/secure/developer and then choose “Create an application””.

After that, you need to fill in required information. Remember to click “To send”.
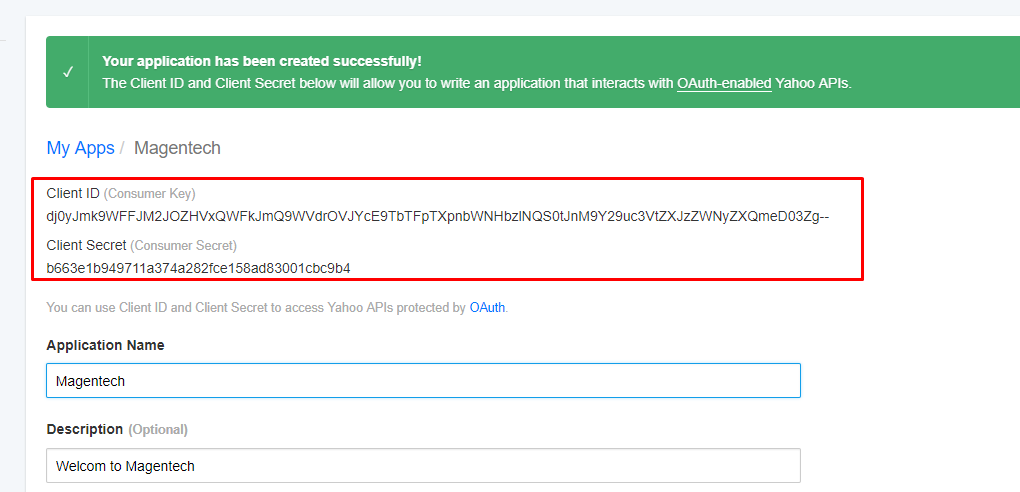
Step 2: Get Client ID and Client Secret. You will see some other fields but thereai??i??s no need
for you to fill in
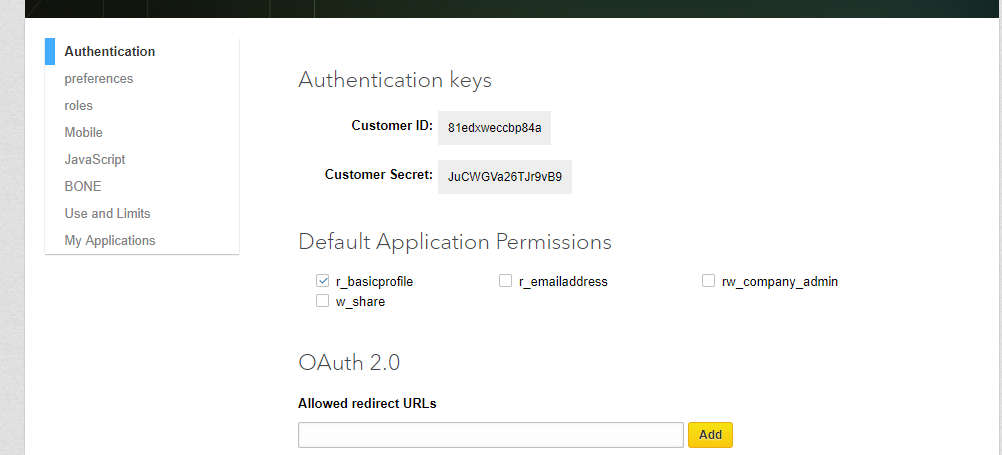
4.3.5 How do I get the Yahoo Client ID and Client Secret?
Step 1: Go to page: https://developer.yahoo.com/apps/ and then choose “Create an app””.

After that, you need to fill in required information. Remember to click “Create App”.
Step 2: Step 2: Get your Client ID and Client Secret:
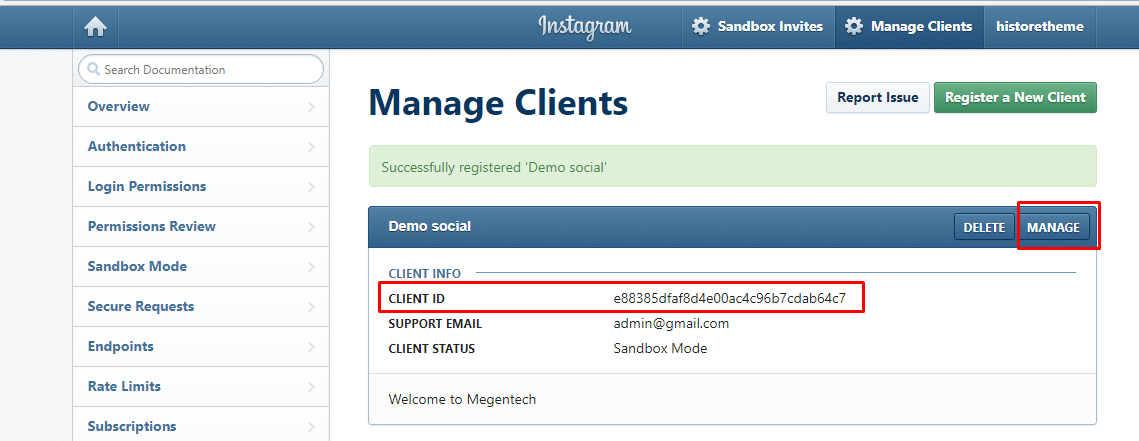
4.3.6 How do I get the Instagram Client ID and Client Secret?
Step 1: Go to page: http://instagram.com/developer/clients/manage/ and then click “Click a New Client””.

Step 2: After that, you need to fill in required information.
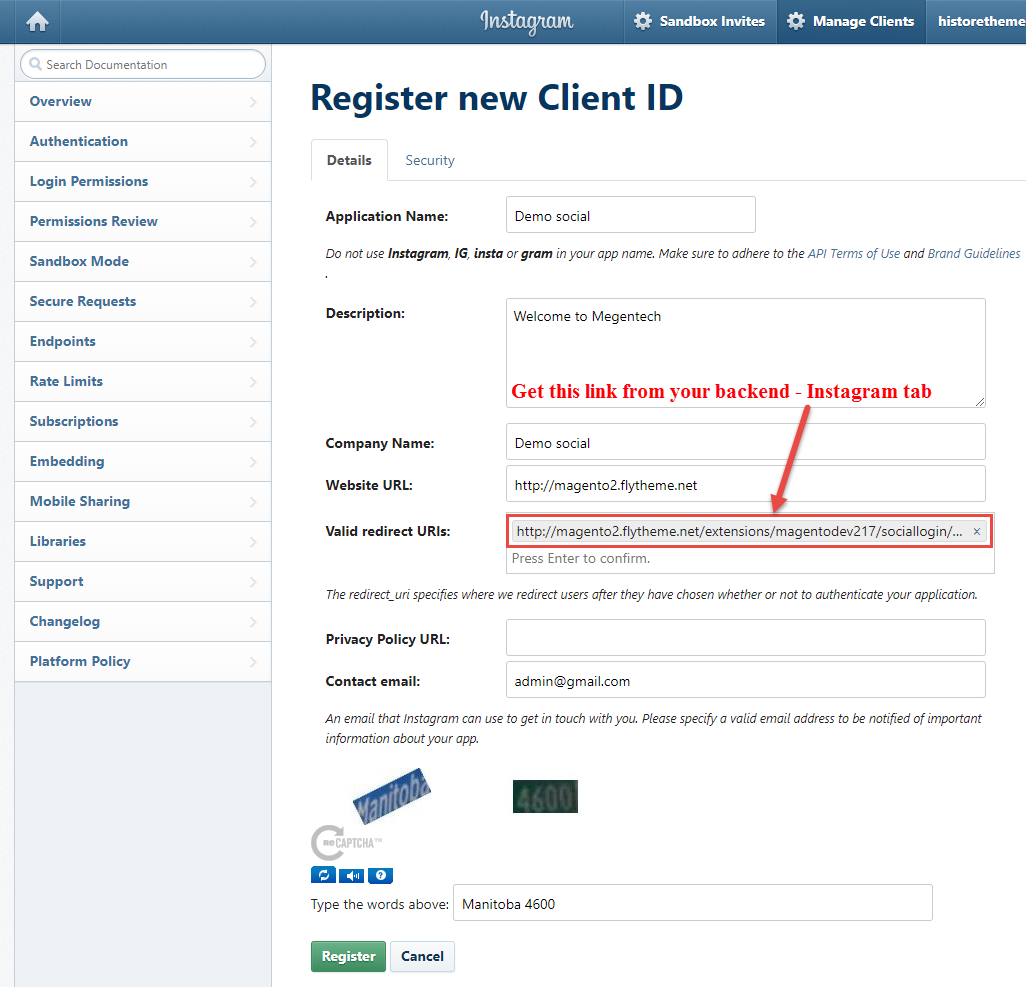
Step 3: After finishing these 2 steps, you can get your Client ID. Click “MANAGE” to get Client Secret:
5SUPPORT
Thank you so much for using this module, your support is truly appreciated. If you have any questions that are beyond the scope of this document, please feel free to contact us via our Support Tickets System