This document is for SM Topshop Magento Version 2.4.x
Firstly, a huge thanks for purchasing this theme, your support is truly appreciated!
This document covers the installation and use of this theme, reveals some answers to common problems and issues. We encourage you to read throughout this document if you are experiencing any difficulties. If you have any questions that are beyond the scope of document, please feel free to contact us via our Support Tickets System.
Note: This theme has versions for Magento 1.9.x, 2.1.x and Magento 2.2.x.
| Version | Userguide |
|---|---|
| SM Topshop Magento Version 1.9.x | Please click Here to view |
| SM Topshop Magento Version 2.2.x | Please click Here to view |
1 SYSTEM REQUIREMENT
At the basic level, this theme will require the following conditions:
2INSTALLATION
As of Magento 2.4.0, MySQL is no longer used for search. You must use Elasticsearch. Magento supports Elasticsearch 7.6.x.
(Magento no longer supports Elasticsearch 2.x, 5.x, and 6.x.)
There are two ways to install a Magento Theme:
- Quickstart Installation: Suitable if you have your first installation and want to get a whole new fresh site as our Demo.
- Manual Installation (including Theme Installation): Suitable if your store is full with content that you donai??i??t want to overwrite.
2.1 Quickstart Installation:
Magentech provides SM Quickstart package for each theme which aims to ease the installation for users. If you plan to start your site from the beginning, it will help you save much time of installing and configuring. Please follow steps below:
Important: You must use the command line to install Magento 2.4+.
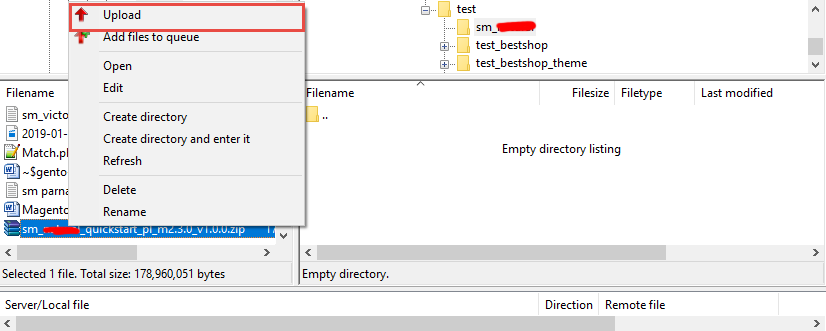
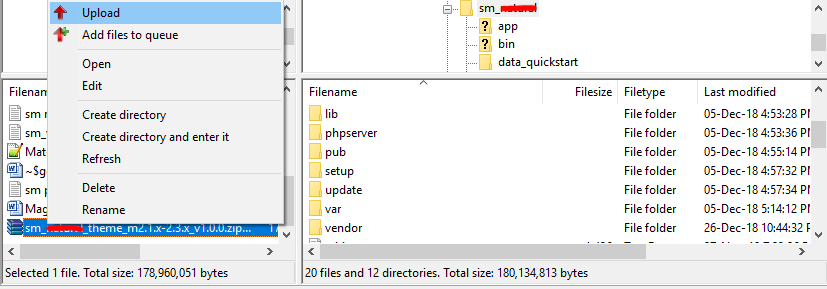
- Step 1: Download the quickstart package named as sm_topshop_quickstart_pl_m2.4.0_v4.0.0
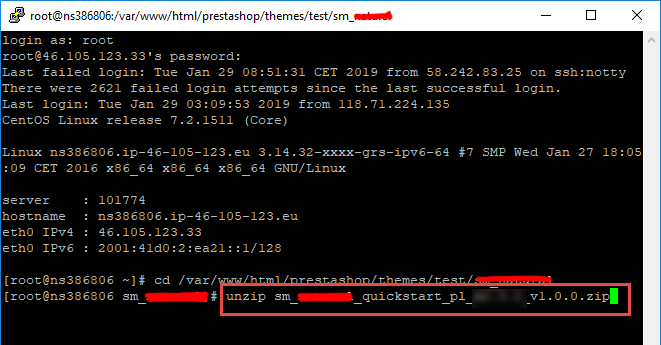
- Step 2: Upload and Extract the whole Quickstart package to your server. In Quickstart folder you will see the extracted folder that include all sample data
- Step 3: Create a Database for your Magento site
Important!
You need to remember the database name to use in the next steps

- Step 4: Import database sample_data.sql under the folder sm_topshop_quickstart_pl_m2.4.0_v4.0.0\data_quickstart
Note: You can import database by run this command
mysql -u root -p database_name < sample_data.sql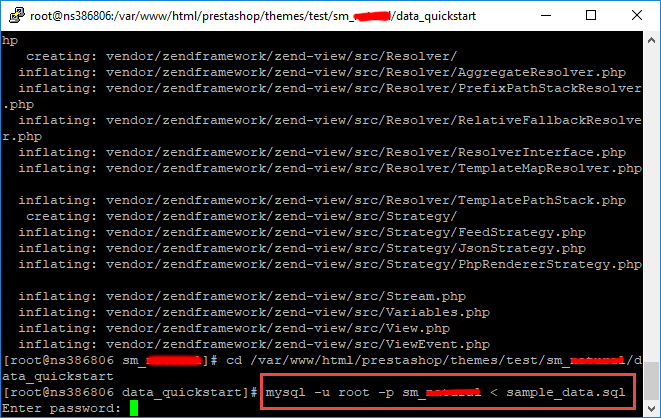
Note: After that please go to folder root and run these command to permissions:chmod -R 777 pub
chmod -R 777 generated
chmod -R 777 var

- Step 5: Install Magento
This example assumes that the Magento install directory is named
sm_topshop, the db-host is on the same machine (localhost), and that the db-name, db-user, and db-password are allmagento:php bin/magento setup:install --base-url=http://192.168.1.220/ytc_templates/magento/sm_topshop --base-url-secure=https://192.168.1.220/ytc_templates/magento/sm_topshop --db-host=localhost --db-name=magento --db-user=magento --db-password=magento --admin-firstname=admin --admin-lastname=admin --admin-email=admin@admin.com --admin-user=admin --admin-password=admin123 --language=en_US --currency=USD --timezone=America/Chicago --use-rewrites=1 --backend-frontname="admin" --search-engine=elasticsearch7 --elasticsearch-index-prefix=topshop
Messages similar to the following display to indicate a successful installation:
Post installation file permissions check...
For security, remove write permissions from these directories: '/var/www/html/ytc_templates/magento/sm_topshop/app/etc'
[Progress: 274 / 274] [SUCCESS]: Magento installation complete.
[SUCCESS]: Admin Panel URI: /admin_puu71qNote: You can customize the Admin URI with the
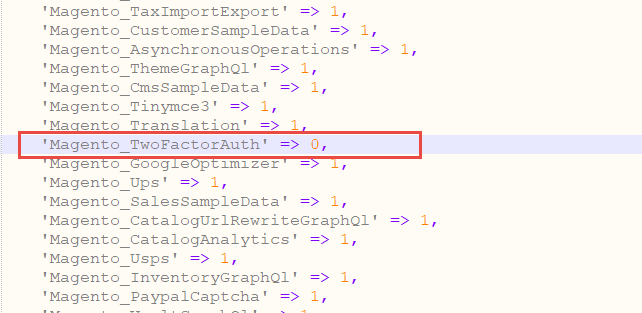
--backend-frontnameoption. However, we recommend omitting this option and allowing the installation command to automatically generate a random URI. A random URI is harder for hackers or malicious software to exploit. The URI displays in your console when installation is complete. - Step 6: Can't login to admin panel
When you login to admin will be display like this image:

Please open file
app/etc/config.phpand change 'Magento_TwoFactorAuth' => 1 to 'Magento_TwoFactorAuth' => 0
After that run these command:php bin/magento setup:upgrade
andphp bin/magento setup:static-content:deploy -f - Step 7: Finally, permissions for the following folders by run these commands:
chmod -R 777 pub
chmod -R 777 generated
chmod -R 777 var
After upload quickstart package, please extract package by this command: unzip file.zip
2.2 Manual Installation
Important!
- We recommend you to duplicate your live store on a development store and try installation on it in advance.
- Backup magento files and the store database.
It's very important to backup all of themes and extensions in Magento before installation, especially when you are working on a live server. We strongly recommend you to do not omit this step.
- Note: Manual Installation can only import CMS Page and Static Block. Products, Categories, Megamenu may not display when you use Manual Installation, you need to configure manually (by yourself >> please read documentation carefully)
- Step 1: Download Magento 2.4.x
https://magento.com/tech-resources/downloadand install on your server - Step 2: Please download 'sm_topshop_theme_m2.1.x-2.4.x_v4.0.0.zip' file and upload to the root of your magento site folder on your server, after that unzip by command
unzip name_file.zip.
- Step 3:
Active SM Extensions, open command line in folder root of magento and run commands via ssh using putty or othersphp bin/magento setup:upgrade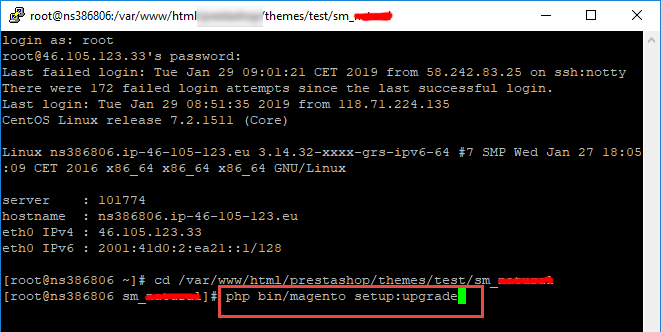
- Step 5:
Navigate to Content > Design > Configuration > Edit Default Store > Select "SM topshop" theme.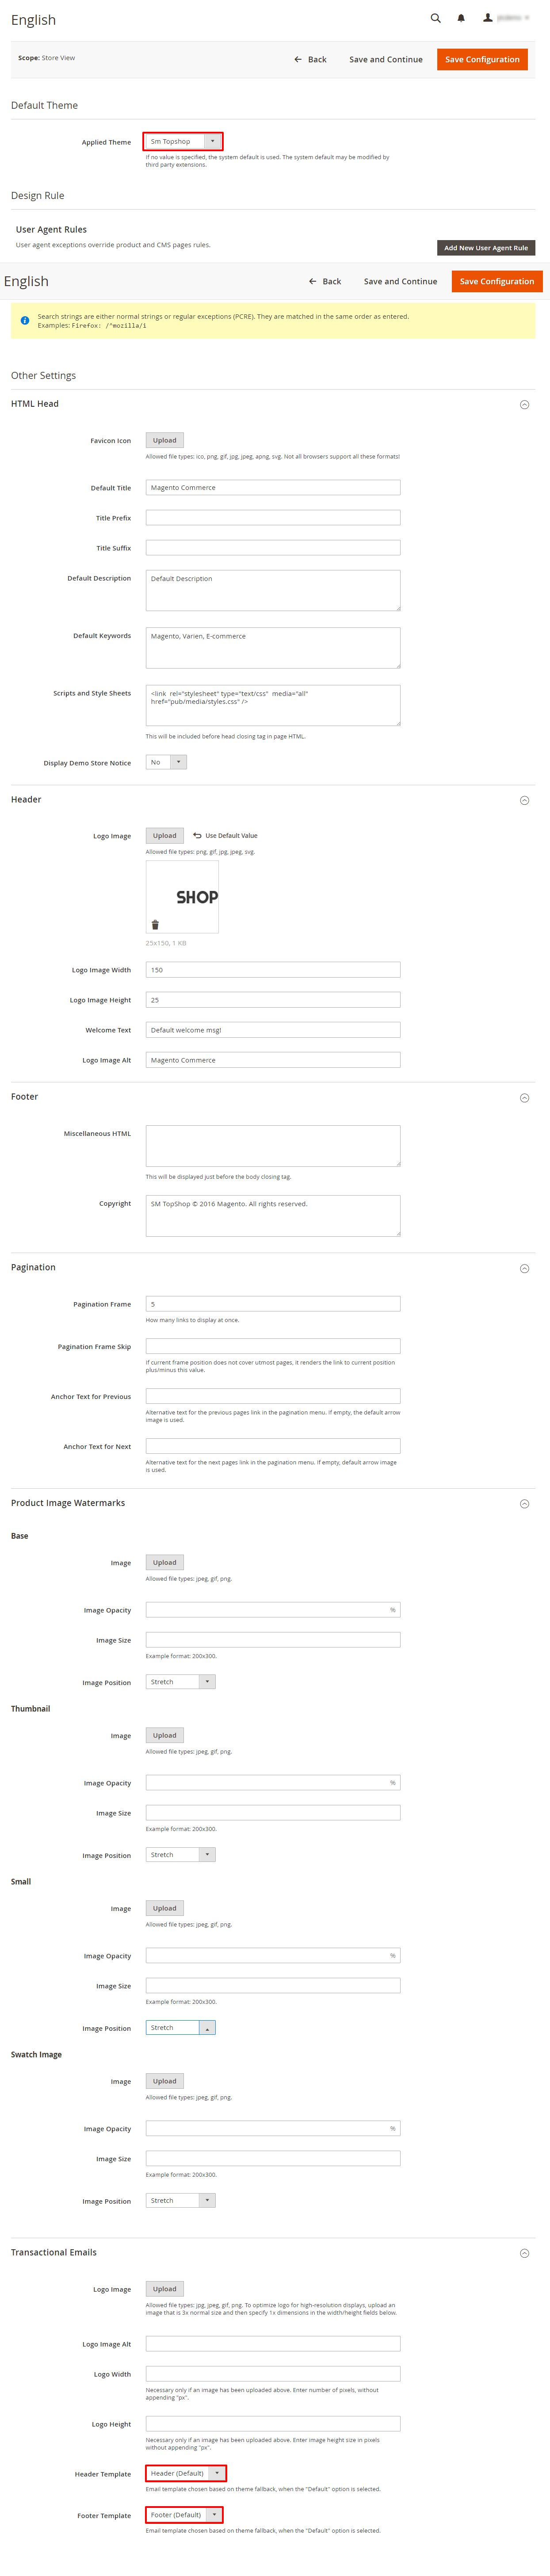
- Step 6: Click "Save Configuarion" button to save your changes.
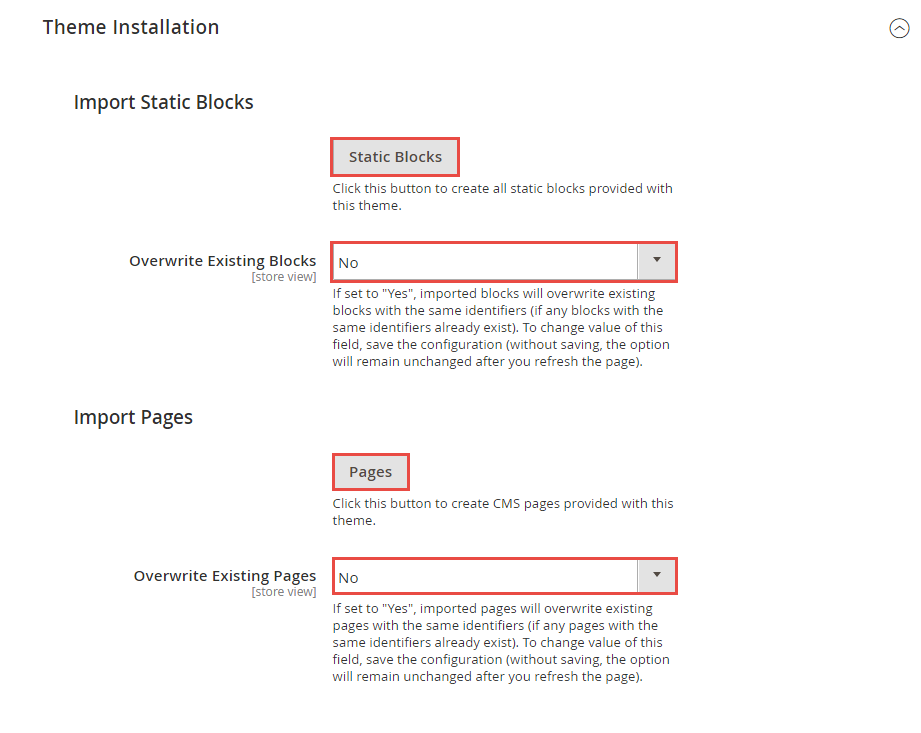
- Step 7: Navigate to Stores>> Settings>> Configuration >> MAGENTECH.COM >> Sm topshop >> Theme Installation. Press the buttons named 'Static Blocks' and 'Pages' to import all default blocks and pages. Click "Save Configuarion" button to save your changes.
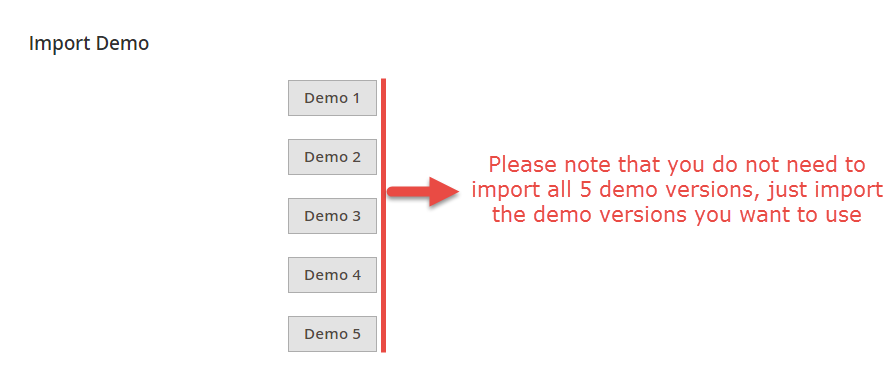
- Step 8: Click "Demo X" button to install demo version that you prefer to install. After that, click "Save config" button on the top.
- Step 9: Flush Cache: After successfully import your demo, save Theme Settings and Design Settings and clear the cache by using this command as php bin/magento cache:flush
in Command Prompt. Or you could go to System >> Tools >> Cache Management, click 'Flush Cache Storage' button to flush all the cache.
Step 4: Run deploy command: php bin/magento setup:static-content:deploy -f
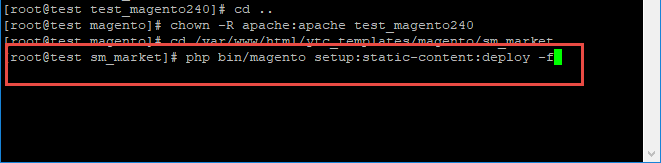
chmod -R 777 pub
chmod -R 777 generated
chmod -R 777 var
Note. Please remember that: If you have imported these Static Blocks, Pages successfully, you would have all blocks and pages provided with this theme and you do not need to create any static blocks or pages manually as the following instruction of this document.
3.1 Page Configuration
Set Default Page
- To set a default page for your Magento Site, in the Admin Panel you go to Stores>> Settings >>Configuration>>Web>>Default Pages. Please click to see the Backend Settings.
- You need to change to the website / store view that you want to change (the dropdown menu in the upper left corner). You will probably have to create a new CMS page if you want to have something different from your default home page.
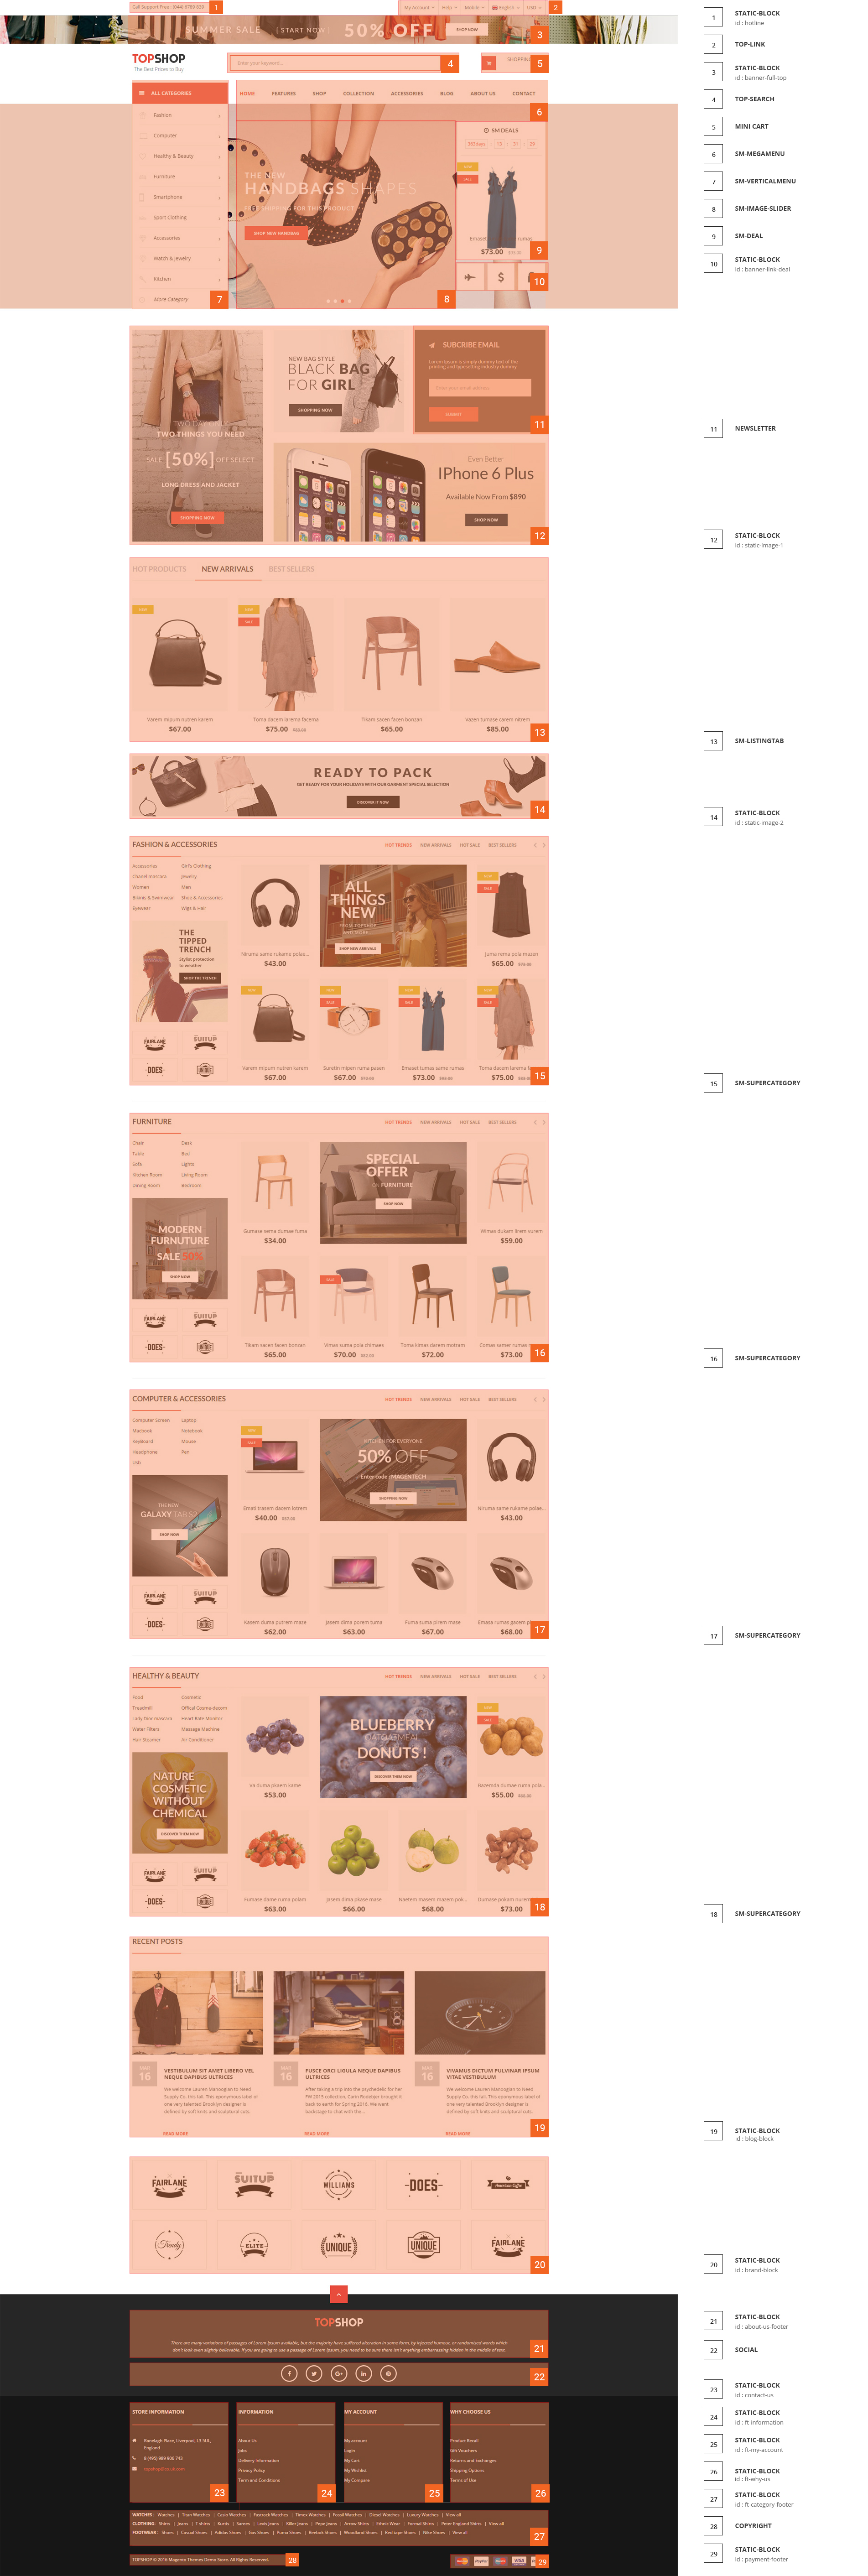
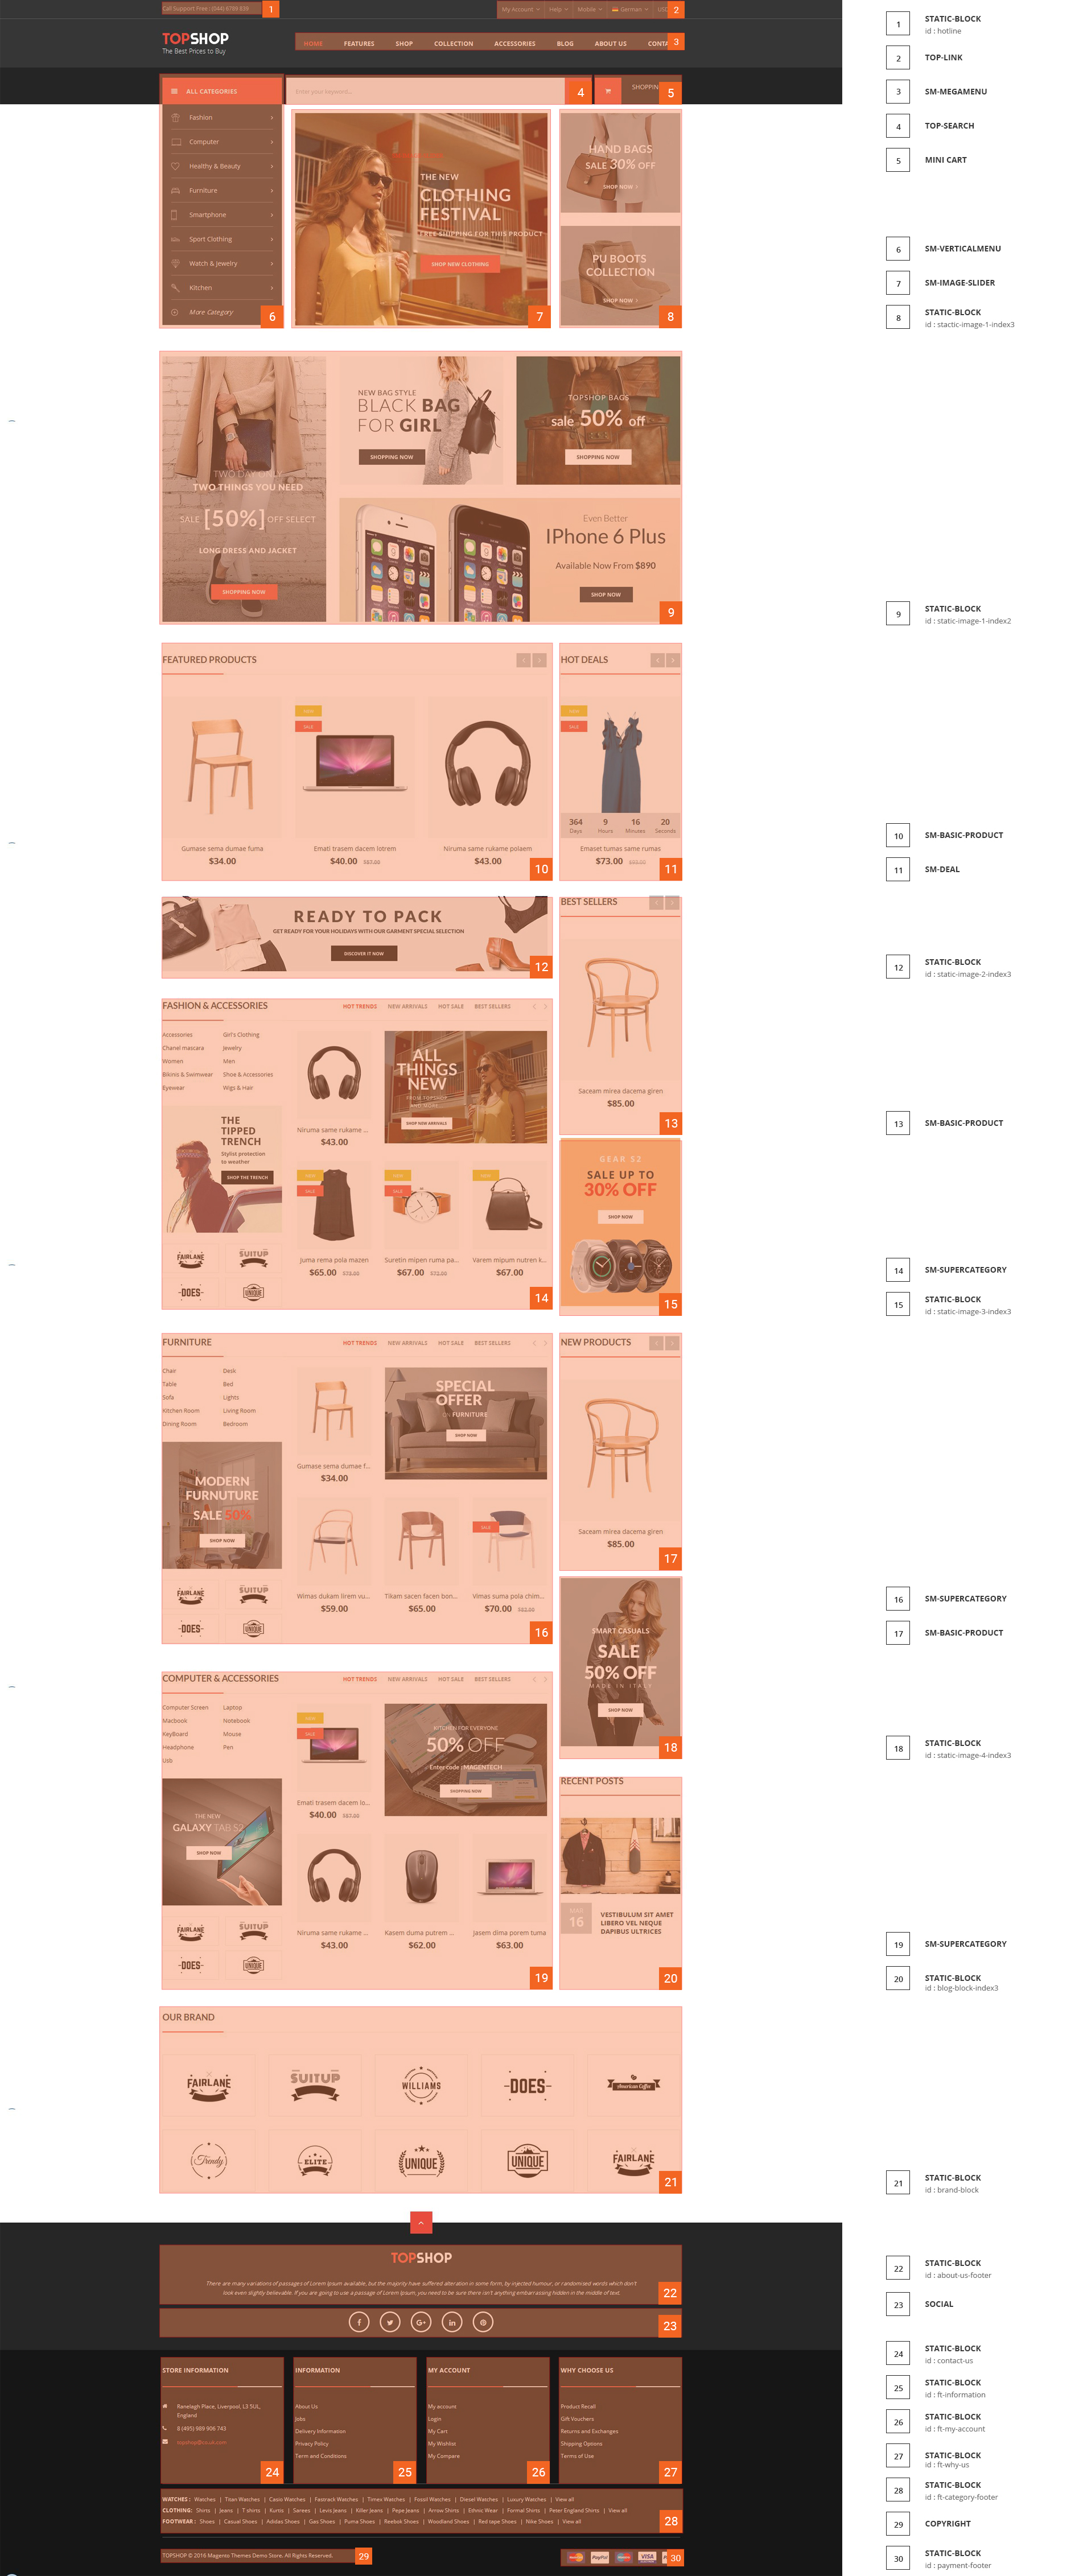
Home Style 1
Frontend of Home Style 1 - Layout Position
In the Admin Panel, please navigate to Content >> Elements >> Pages to create a new page in Pages section.
- Backend Setting: Please click Here to view.
- Copy and paste the following code into the Content field:
<div class="homepage-wrapper home-style-1"> <div class="full-wrapper banner-top"> <div class="container"> <div class="boxed-container">{{block class="Magento\\Cms\\Block\\Block" block_id="static-image-1"}}</div> <div class="boxed-container listingtab-wrap">{{block class="Sm\ListingTabs\Block\ListingTabs" name="listingtabs.default" as="listingtabs_default" template="Sm_ListingTabs::default.phtml"}}</div> <div class="boxed-container">{{block class="Magento\\Cms\\Block\\Block" block_id="static-image-2"}}</div> <div class="boxed-container fashion-cat">{{block class="Sm\SuperCategories\Block\SuperCategories" name="supercategories" template="Sm_SuperCategories::default.phtml" product_category="73" pretext="static_c_fashion" posttext="banner_s_p_fashion" }}</div> <div class="boxed-container">{{block class="Sm\SuperCategories\Block\SuperCategories" name="supercategories_fur" template="Sm_SuperCategories::default.phtml" product_category="74" pretext="static_c_furniture" posttext="banner_s_p_furniture" }}</div> <div class="boxed-container">{{block class="Sm\SuperCategories\Block\SuperCategories" name="supercategories_com" template="Sm_SuperCategories::default.phtml" product_category="75" pretext="static_c_computer" posttext="banner_s_p_computer" }}</div> <div class="boxed-container healthy-cate">{{block class="Sm\SuperCategories\Block\SuperCategories" name="supercategories_hea" template="Sm_SuperCategories::default.phtml" product_category="76" pretext="static_c_healthy" posttext="banner_s_p_healthy" }}</div> <div class="boxed-container">{{block class="Magento\\Cms\\Block\\Block" block_id="blog-block"}}</div> <div class="boxed-container brand-wrap">{{block class="Magento\\Cms\\Block\\Block" block_id="brand-block"}}</div> </div> </div> </div> - Copy and paste the following code into the Layout Update XML field:
<referenceContainer name="columns.top_container">
	<block class="Sm\ImageSlider\Block\ImageSlider" name="imageslider" before="-" template="Sm_ImageSlider::default.phtml"/>

			<block class="Sm\Deals\Block\Deals" name="deals" template="Sm_Deals::default.phtml" img_background="ffffff"/>
</referenceContainer>
Home Style 2
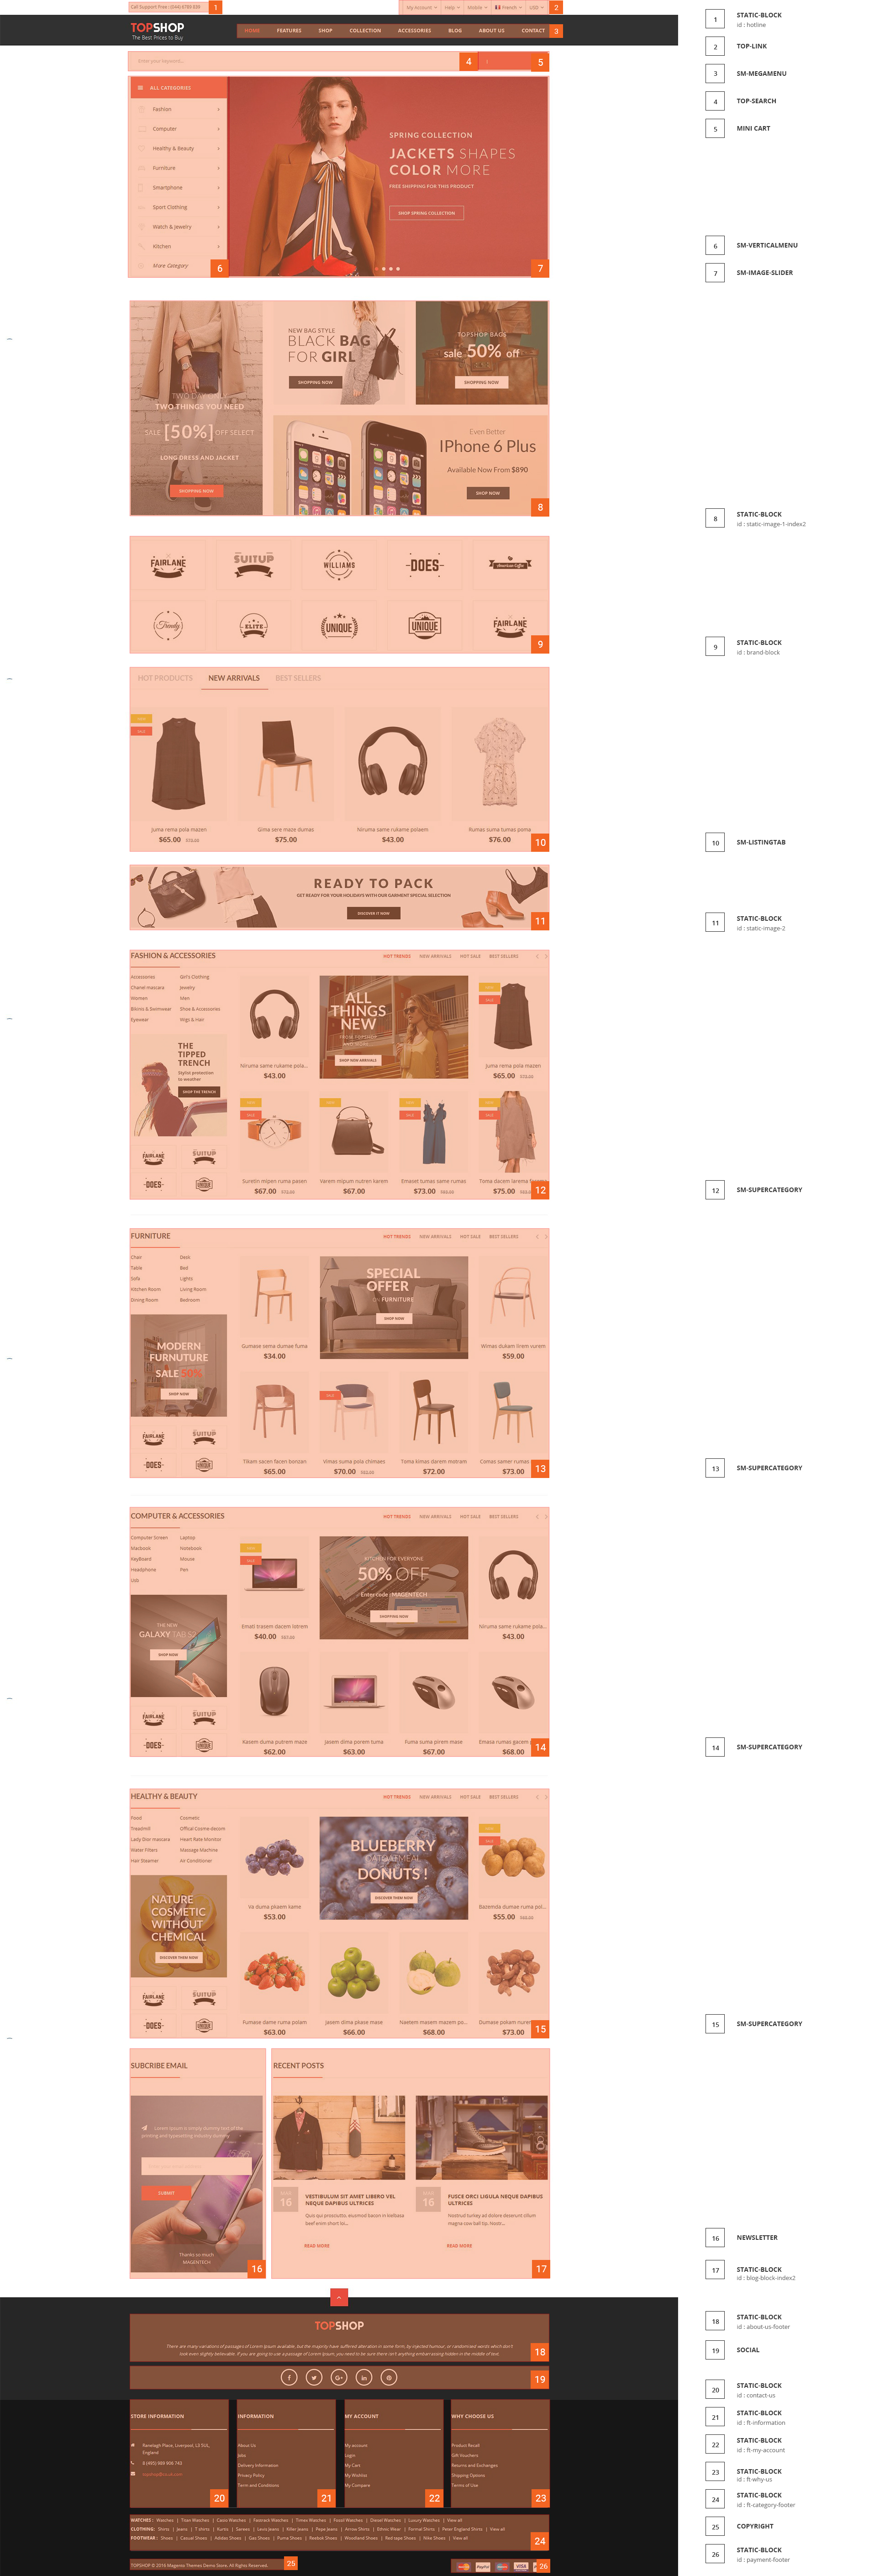
Frontend of Home Style 2 - Layout Position
In the Admin Panel, please navigate to Content >> Elements >> Pages to create a new page in Pages section.
- Backend Setting: Please click Here to view.
- Copy and paste the following code into the Content field:
<div class="homepage-wrapper home-style-2">
<div class="full-wrapper banner-top">
<div class="container">
<div class="boxed-container top-full">
<div class="row">
<div class="col-lg-3 vertical-menu-box">{{block class="Magento\\Cms\\Block\\Block" block_id="vertical-menu-config"}}</div>
<div class="col-lg-9 slideshow-box">{{block class="Sm\ImageSlider\Block\ImageSlider" name="imageslider" template="Sm_ImageSlider::default.phtml"}}</div>
</div>
</div>
<div class="boxed-container">{{block class="Magento\\Cms\\Block\\Block" block_id="static-image-1-index2"}}</div>
<div class="boxed-container">{{block class="Magento\\Cms\\Block\\Block" block_id="brand-block"}}</div>
<div class="boxed-container">{{block class="Sm\ListingTabs\Block\ListingTabs" name="listingtabs.default" as="listingtabs_default" template="Sm_ListingTabs::default.phtml"}}</div>
<div class="boxed-container">{{block class="Magento\\Cms\\Block\\Block" block_id="static-image-2"}}</div>
<div class="boxed-container">{{block class="Sm\SuperCategories\Block\SuperCategories" name="supercategories" template="Sm_SuperCategories::sm/supercategories/default.phtml" product_category="73" pretext="static_c_fashion" posttext="banner_s_p_fashion" }}</div>
<div class="boxed-container">{{block class="Sm\SuperCategories\Block\SuperCategories" name="supercategories_fur" template="Sm_SuperCategories::default.phtml" product_category="74" pretext="static_c_furniture" posttext="banner_s_p_furniture" }}</div>
<div class="boxed-container">{{block class="Sm\SuperCategories\Block\SuperCategories" name="supercategories_com" template="Sm_SuperCategories::default.phtml" product_category="75" pretext="static_c_computer" posttext="banner_s_p_computer" }}</div>
<div class="boxed-container healthy-cate">{{block class="Sm\SuperCategories\Block\SuperCategories" name="supercategories_hea" template="Sm_SuperCategories::default.phtml" product_category="76" pretext="static_c_healthy" posttext="banner_s_p_healthy" }}</div>
<div class="boxed-container">
<div class="row">
<div class="col-lg-4 col-md-4 col-sm-4 newsletter-box">{{block class="Magento\Newsletter\Block\Subscribe" template="subscribe-index2.phtml"}}</div>
<div class="col-lg-8 col-md-8 col-sm-8 latest-post-wrapper">
<div class="slider-latest-blog">{{block class="Magento\\Cms\\Block\\Block" block_id="blog-block-index2"}}</div>
</div>
</div>
</div>
</div>
</div>
</div>
Home Style 3
Frontend of Home Style 3 - Layout Position
In the Admin Panel, please navigate to Content >> Elements >> Pages to create a new page in Pages section.
- Backend Setting: Please click Here to view.
- Copy and paste the following code into the Content field:
<div class="homepage-wrapper home-style-3">
<div class="full-wrapper banner-top">
<div class="container">
<div class="boxed-container top-full">
<div class="row">
<div class="col-lg-3 col-md-3 col-sm-12 vertical-menu-virtual"> </div>
<div class="col-lg-6 col-md-6 col-sm-12 slideshow-box">{{block class="Sm\ImageSlider\Block\ImageSlider" name="imageslider" before="-" template="Sm_ImageSlider::default.phtml"}}</div>
<div class="col-lg-3 col-md-3 col-sm-12 banner-box">{{block class="Magento\\Cms\\Block\\Block" block_id="static-image-1-index3"}}</div>
</div>
</div>
<div class="boxed-container banner-2">{{block class="Magento\\Cms\\Block\\Block" block_id="static-image-1-index2"}}</div>
<div class="boxed-container hotdeal-custom-wrapper">
<div class="row featured-deal-wrap">
<div class="col-lg-9 col-md-9 col-sm-8 col-xs-12 slider-basic-wrapper">{{block class="Sm\BasicProducts\Block\BasicProducts" name="basicproducts" template="Sm_BasicProducts::slider-index3.phtml" title="Featured Products" product_order_by="price" product_category="11" product_limitation="6" nb_column1="3" nb_column2="3" nb_column3="2" nb_column4="2" nb_column5="1" }}</div>
<div class="col-lg-3 col-md-3 col-sm-4 col-xs-12 deal-wrapper slidebar">{{block class="Sm\Deals\Block\Deals" name="deals" template="Sm_Deals::default-index3.phtml" title="Hot deals" posttext="" nb_column4="2" margin="30"}}</div>
</div>
</div>
<div class="boxed-container">
<div class="row">
<div class="col-lg-9 col-md-9 col-sm-8 left9-wrapper">{{block class="Magento\\Cms\\Block\\Block" block_id="static-image-2-index3"}}
<div class="supercategories-wrap">{{block class="Sm\SuperCategories\Block\SuperCategories" name="supercategories" template="Sm_SuperCategories::default.phtml" product_category="73" pretext="static_c_fashion" posttext="banner_s_p_fashion" nbi_rows="4" }}</div>
<div class="supercategories-wrap furniture-cate">{{block class="Sm\SuperCategories\Block\SuperCategories" name="supercategories" template="Sm_SuperCategories::default.phtml" product_category="74" pretext="static_c_furniture" posttext="banner_s_p_furniture" nbi_rows="4" }}</div>
<div class="supercategories-wrap computer-cate">{{block class="Sm\SuperCategories\Block\SuperCategories" name="supercategories" template="Sm_SuperCategories::default.phtml" product_category="75" pretext="static_c_computer" posttext="banner_s_p_computer" nbi_rows="4" }}</div>
</div>
<div class="col-lg-3 col-md-3 col-sm-4 slidebar">
<div class="slider-basic-wrapper">{{block class="Sm\BasicProducts\Block\BasicProducts" name="basicproducts" template="Sm_BasicProducts::slider-index3.phtml" title="Best sellers" product_order_by="best_sales" product_category="11" product_limitation="6" nb_column1="1" nb_column2="1" nb_column3="1" nb_column4="2" nb_column5="1" }}</div>
{{block class="Magento\\Cms\\Block\\Block" block_id="static-image-3-index3"}}
<div class="slider-basic-wrapper">{{block class="Sm\BasicProducts\Block\BasicProducts" name="basicproducts" template="Sm_BasicProducts::slider-index3.phtml" title="New Products" product_order_by="created_at" product_category="11" product_limitation="6" nb_column1="1" nb_column2="1" nb_column3="1" nb_column4="2" nb_column5="1" }}</div>
{{block class="Magento\\Cms\\Block\\Block" block_id="static-image-4-index3"}}
<div class="latest-post-wrapper">
<div class="slider-latest-blog">{{block class="Magento\\Cms\\Block\\Block" block_id="blog-block-index3"}}</div>
</div>
</div>
</div>
</div>
<div class="boxed-container">{{block class="Magento\\Cms\\Block\\Block" block_id="brand-block"}}</div>
</div>
</div>
</div>
Home Style 4
Frontend of Home Style 4 - Layout Position
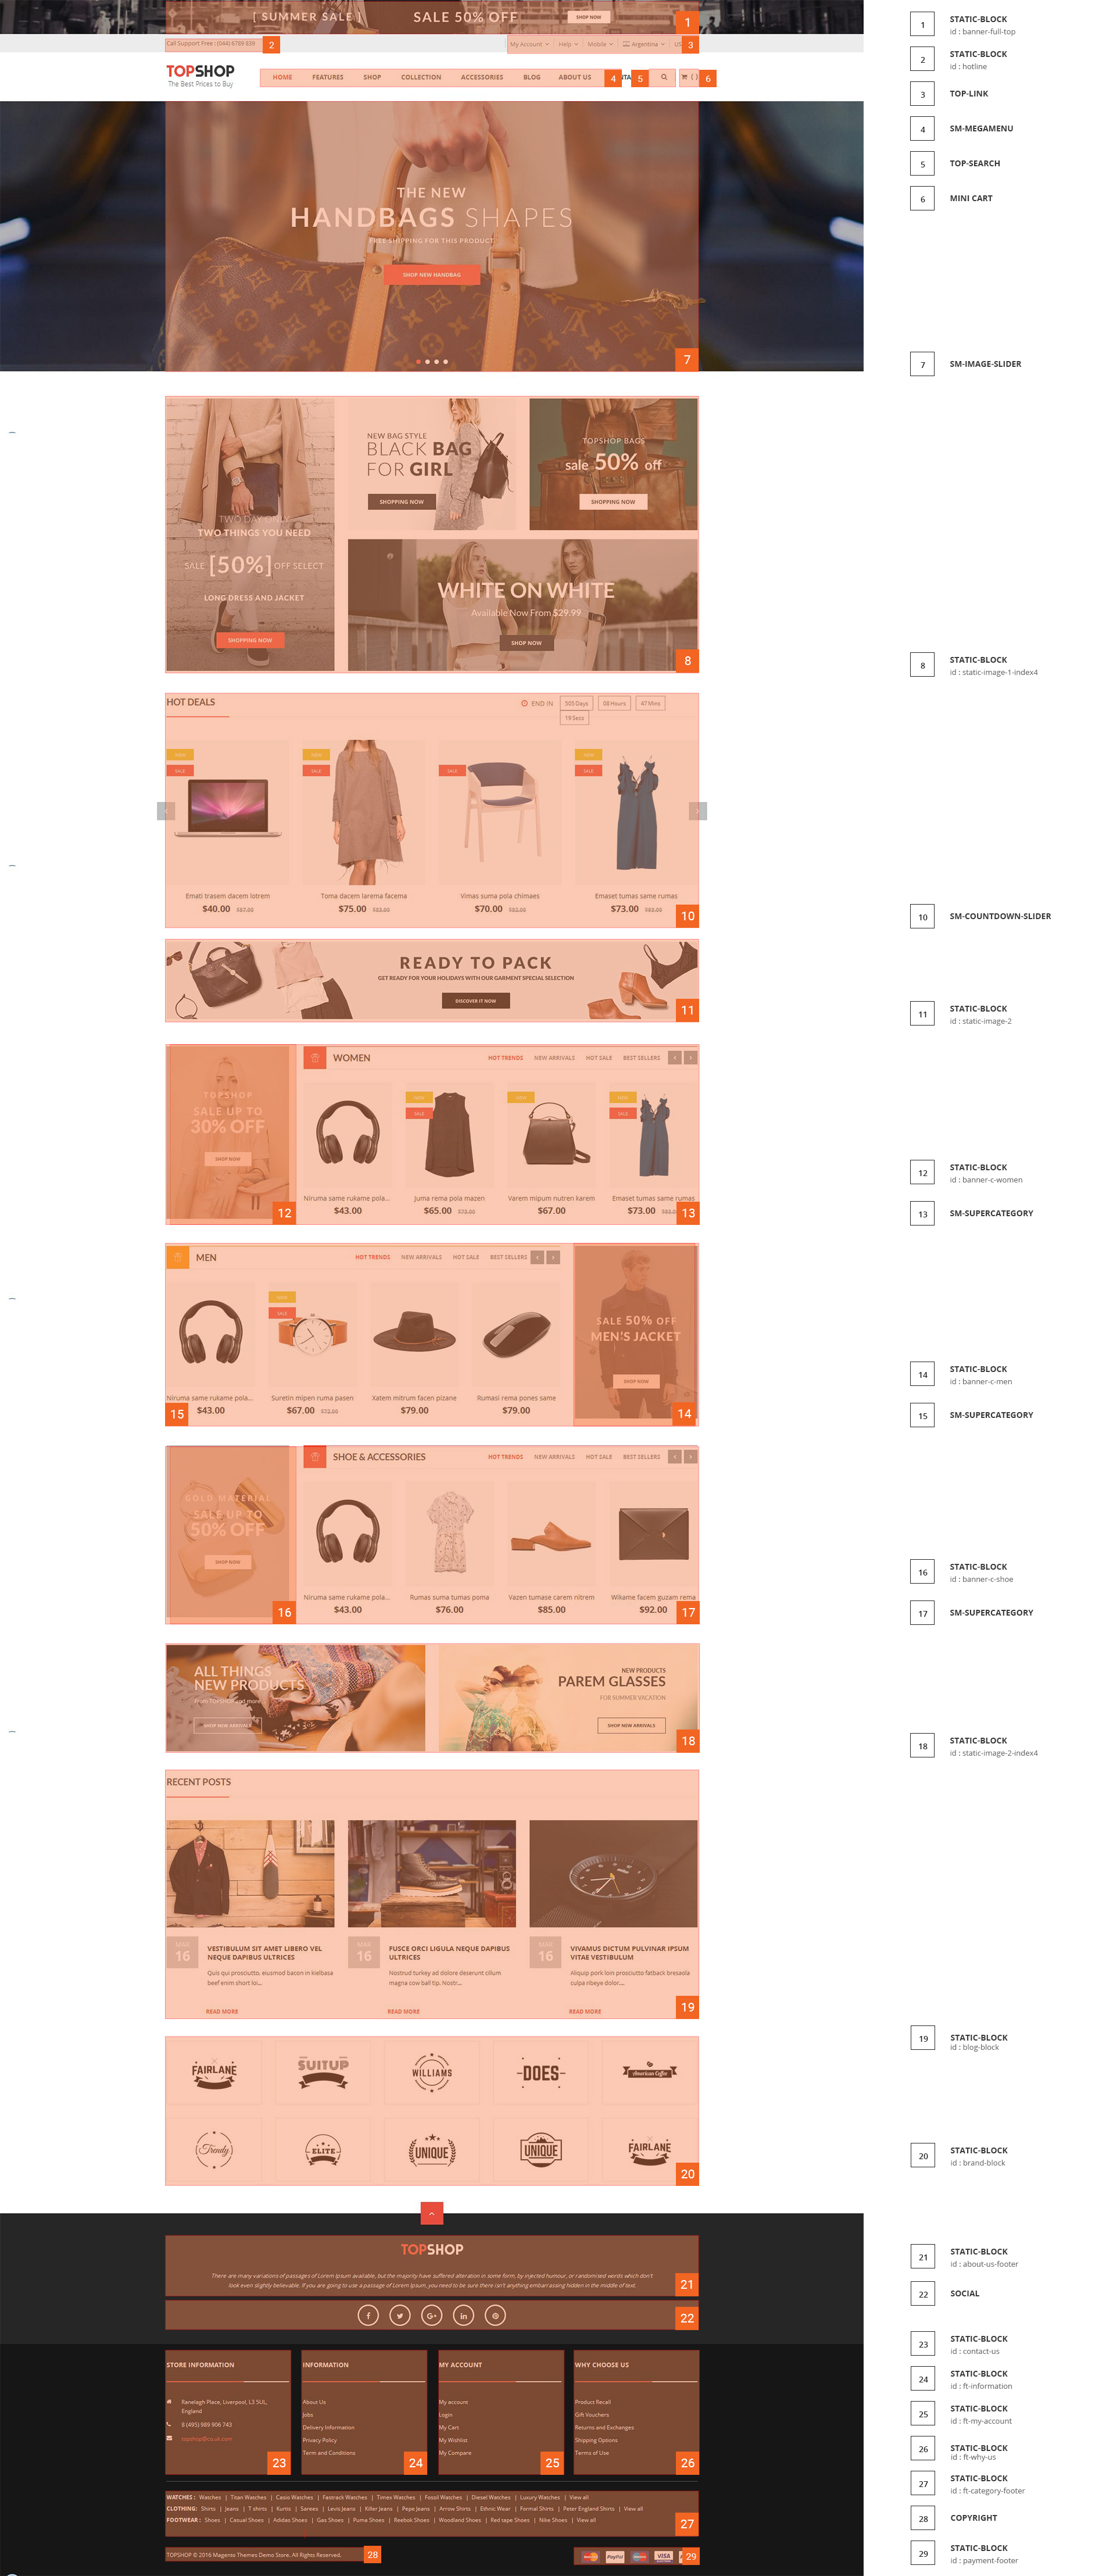
In the Admin Panel, please navigate to Content >> Elements >> Pages to create a new page in Pages section.
- Backend Setting: Please click Here to view.
- Copy and paste the following code into the Content field:
<div class="homepage-wrapper home-style-4"> <div class="full-wrapper banner-top"> <div class="container"> <div class="boxed-container">{{block class="Magento\\Cms\\Block\\Block" block_id="static-image-1-index4"}}</div> <div class="boxed-container hotdeal-custom-wrapper">{{block class="Sm\CountdownProductSlider\Block\CountdownProductSlider" name="countdownproductslider.default" as="countdownproductslider_default" template="Sm_CountdownProductSlider::default.phtml"}}</div> <div class="boxed-container banner-2">{{block class="Magento\\Cms\\Block\\Block" block_id="static-image-2"}}</div> <div class="boxed-container supercategories-wrap women-cate">{{block class="Sm\SuperCategories\Block\SuperCategories" name="supercategories" template="Sm_SuperCategories::default.phtml" product_category="80" nbi_rows="4" pretext="banner-c-women" posttext="" }}</div> <div class="boxed-container supercategories-wrap men-cate supercate-right">{{block class="Sm\SuperCategories\Block\SuperCategories" name="supercategories" template="Sm_SuperCategories::default.phtml" product_category="81" nbi_rows="4" pretext="banner-c-men" posttext="" }}</div> <div class="boxed-container supercategories-wrap shoe-cate">{{block class="Sm\SuperCategories\Block\SuperCategories" name="supercategories" template="Sm_SuperCategories::default.phtml" product_category="98" nbi_rows="4" pretext="banner-c-shoe" posttext="" }}</div> <div class="boxed-container">{{block class="Magento\\Cms\\Block\\Block" block_id="static-image-2-index4"}}</div> <div class="boxed-container">{{block class="Magento\\Cms\\Block\\Block" block_id="blog-block"}}</div> <div class="boxed-container">{{block class="Magento\\Cms\\Block\\Block" block_id="brand-block"}}</div> </div> </div> </div> - Copy and paste the following code into the Layout Update XML field:
<referenceContainer name="main.content">
	<block class="Sm\ImageSlider\Block\ImageSlider" name="imageslider" before="-" template="Sm_ImageSlider::default.phtml"/>
</referenceContainer>
Home Style 5
Frontend of Home Style 5 - Layout Position
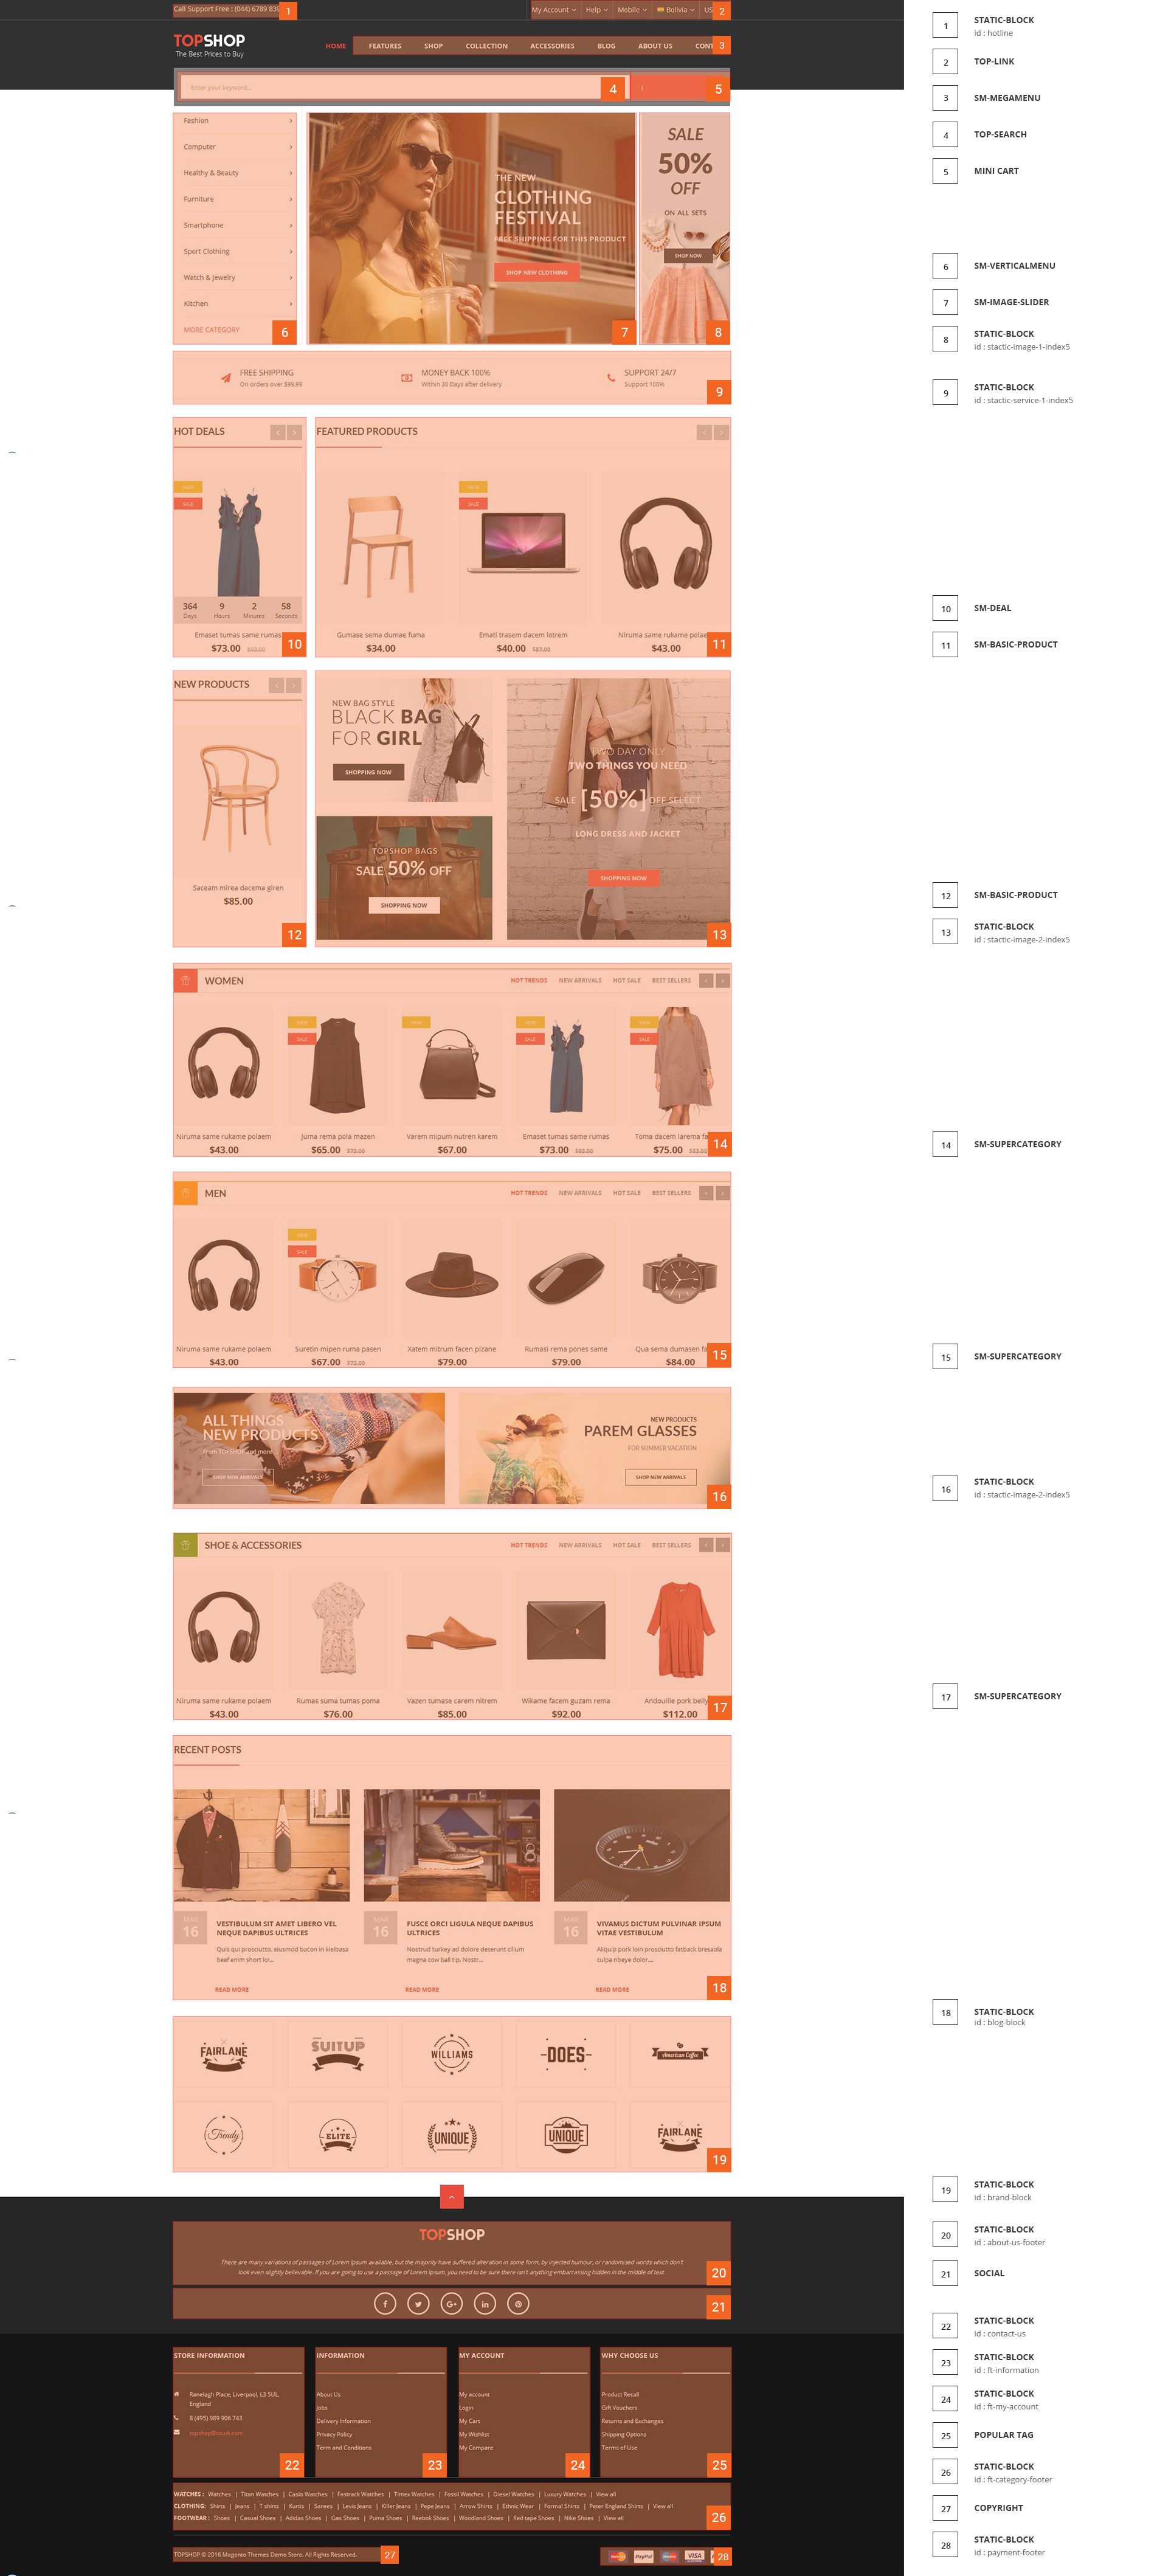
In the Admin Panel, please navigate to Content >> Elements >> Pages to create a new page in Pages section.
- Backend Setting: Please click Here to view.
- Copy and paste the following code into the Content field:
<div class="homepage-wrapper home-style-5">
<div class="full-wrapper banner-top">
<div class="container">
<div class="boxed-container top-full">
<div class="row">
<div class="col-lg-3 col-md-3 hidden-sm vertical-menu-virtual">{{block class="Magento\\Cms\\Block\\Block" block_id="vertical-menu-config"}}</div>
<div class="col-lg-7 col-md-7 col-sm-12 slideshow-box">{{block class="Sm\ImageSlider\Block\ImageSlider" name="imageslider" before="-" template="Sm_ImageSlider::default.phtml"}}</div>
<div class="col-lg-2 col-md-2 hidden-sm hidden-xs banner-box">{{block class="Magento\\Cms\\Block\\Block" block_id="static-image-1-index5"}}</div>
</div>
</div>
<div class="boxed-container">{{block class="Magento\\Cms\\Block\\Block" block_id="static-service-1-index5"}}</div>
<div class="boxed-container deal-featured">
<div class="row">
<div class="col-lg-3 col-md-3 col-sm-4 col-xs-6 slidebar deal-wrapper">{{block class="Sm\Deals\Block\Deals" name="deals" template="Sm_Deals::default-index3.phtml" title="Hot deals" posttext="" nb_column5="1"}}</div>
<div class="col-lg-9 col-md-9 col-sm-8 col-xs-6  slider-basic-wrapper">{{block class="Sm\BasicProducts\Block\BasicProducts" name="basicproducts" template="Sm_BasicProducts::slider-index3.phtml" title="Featured Products" product_order_by="price" product_category="11" product_limitation="6" nb_column1="3" nb_column2="3" nb_column3="2" nb_column4="1" nb_column5="1" }}</div>
</div>
</div>
<div class="boxed-container new-banner">
<div class="row">
<div class="col-lg-3 col-md-3 col-sm-4 col-xs-12 slidebar">
<div class="slider-basic-wrapper">{{block class="Sm\BasicProducts\Block\BasicProducts" template="Sm_BasicProducts::slider-index5.phtml" title="New Products" product_order_by="created_at" product_category="11" product_limitation="6" nb_column1="1" nb_column2="1" nb_column3="1" nb_column4="2" nb_column5="1" }}</div>
</div>
<div class="col-lg-9 col-md-9 col-sm-8 col-xs-12 banner-custom-wrapper">
<div class="banner-wrapper">{{block class="Magento\\Cms\\Block\\Block" block_id="static-image-2-index5"}}</div>
</div>
</div>
</div>
<div class="boxed-container supercategories-wrap women-cate">{{block class="Sm\SuperCategories\Block\SuperCategories" name="supercategories" template="Sm_SuperCategories::default.phtml" product_category="80" nbi_rows="5" pretext="" posttext="" }}</div>
<div class="boxed-container supercategories-wrap men-cate">{{block class="Sm\SuperCategories\Block\SuperCategories" name="supercategories" template="Sm_SuperCategories::default.phtml" product_category="81" nbi_rows="5" pretext="" posttext="" }}</div>
<div class="boxed-container">{{block class="Magento\\Cms\\Block\\Block" block_id="static-image-2-index4"}}</div>
<div class="boxed-container supercategories-wrap shoe-cate">{{block class="Sm\SuperCategories\Block\SuperCategories" name="supercategories" template="Sm_SuperCategories::default.phtml" product_category="98" nbi_rows="5" pretext="" posttext="" }}</div>
<div class="boxed-container latest-post-wrapper">
<div class="slider-latest-blog">{{block class="Magento\\Cms\\Block\\Block" block_id="blog-block"}}</div>
</div>
<div class="boxed-container brand-wraper">{{block class="Magento\\Cms\\Block\\Block" block_id="brand-block"}}</div>
</div>
</div>
</div>
3.2 Configure Megamenu
- Step 1: Create a New Menu In Admin Panel, navigate to SM Megamenu >> Add New Menu (add group: "Mega Menu Horizon.
- Step 2: Navigate to SM Megamenu >> Configuration & fill the ID number for the created menu in step 1
- Step 3: In order to add menu items, go to SM Megamenu >> Menu Manager >> click on 'Edit'to open Menu Items to add items as you want
3.2.1 Horizontal Megamenu:

- Sortable Categories Items Please click Here to view.
Features
Frontend Appearance 
- Backend Settings: Please click Here to view.
- Backend of 'Dropdown Features': Please click Here to view.
Copy and paste the following code into the content editor:
<div class="home-menu-dropdown">
	<ul class="item-home-store layout-home">
		<li class="title-menu-home">Layouts</li>
		<li><a title="Home Style 1" href="{{store url="?___store=default&___from_store=french"}}">Home Style 1</a></li>
		<li><a title="Home Style 2" href="{{store url="?___store=french&___from_store=default"}}">Home Style 2</a></li>
		<li><a title="Home Style 3" href="{{store url="?___store=german&___from_store=default"}}">Home Style 3</a></li>
		<li><a title="Home Style 4" href="{{store url="?___store=argentina&___from_store=default"}}">Home Style 4</a></li>
		<li><a title="Home Style 5" href="{{store url="?___store=bolivia&___from_store=default"}}">Home Style 5</a></li>
		<li><a title="Boxed Layout" href="{{store url="?___store=somaliland&___from_store=default"}}">Boxed Layout</a></li>
	</ul>

	<ul class="item-home-store header-home">
		<li class="title-menu-home">Headers</li>
		<li><a title="Header Type 1" href="{{store url="?___store=default&___from_store=french"}}">Header Type 1</a></li>
		<li><a title="Header Type 2" href="{{store url="?___store=french&___from_store=default"}}">Header Type 2</a></li>
		<li><a title="Header Type 3" href="{{store url="?___store=german&___from_store=default"}}">Header Type 3</a></li>
		<li><a title="Header Type 4" href="{{store url="?___store=argentina&___from_store=default"}}">Header Type 4</a></li>
		<li><a title="Header Type 5" href="{{store url="?___store=bolivia&___from_store=default"}}">Header Type 5</a></li>
	</ul>

	<ul class="item-home-store theme-color">
		<li class="title-menu-home">Color Styles</li>
		<li class="blue"><a title="Blue" href="{{store url="?___store=belgium&___from_store=default"}}">Blue</a></li>
		<li class="brown"><a title="Brown" href="{{store url="?___store=australia&___from_store=default"}}">Brown</a></li>
		<li class="cyan"><a title="Cyan" href="{{store url="?___store=japan&___from_store=default"}}">Cyan</a></li>
		<li class="green"><a title="Green" href="{{store url="?___store=andorra&___from_store=default"}}">Green</a></li>
		<li class="orange"><a title="Orange" href="{{store url="?___store=vietnam&___from_store=default"}}">Orange</a></li>
		<li class="pink"><a title="Pink" href="{{store url="?___store=benin&___from_store=default"}}">Pink</a></li>
		<li class="teal"><a title="Teal" href="{{store url="?___store=barbados&___from_store=default"}}">Teal</a></li>
		<li class="red"><a title="Red" href="{{store url="?___store=default&___from_store=default"}}">Red</a></li>
	</ul>

	<ul class="item-home-store layout-home">
		<li class="title-menu-home">404 Page Layout</li>
		<li><a title="404 Page Style 1" href="{{store url="404page"}}">404 Page Style 1</a></li>
	</ul>

	<div style="clear:both;"> </div>

</div>
Shop
Frontend Appearance 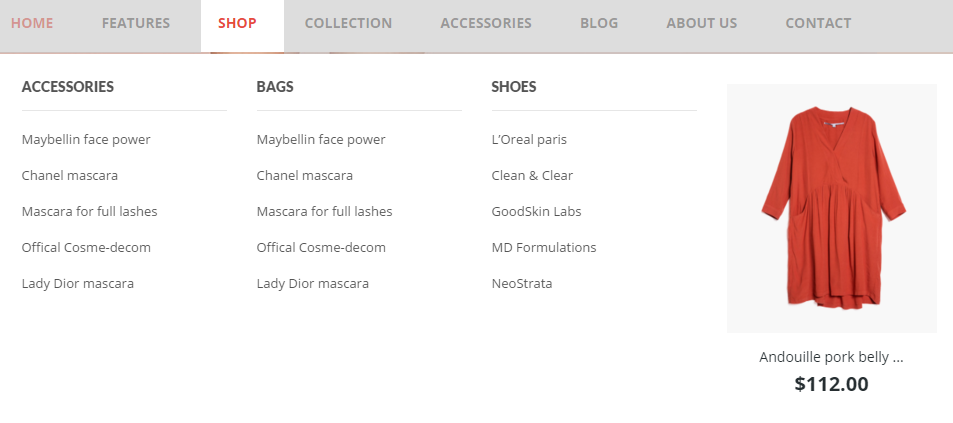
- Backend Settings: Please click Here to view.
- Backend of 'Group 1': Please click Here to view.
Note: Do the same with item 'Group 2'
- Backend of 'Accessories - Women' in the 'Group 1': Please click Here to view.
- Backend of 'Bag - Women' in the 'Group 1': Please click Here to view.
Note: Do the same with other items having same level as 'Bag - Women' in the 'Group 1'
- Backend of 'Shoes - Women' in the 'Group 2': Please click Here to view.
- Backend of 'Product Slider - Men' in the 'Group 2': Please click Here to view.
Note: Do the same with other items having same level as 'Product Slider - Men' in the 'Group 2'
Collection
Frontend Appearance 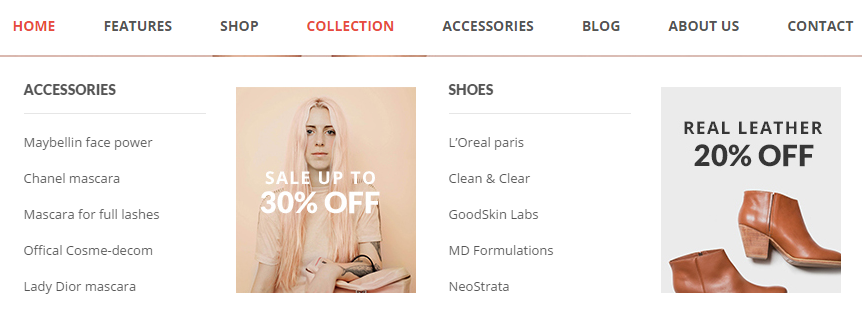
- Backend Settings: Please click Here to view.
- Backend of 'Group 1': Please click Here to view.
Note: Do the same with item 'Group 2'
- Backend of 'Accessories - Women' in the 'Group 1': Please click Here to view.
- Backend of 'Image 1' in the 'Group 1': Please click Here to view.
Copy and paste the following code into the content:
<div class="static-image-menu">
<a title="Static Image" href="#">
<img src="{{media url="wysiwyg/image-megamenu/img-megamenu-4.jpg"}}" alt="Static Image" />
</a>
</div>
- Backend of 'Shoes-Women' in the 'Group 2': Please click Here to view.
- Backend of 'Image 2' in the 'Group 2': Please click Here to view.
Copy and paste the following code into the content:
<div class="static-image-menu">
<a title="Static Image" href="#">
<img src="{{media url="wysiwyg/image-megamenu/img-megamenu-5.jpg"}}" alt="Static Image" />
</a>
</div>
Accessories
Frontend Appearance 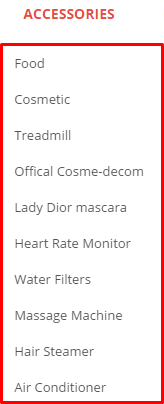
- Backend Settings: Please click Here to view.
- Backend of 'Accessories' in the 'Accessories': Please click Here to view.
Blog
Frontend Appearance 
- Backend Settings: Please click Here to view.
About Us
Frontend Appearance 
- Backend Settings: Please click Here to view.
Contact
Frontend Appearance 
- Backend Settings: Please click Here to view.
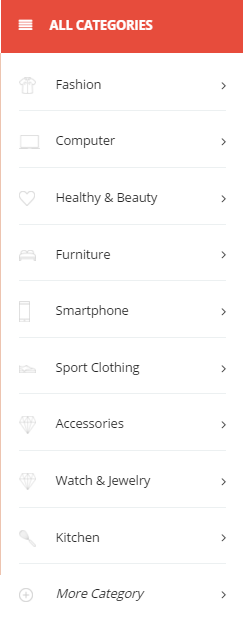
3.2.2 Vertical Megamenu:

- Sortable Categories Items Please click Here to view.
Fashion
Frontend Appearance 
- Backend Settings: Please click Here to view.
- Backend of 'Row 1': Please click Here to view.
Note: Do the same with item 'Row 2'
- Backend of 'T-shirt' in the 'Row 1': Please click Here to view.
- Backend of 'Dress' in the 'Row 1': Please click Here to view.
- Backend of 'Shoes' in the 'Row 1': Please click Here to view.
- Backend of 'Bags' in the 'Row 2': Please click Here to view.
- Backend of 'Dress' in the 'Row 2': Please click Here to view.
- Backend of 'Shoes' in the 'Row 2': Please click Here to view.
Computer
Frontend Appearance 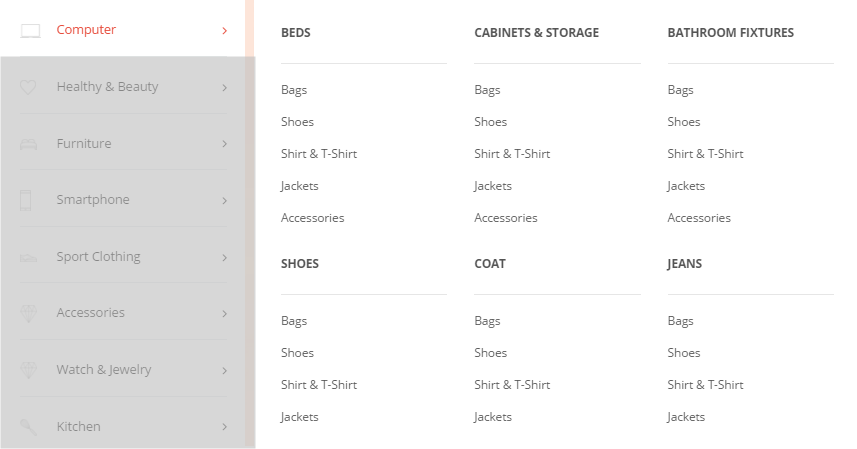
- Backend Settings: Please click Here to view.
http://www.smartaddons.com/images_amazon/sm-magento-images/magento-themes/sm-topshop-magentov211/config-megamenu/vertical/computer-computer column 1-backend.png" target="_bla
- Backend of 'Computer Column 1': Please click Here to view.
Note: Do the same with item 'Computer Column 2'
- Backend of 'Col 1' in the 'Computer Column 1': Please click Here to view.
Note: The item named 'Col 2' in the 'Computer Column 1' and 'Col 1', 'Col 2' in the 'Computer Column 2' having same menu level (Level 3) as item 'Col 1' could have the same configuration. However, you should be aware that the Parent Item of 'Col 1', 'Col 2' in the 'Computer Column 2' is different.
- Backend of 'Beds' in the 'Col 1': Please click Here to view.
Note: Do the same with item 'Cabinets & Storage' in the 'Col 2'
- Backend of 'Shoes' in the 'Col 1': Please click Here to view.
Note: Do the same with item 'Coat' in 'the 'Col 2'
- Backend of 'Bathroom Fixtures' in the 'Col 1': Please click Here to view.
- Backend of 'Banner' in the 'Col 2': Please click Here to view.
Copy and paste the following code into the content:
<div class="static-image-menu ab-right">
<a title="Static Image" href="#">
<img src="{{media url="wysiwyg/image-megamenu/img-megamenu.jpg"}}" alt="Static Image" />
</a>
</div>
Healthy & Beauty
Frontend Appearance 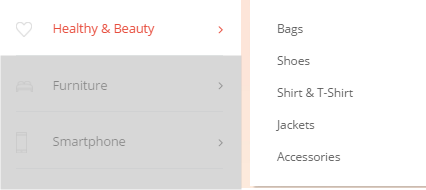
- Backend Settings: Please click Here to view.
- Backend of 'Sub list' in the 'Healthy & Beauty': Please click Here to view.
Furniture
Frontend Appearance 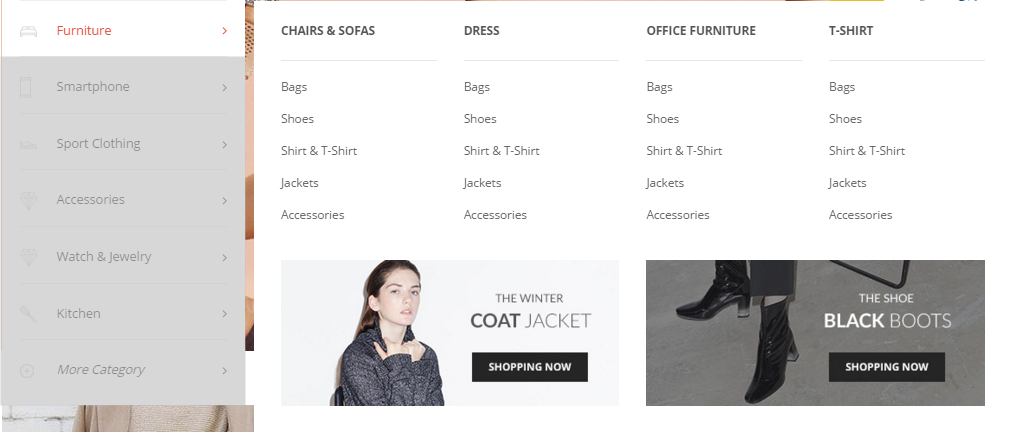
- Backend Settings: Please click Here to view.
- Backend of 'Row 1' in the 'Furniture': Please click Here to view.
- Backend of 'Fu.. R1 Column 1' in the 'Row 1': Please click Here to view.
- Backend of 'Col 1'in the'Fu.. R1 Column 1': Please click Here to view.
Note: Do the same with item 'Col 2'
- Backend of 'Chairs & Sofas'in the'Col 1': Please click Here to view.
Note: Do the same with item 'Dress'
- Backend of 'Fu.. R1 Column 2' in the 'row1': Please click Here to view.
- Backend of 'Col 1'in the'Fu.. R1 Column 2': Please click Here to view.
Note: Do the same with item 'Col 2'
- Backend of 'Office Furniture'in the'Col 1': Please click Here to view.
Note: Do the same with item 'T-shirt'
- Backend of 'Banner 2'in the'Fu.. Row 2': Please click Here to view.
Copy and paste the following code into the content:
<a title="Static Image" href="#"><img src="{{media url="wysiwyg/image-megamenu/img-megamenu-2.jpg"}}" alt="Static Image" /></a>
- Backend of 'Banner 3'in the'Fu.. Row 2': Please click Here to view.
Copy and paste the following code into the content:
<a title="Static Image" href="#"><img src="{{media url="wysiwyg/image-megamenu/img-megamenu-3.jpg"}}" alt="Static Image" /></a>
Smartphone
Frontend Appearance 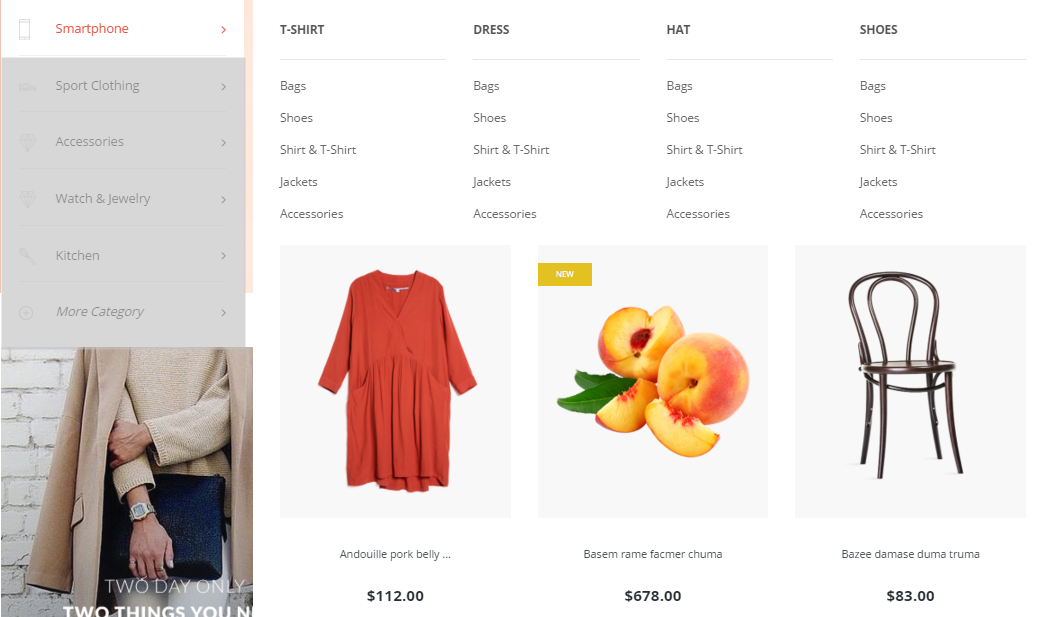
- Backend Settings: Please click Here to view.
- Backend of 'Row 1': Please click Here to view.
Note: Do the same with item 'Fu.. Row 2'
- Backend of 'Fu.. R1 Column 1' in the 'Row 1': Please click Here to view.
Note: Do the same with item 'Fu.. R1 Column 2'
- Backend of 'Col 1' in the 'Fu.. R1 Column 1': Please click Here to view.
Note: Do the same with item 'Col 2'
- Backend of 'T-shirt' in the 'Col 1': Please click Here to view.
Note: Do the same with item 'Dress'
- Backend of 'Col 1' in the 'Fu.. R1 Column 2': Please click Here to view.
Note: Do the same with item 'Col 2'
- Backend of 'Hat' in the 'Col 1': Please click Here to view.
Note: Do the same with item 'Shoes'
- Backend of 'Banner 3'in the'Fu.. Row 2': Please click Here to view.
Copy and paste the following code into the content:
<a title="Static Image" href="#"><img src="{{media url="wysiwyg/image-megamenu/img-megamenu-3.jpg"}}" alt="Static Image" /></a>
Sport Clothing
Frontend Appearance 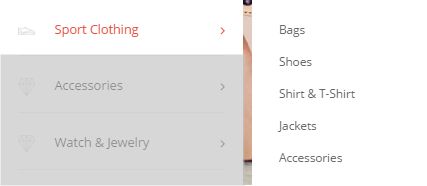
- Backend Settings: Please click Here to view.
- Backend of 'Sub list' in the 'Sport Clothing': Please click Here to view.
Accessories
Frontend Appearance 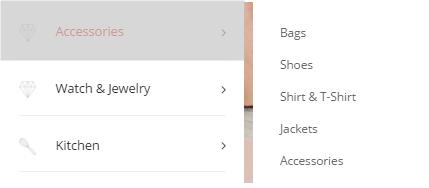
- Backend Settings: Please click Here to view.
- Backend of 'Sub list' in the 'Accessories': Please click Here to view.
Watch & Jewelry
Frontend Appearance 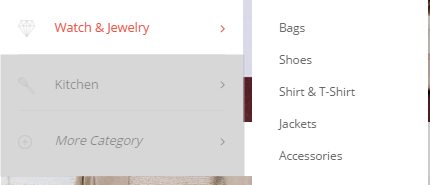
- Backend Settings: Please click Here to view.
- Backend of 'Sub list' in the 'Watch & Jewelry': Please click Here to view.
Kitchen
Frontend Appearance 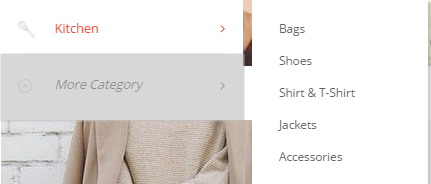
- Backend Settings: Please click Here to view.
- Backend of 'Sub list' in the 'Kitchen': Please click Here to view.
More Category
Frontend Appearance 
- Backend Settings: Please click Here to view.
3.3 Configure Extensions
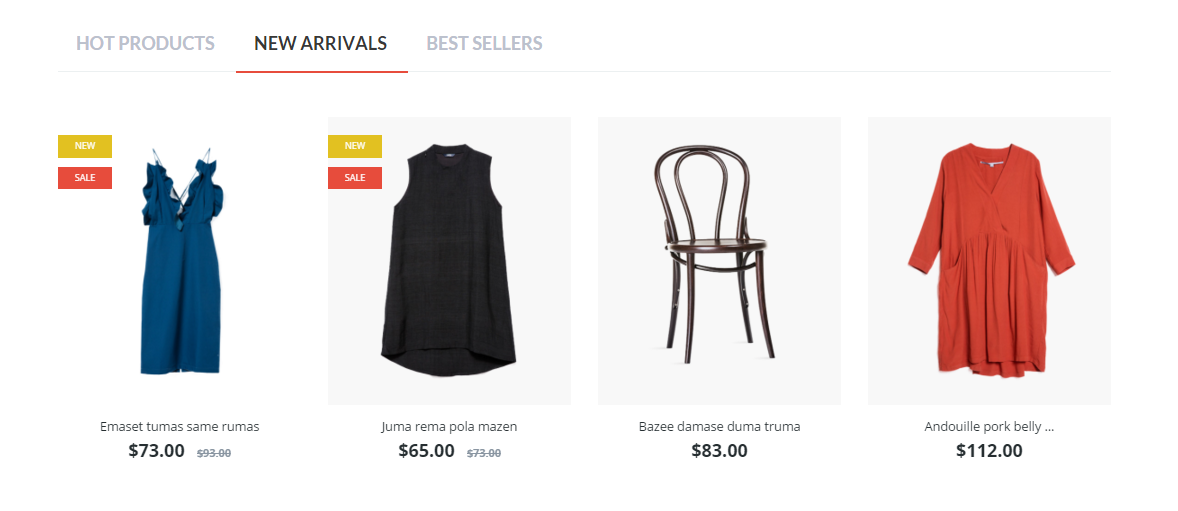
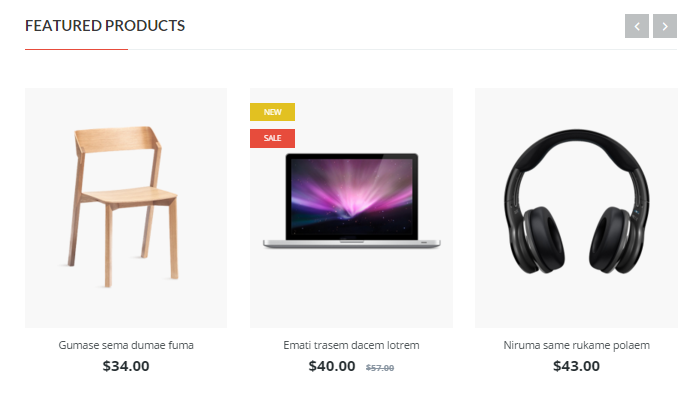
The SM topshop front-page has been integrated with the extensions in the following list:
- SM Listing Tabs
- SM Basic Products
- SM Megamenu
- SM Countdown Product Slider
- SM Image Slider
- SM Super Categories
- SM Deals
- SM Cart Quick Pro
In SM topshop Administration Page, please navigate to Stores>> Settings>> Configuration >> MAGENTECH.COM to configure extensions as you want.
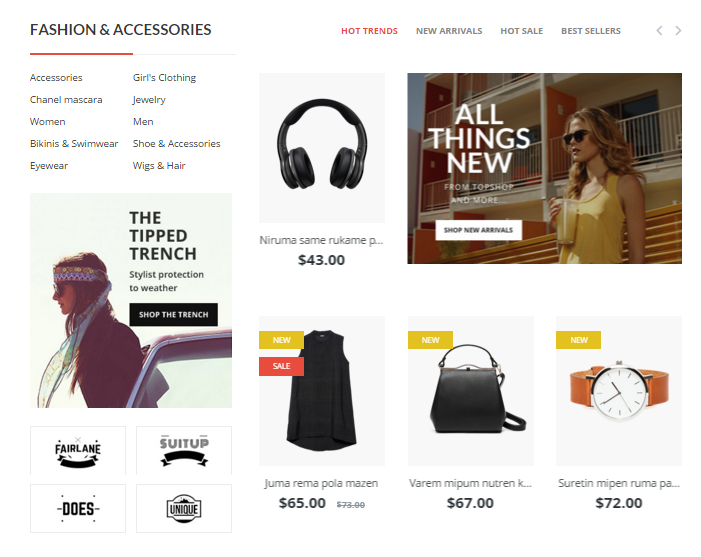
- Position: SM Listing Tabs
- Frontend Appearance
- Backend of SM Listing Tabs: Click Here
- Position: SM Basic Products
- Frontend Appearance
- Backend of SM Basic Products: Click Here
- Position: SM Megamenu
- Frontend Appearance
Horizontal Megamenu

Vertical Megamenu
- Backend of SM Megamenu: Click Here
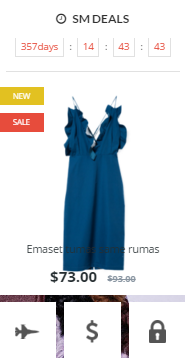
- Position: SM Countdown Product Slider
- Frontend Appearance
- Backend of SM Countdown Product Slider: Click Here
- Position: SM Image Slider
- Frontend Appearance
- Position: SM Super Categories
- Frontend Appearance
- Backend of SM Super Categories: Click Here
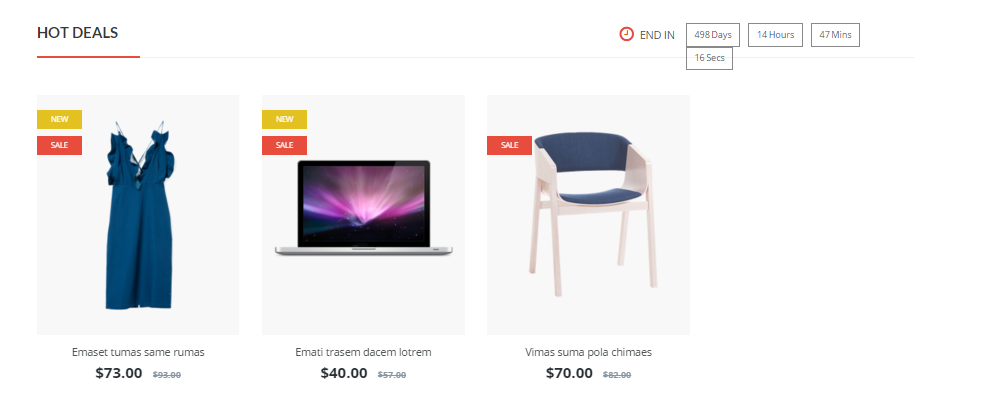
- Position: SM Deals
- Frontend Appearance
- Backend of SM Deals: Click Here
- Position: SM Cart Quick Pro
- Frontend Appearance
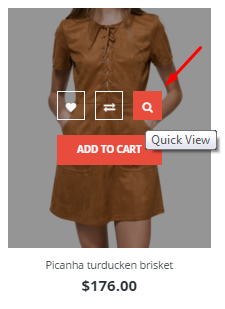
- Backend of SM Cart Quick Pro: Click Here
3.4 Configure Static Blocks
The SM topshop front-page has the following static blocks in the theme:
- Static Block:hotline
- Static Block:banner-full-top
- Static Block:banner-link-deal
- Static Block:static-image-1
- Static Block:static-image-2
- Static Block:blog-block
- Static Block:brand-block
- Static Block:about-us-footer
- Static Block:contact-us
- Static Block:ft-information
- Static Block:ft-my-account
- Static Block:ft-why-us
- Static Block:ft-category-footer
- Static Block:payment-footer
- Static Block:static-image-1-index2
- Static Block:blog-block-index2
- Static Block:static-image-1-index3
- Static Block:static-image-2-index3
- Static Block:static-image-3-index3
- Static Block:static-image-4-index3
- Static Block:blog-block-index3
- Static Block:static-image-1-index4
- Static Block:banner-c-women
- Static Block:banner-c-men
- Static Block:banner-c-shoe
- Static Block:static-image-2-index4
- Static Block:static-image-1-index5
- Static Block:static-service-1-index5
- Static Block:static-image-2-index5
- Static Block:vertical-menu-config
To create a new static block, go to Content>> Elements>> Blocks >> Add new block.
Static Block: hotline
To create the static block, go to Content>> Elements>> Blocks with Identifier * : "hotline"
Frontend Appearance 
- Backend Setting: Please click Here to view.
Copy and paste the following code into the content tab of this static block:
<p>Call Support Free : (044) 6789 839</p>
To create the static block, go to Content>> Elements>> Blocks with Identifier * : "banner-full-top"
Frontend Appearance 
- Backend Setting: Please click Here to view.
Copy and paste the following code into the content tab of this static block:
<p><a title="Static Image" href="#"><img class="img-static" src="{{media url="wysiwyg/home-page-image/home-1/banner-full-top.jpg"}}" alt="Image static" /></a></p>
To create the static block, go to Content>> Elements>> Blocks with Identifier * : "banner-link-deal"
Frontend Appearance 
- Backend Setting: Please click Here to view.
Copy and paste the following code into the content tab of this static block:
<ul>
<li><a href="#"><img src="{{media url="wysiwyg/home-page-image/home-1/plicy-1.png"}}" alt="" /></a></li>
<li><a href="#"><img src="{{media url="wysiwyg/home-page-image/home-1/plicy-2.png"}}" alt="" /></a></li>
<li><a href="#"><img src="{{media url="wysiwyg/home-page-image/home-1/plicy-3.png"}}" alt="" /></a></li>
</ul>
Static Block: static-image-1
To create the static block, go to Content>> Elements>> Blocks with Identifier * : "static-image-1"
Frontend Appearance 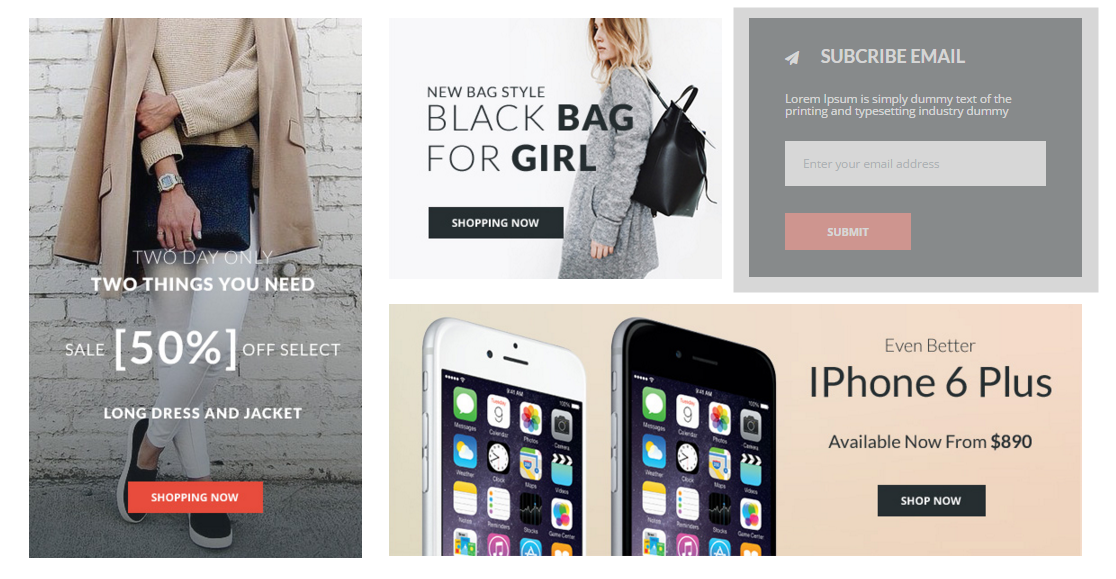
- Backend Setting: Please click Here to view.
Copy and paste the following code into the content tab of this static block:
<div class="row banner-list static-image-1">
<div class="col-lg-4 col-md-4 col-xs-4"><a class="first-image" title="Static Image" href="#"><img class="img-static" src="{{media url="wysiwyg/home-page-image/home-1/image-1.jpg"}}" alt="Static Image" /></a></div>
<div class="col-lg-8 col-md-8 col-xs-8">
<div class="row">
<div class="col-lg-6 col-md-6 col-xs-6"><a class="first-image" title="Static Image" href="#"><img class="img-static" src="{{media url="wysiwyg/home-page-image/home-1/image-2.jpg"}}" alt="Static Image" /></a></div>
<div class="col-lg-6 col-md-6 col-xs-6 newsletter-wrap">{{block class="Magento\Newsletter\Block\Subscribe" template="subscribe.phtml"}}</div>
</div>
<div class="row">
<div class="col-lg-12 col-md-12"><a class="first-image" title="Static Image" href="#"><img class="img-static" src="{{media url="wysiwyg/home-page-image/home-1/image-3.jpg"}}" alt="Static Image" /></a></div>
</div>
</div>
</div>
Static Block: static-image-2
To create the static block, go to Content>> Elements>> Blocks with Identifier * : "static-image-2"
Frontend Appearance 
- Backend Setting: Please click Here to view.
Copy and paste the following code into the content tab of this static block:
<div class="row banner-list static-image-2">
<div class="col-lg-12 col-md-12"><a class="first-image" title="Static Image" href="#"><img class="img-static" src="{{media url="wysiwyg/home-page-image/home-1/image-4.jpg"}}" alt="Static Image" /></a></div>
</div>
Static Block: blog-block
To create the static block, go to Content>> Elements>> Blocks with Identifier * : "blog-block"
Frontend Appearance 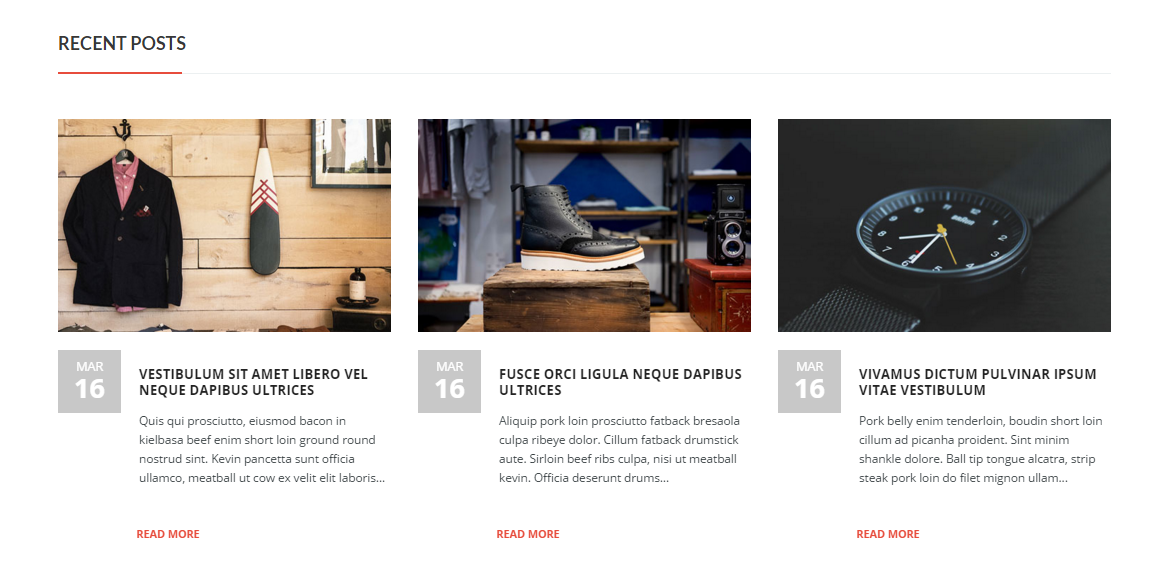
- Backend Setting: Please click Here to view.
Copy and paste the following code into the content tab of this static block:
<div class="box-content latest-post-block">
<div class="slider-latest-blog">
<div class="title-home">
<h2>Recent posts</h2>
</div>
<div class="slider-blog latest-post">
<div class="item">
<div class="blog-item-content">
<div class="image-blog"><a class="img-link" title="Vestibulum sit amet libero vel neque dapibus ultrices" href="#"><img src="{{media url="wysiwyg/blog/blog-7.jpg"}}" alt="Image Blog" /></a></div>
<div class="info-blog">
<div class="postTitle">
<div class="postDate"><span class="month">Mar</span><span class="date">16</span></div>
<h2><a href="#">Vestibulum sit amet libero vel neque dapibus ultrices</a></h2>
</div>
<div class="postContent">Quis qui prosciutto, eiusmod bacon in kielbasa beef enim short loin ground round nostrud sint. Kevin pancetta sunt officia ullamco, meatball ut cow ex velit elit laboris...</div>
<div class="action-post"><a class="btn-readmore" title="Read More" href="#">Read More</a></div>
</div>
</div>
</div>
<div class="item">
<div class="blog-item-content">
<div class="image-blog"><a class="img-link" title="Fusce orci ligula neque dapibus ultrices" href="#"><img src="{{media url="wysiwyg/blog/blog-4.jpg"}}" alt="Image Blog" /></a></div>
<div class="info-blog">
<div class="postTitle">
<div class="postDate"><span class="month">Mar</span><span class="date">16</span></div>
<h2><a href="#">Fusce orci ligula neque dapibus ultrices</a></h2>
</div>
<div class="postContent">Aliquip pork loin prosciutto fatback bresaola culpa ribeye dolor. Cillum fatback drumstick aute. Sirloin beef ribs culpa, nisi ut meatball kevin. Officia deserunt drums...</div>
<div class="action-post"><a class="btn-readmore" title="Read More" href="#">Read More</a></div>
</div>
</div>
</div>
<div class="item">
<div class="blog-item-content">
<div class="image-blog"><a class="img-link" title="Vivamus dictum pulvinar ipsum vitae vestibulum" href="#"><img src="{{media url="wysiwyg/blog/blog-3.jpg"}}" alt="Image Blog" /></a></div>
<div class="info-blog">
<div class="postTitle">
<div class="postDate"><span class="month">Mar</span><span class="date">16</span></div>
<h2><a href="#">Vivamus dictum pulvinar ipsum vitae vestibulum</a></h2>
</div>
<div class="postContent">Pork belly enim tenderloin, boudin short loin cillum ad picanha proident. Sint minim shankle dolore. Ball tip tongue alcatra, strip steak pork loin do filet mignon ullam...</div>
<div class="action-post"><a class="btn-readmore" title="Read More" href="#">Read More</a></div>
</div>
</div>
</div>
<div class="item">
<div class="blog-item-content">
<div class="image-blog"><a class="img-link" title="Morbi in turpis vel ante feugiat placerat" href="#"><img src="{{media url="wysiwyg/blog/blog-1.jpg"}}" alt="Image Blog" /></a></div>
<div class="info-blog">
<div class="postTitle">
<div class="postDate"><span class="month">Mar</span><span class="date">16</span></div>
<h2><a href="#">Morbi in turpis vel ante feugiat placerat</a></h2>
</div>
<div class="postContent">We welcome Lauren Manoogian to Need Supply Co. this fall. This eponymous label of one very talented Brooklyn designer is defined by soft knits and sculptural cuts.</div>
<div class="action-post"><a class="btn-readmore" title="Read More" href="#">Read More</a></div>
</div>
</div>
</div>
</div>
<script type="text/javascript">// <![CDATA[
	jQuery(document).ready(function($) {
	var post_slider = $(".slider-blog.latest-post");
	post_slider.owlCarousel({
	responsive:{
		0:{
			items:1
		},
		480:{
			items:1
		},
		768:{
			items:2
		},
		992:{
			items:2
		},
		1200:{
			items:3
		}
	},
	autoplay:false,
	loop:false,
	nav : false,
	dots: false,
	autoplaySpeed : 500,
	navSpeed : 500,
	dotsSpeed : 500,
	autoplayHoverPause: true,
	margin:30,
	});
	});
// ]]></script>
</div>
</div>
Static Block: brand-block
To create the static block, go to Content>> Elements>> Blocks with Identifier * : "brand-block"
Frontend Appearance 
- Backend Setting: Please click Here to view.
Copy and paste the following code into the content tab of this static block:
<div class="brand-block">
<div class="title-home">
<h2>Our brand</h2>
</div>
<div class="brand-content">
<ul class="list-brands row">
<li class="col-lg-2 col-md-2 col-sm-3"><a title="Brand" href="#"><img src="{{media url="wysiwyg/brand/br01.jpg"}}" alt="Brand" /></a></li>
<li class="col-lg-2 col-md-2 col-sm-3"><a title="Brand" href="#"><img src="{{media url="wysiwyg/brand/br02.jpg"}}" alt="Brand" /></a></li>
<li class="col-lg-2 col-md-2 col-sm-3"><a title="Brand" href="#"><img src="{{media url="wysiwyg/brand/br03.jpg"}}" alt="Brand" /></a></li>
<li class="col-lg-2 col-md-2 col-sm-3"><a title="Brand" href="#"><img src="{{media url="wysiwyg/brand/br04.jpg"}}" alt="Brand" /></a></li>
<li class="col-lg-2 col-md-2 col-sm-3"><a title="Brand" href="#"><img src="{{media url="wysiwyg/brand/br05.jpg"}}" alt="Brand" /></a></li>
<li class="col-lg-2 col-md-2 col-sm-3"><a title="Brand" href="#"><img src="{{media url="wysiwyg/brand/br06.jpg"}}" alt="Brand" /></a></li>
<li class="col-lg-2 col-md-2 col-sm-3"><a title="Brand" href="#"><img src="{{media url="wysiwyg/brand/br07.jpg"}}" alt="Brand" /></a></li>
<li class="col-lg-2 col-md-2 col-sm-3"><a title="Brand" href="#"><img src="{{media url="wysiwyg/brand/br08.jpg"}}" alt="Brand" /></a></li>
<li class="col-lg-2 col-md-2 col-sm-3"><a title="Brand" href="#"><img src="{{media url="wysiwyg/brand/br09.jpg"}}" alt="Brand" /></a></li>
<li class="col-lg-2 col-md-2 col-sm-3"><a title="Brand" href="#"><img src="{{media url="wysiwyg/brand/br10.jpg"}}" alt="Brand" /></a></li>
</ul>
</div>
</div>
To create the static block, go to Content>> Elements>> Blocks with Identifier * : "about-us-footer"
Frontend Appearance 
- Backend Setting: Please click Here to view.
Copy and paste the following code into the content tab of this static block:
<p><img src="{{media url="wysiwyg/footer/footer-logo.png"}}" alt="Topshop - Responsive Magento Theme for Multipurpose" /></p>
<p>There are many variations of passages of Lorem Ipsum available, but the majority have suffered alteration in some form, by injected humour, or randomised words which don't look even slightly believable. If you are going to use a passage of Lorem Ipsum, you need to be sure there isn't anything embarrassing hidden in the middle of text.</p>
Static Block: ft-contact-us
To create the static block, go to Content>> Elements>> Blocks with Identifier * : "ft-contact-us"
Frontend Appearance 
- Backend Setting: Please click Here to view.
Copy and paste the following code into the content tab of this static block:
<div class="block ft-contact-us">
<div class="title">Store Information</div>
<div class="content">
<p class="address"><em class="fa fa-home"></em>Ranelagh Place, Liverpool, L3 5UL, England</p>
<p class="phone"><em class="fa fa-phone"></em><a title="Telephone" href="#">8 (495) 989 906 743</a></p>
<p class="email"><em class="fa fa-envelope"></em><a title="Mail to: topshop@co.uk.com" href="mailto:topshop@co.uk.com">topshop@co.uk.com</a></p>
</div>
</div>
Static Block: ft-information
To create the static block, go to Content>> Elements>> Blocks with Identifier * : "ft-information"
Frontend Appearance 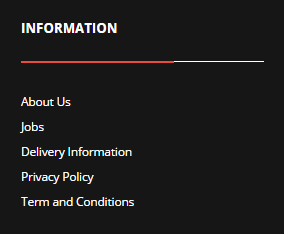
- Backend Setting: Please click Here to view.
Copy and paste the following code into the content tab of this static block:
<div class="block ft-information">
<div class="title">INFORMATION</div>
<div class="content">
<ul>
<li><a title="About Us" href="{{config path="web/secure/base_url"}}about-us.html">About Us</a></li>
<li><a title="Jobs" href="#">Jobs</a></li>
<li><a title="Delivery Information" href="#">Delivery Information</a></li>
<li><a title="Privacy Policy" href="#">Privacy Policy</a></li>
<li><a title="Term and Conditions" href="#">Term and Conditions</a></li>
</ul>
</div>
</div>
Static Block: ft-my-account
To create the static block, go to Content>> Elements>> Blocks with Identifier * : "ft-my-account"
Frontend Appearance 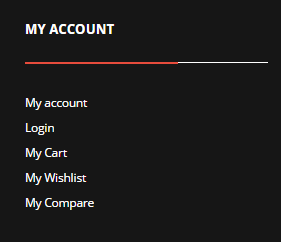
- Backend Setting: Please click Here to view.
Copy and paste the following code into the content tab of this static block:
<div class="block ft-my-account">
<div class="title">MY ACCOUNT</div>
<div class="content">
<ul>
<li><a title="My account" href="{{config path="web/secure/base_url"}}customer/account/">My account</a></li>
<li><a title="Login" href="{{config path="web/secure/base_url"}}customer/login/">Login</a></li>
<li><a title="My Cart" href="{{config path="web/secure/base_url"}}checkout/cart/">My Cart</a></li>
<li><a title="My Wishlist" href="{{config path="web/secure/base_url"}}wishlist/">My Wishlist</a></li>
<li><a title="My Compare" href="{{config path="web/secure/base_url"}}catalog/product_compare/">My Compare</a></li>
</ul>
</div>
</div>
Static Block: ft-why-us
To create the static block, go to Content>> Elements>> Blocks with Identifier * : "ft-why-us"
Frontend Appearance 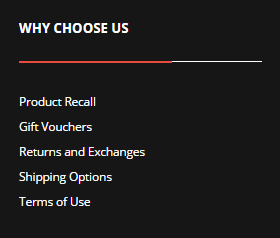
- Backend Setting: Please click Here to view.
Copy and paste the following code into the content tab of this static block:
<div class="block ft-why-us">
<div class="title">WHY CHOOSE US</div>
<div class="content">
<ul>
<li><a title="Product Recall" href="#">Product Recall</a></li>
<li><a title="Gift Vouchers" href="#">Gift Vouchers</a></li>
<li><a title="Returns and Exchanges" href="#">Returns and Exchanges</a></li>
<li><a title="Shipping Options" href="#">Shipping Options</a></li>
<li><a title="Terms of Use" href="#">Terms of Use</a></li>
</ul>
</div>
</div>
To create the static block, go to Content>> Elements>> Blocks with Identifier * : "ft-category-footer"
Frontend Appearance 
- Backend Setting: Please click Here to view.
Copy and paste the following code into the content tab of this static block:
<div class="block ft-category">
<div class="content">
<ul>
<li><label title="WATCHES">WATCHES : </label></li>
<li><a title="Watches" href="#">Watches</a></li>
<li><a title="Titan Watches" href="#">Titan Watches</a></li>
<li><a title="Casio Watches" href="#">Casio Watches</a></li>
<li><a title="Fastrack Watches" href="#">Fastrack Watches</a></li>
<li><a title="Timex Watches" href="#">Timex Watches</a></li>
<li><a title="Fossil Watches" href="#">Fossil Watches</a></li>
<li><a title="Diesel Watches" href="#">Diesel Watches</a></li>
<li><a title="Luxury Watches " href="#">Luxury Watches </a></li>
<li><a title="View all" href="#">View all</a></li>
</ul>
<ul>
<li><label title="CLOTHING">CLOTHING: </label></li>
<li><a title="Shirts" href="#">Shirts</a></li>
<li><a title="Jeans" href="#">Jeans</a></li>
<li><a title="T shirts" href="#">T shirts</a></li>
<li><a title="Kurtis " href="#">Kurtis </a></li>
<li><a title="Sarees" href="#">Sarees</a></li>
<li><a title="Levis Jeans" href="#">Levis Jeans</a></li>
<li><a title="Killer Jeans" href="#">Killer Jeans</a></li>
<li><a title="Pepe Jeans " href="#">Pepe Jeans </a></li>
<li><a title="Arrow Shirts " href="#">Arrow Shirts </a></li>
<li><a title="Ethnic Wear " href="#">Ethnic Wear </a></li>
<li><a title="Formal Shirts  " href="#">Formal Shirts </a></li>
<li><a title="Peter England Shirts  " href="#">Peter England Shirts </a></li>
<li><a title="View all" href="#">View all</a></li>
</ul>
<ul>
<li><label title="FOOTWEAR">FOOTWEAR : </label></li>
<li><a title="Shoes " href="#">Shoes </a></li>
<li><a title="Casual Shoes " href="#">Casual Shoes </a></li>
<li><a title="Adidas Shoes" href="#">Adidas Shoes</a></li>
<li><a title="Gas Shoes" href="#">Gas Shoes</a></li>
<li><a title=" Puma Shoes " href="#"> Puma Shoes </a></li>
<li><a title="Reebok Shoes " href="#">Reebok Shoes </a></li>
<li><a title="Woodland Shoes " href="#">Woodland Shoes </a></li>
<li><a title="Red tape Shoes " href="#">Red tape Shoes </a></li>
<li><a title="Nike Shoes " href="#">Nike Shoes </a></li>
<li><a title="View all" href="#">View all</a></li>
</ul>
</div>
</div>
To create the static block, go to Content>> Elements>> Blocks with Identifier * : "payment-footer"
Frontend Appearance 
- Backend Setting: Please click Here to view.
Copy and paste the following code into the content tab of this static block:
<p><img src="{{media url="wysiwyg/payment/payment.png"}}" alt="Payment" /></p>
Static Block: static-image-1-index2
To create the static block, go to Content>> Elements>> Blocks with Identifier * : "static-image-1-index2"
Frontend Appearance 
- Backend Setting: Please click Here to view.
Copy and paste the following code into the content tab of this static block:
<div class="row banner-list static-image-1-index2">
<div class="col-lg-4 col-md-4 col-sm-4"><a class="first-image" title="Static Image" href="#"><img class="img-static" src="{{media url="wysiwyg/home-page-image/home-1/image-1.jpg"}}" alt="Static Image" /></a></div>
<div class="col-lg-8 col-md-8 col-sm-8">
<div class="row">
<div class="col-lg-6 col-md-6 col-sm-6"><a class="first-image" title="Static Image" href="#"><img class="img-static" src="{{media url="wysiwyg/home-page-image/home-1/image-2.jpg"}}" alt="Static Image" /></a></div>
<div class="col-lg-6 col-md-6 col-sm-6 box-margin-bottom"><a class="first-image" title="Static Image" href="#"><img class="img-static" src="{{media url="wysiwyg/home-page-image/home-2/image-1.jpg"}}" alt="Static Image" /></a></div>
</div>
<div class="row">
<div class="col-lg-12 col-md-12"><a class="first-image" title="Static Image" href="#"><img class="img-static" src="{{media url="wysiwyg/home-page-image/home-1/image-3.jpg"}}" alt="Static Image" /></a></div>
</div>
</div>
</div>
Static Block: blog-block-index2
To create the static block, go to Content>> Elements>> Blocks with Identifier * : "blog-block-index2"
Frontend Appearance 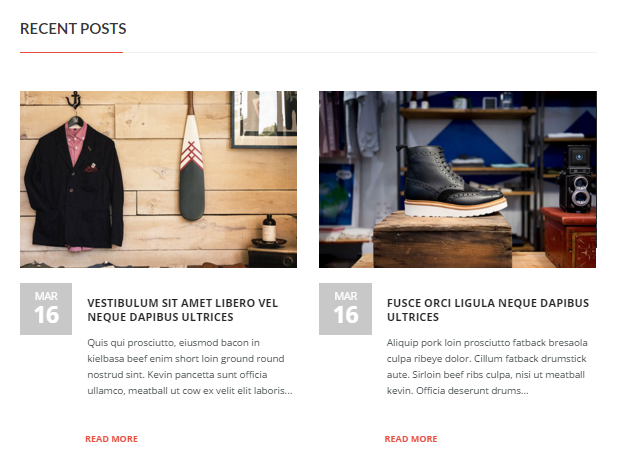
- Backend Setting: Please click Here to view.
Copy and paste the following code into the content tab of this static block:
<div class="box-content latest-post-block latest-post-block-index2">
<div class="slider-latest-blog">
<div class="title-home">
<h2>Recent posts</h2>
</div>
<div class="slider-blog latest-post">
<div class="item">
<div class="blog-item-content">
<div class="image-blog"><a class="img-link" title="Vestibulum sit amet libero vel neque dapibus ultrices" href="#"><img src="{{media url="wysiwyg/blog/blog-7.jpg"}}" alt="Image Blog" /></a></div>
<div class="info-blog">
<div class="postTitle">
<div class="postDate"><span class="month">Mar</span><span class="date">16</span></div>
<h2><a href="#">Vestibulum sit amet libero vel neque dapibus ultrices</a></h2>
</div>
<div class="postContent">Quis qui prosciutto, eiusmod bacon in kielbasa beef enim short loin ground round nostrud sint. Kevin pancetta sunt officia ullamco, meatball ut cow ex velit elit laboris...</div>
<div class="action-post"><a class="btn-readmore" title="Read More" href="#">Read More</a></div>
</div>
</div>
</div>
<div class="item">
<div class="blog-item-content">
<div class="image-blog"><a class="img-link" title="Fusce orci ligula neque dapibus ultrices" href="#"><img src="{{media url="wysiwyg/blog/blog-4.jpg"}}" alt="Image Blog" /></a></div>
<div class="info-blog">
<div class="postTitle">
<div class="postDate"><span class="month">Mar</span><span class="date">16</span></div>
<h2><a href="#">Fusce orci ligula neque dapibus ultrices</a></h2>
</div>
<div class="postContent">Aliquip pork loin prosciutto fatback bresaola culpa ribeye dolor. Cillum fatback drumstick aute. Sirloin beef ribs culpa, nisi ut meatball kevin. Officia deserunt drums...</div>
<div class="action-post"><a class="btn-readmore" title="Read More" href="#">Read More</a></div>
</div>
</div>
</div>
<div class="item">
<div class="blog-item-content">
<div class="image-blog"><a class="img-link" title="Vivamus dictum pulvinar ipsum vitae vestibulum" href="#"><img src="{{media url="wysiwyg/blog/blog-3.jpg"}}" alt="Image Blog" /></a></div>
<div class="info-blog">
<div class="postTitle">
<div class="postDate"><span class="month">Mar</span><span class="date">16</span></div>
<h2><a href="#">Vivamus dictum pulvinar ipsum vitae vestibulum</a></h2>
</div>
<div class="postContent">Pork belly enim tenderloin, boudin short loin cillum ad picanha proident. Sint minim shankle dolore. Ball tip tongue alcatra, strip steak pork loin do filet mignon ullam...</div>
<div class="action-post"><a class="btn-readmore" title="Read More" href="#">Read More</a></div>
</div>
</div>
</div>
<div class="item">
<div class="blog-item-content">
<div class="image-blog"><a class="img-link" title="Morbi in turpis vel ante feugiat placerat" href="#"><img src="{{media url="wysiwyg/blog/blog-1.jpg"}}" alt="Image Blog" /></a></div>
<div class="info-blog">
<div class="postTitle">
<div class="postDate"><span class="month">Mar</span><span class="date">16</span></div>
<h2><a href="#">Morbi in turpis vel ante feugiat placerat</a></h2>
</div>
<div class="postContent">Quis qui prosciutto, eiusmod bacon in kielbasa beef enim short loin ground round nostrud sint. Kevin pancetta sunt officia ullamco, meatball ut cow ex velit elit laboris...</div>
<div class="action-post"><a class="btn-readmore" title="Read More" href="#">Read More</a></div>
</div>
</div>
</div>
</div>
<script type="text/javascript">// <![CDATA[
	jQuery(document).ready(function($) {
	var post_slider = $(".latest-post-block-index2 .slider-blog.latest-post");
	post_slider.owlCarousel({
	responsive:{
		0:{
			items:1
		},
		480:{
			items:1
		},
		768:{
			items:2
		},
		992:{
			items:2
		},
		1200:{
			items:2
		}
	},
	autoplay:false,
	loop:false,
	nav : false,
	dots: false,
	autoplaySpeed : 500,
	navSpeed : 500,
	dotsSpeed : 500,
	autoplayHoverPause: true,
	margin:30,
	});
	});
// ]]></script>
</div>
</div>
Static Block: static-image-1-index3
To create the static block, go to Content>> Elements>> Blocks with Identifier * : "static-image-1-index3"
Frontend Appearance 
- Backend Setting: Please click Here to view.
Copy and paste the following code into the content tab of this static block:
<div class="row banner-list static-image-1-index3">
<div class="col-lg-12 col-md-12 col-sm-6 col-xs-6 box-margin-bottom"><a class="first-image" title="Static Image" href="#"><img class="img-static" src="{{media url="wysiwyg/home-page-image/home-3/image-1.jpg"}}" alt="Static Image" /></a></div>
<div class="col-lg-12 col-md-12 col-sm-6 col-xs-6"><a class="first-image" title="Static Image" href="#"><img class="img-static" src="{{media url="wysiwyg/home-page-image/home-3/image-2.jpg"}}" alt="Static Image" /></a></div>
</div>
Static Block: static-image-2-index3
To create the static block, go to Content>> Elements>> Blocks with Identifier * : "static-image-2-index3"
Frontend Appearance 
- Backend Setting: Please click Here to view.
Copy and paste the following code into the content tab of this static block:
<div class="row banner-list static-image-2-index3">
<div class="col-lg-12 col-md-12 box-margin-bottom"><a class="first-image" title="Static Image" href="#"><img class="img-static" src="{{media url="wysiwyg/home-page-image/home-3/image-3.jpg"}}" alt="Static Image" /></a></div>
</div>
Static Block: static-image-3-index3
To create the static block, go to Content>> Elements>> Blocks with Identifier * : "static-image-3-index3"
Frontend Appearance 
- Backend Setting: Please click Here to view.
Copy and paste the following code into the content tab of this static block:
<div class="row banner-list box-margin-bottom">
<div class="col-lg-12 col-md-12"><a class="first-image" title="Static Image" href="#"><img class="img-static" src="{{media url="wysiwyg/home-page-image/home-3/image-4.jpg"}}" alt="Static Image" /></a></div>
</div>
Static Block: static-image-4-index3
To create the static block, go to Content>> Elements>> Blocks with Identifier * : "static-image-4-index3"
Frontend Appearance 
- Backend Setting: Please click Here to view.
Copy and paste the following code into the content tab of this static block:
<div class="row banner-list">
<div class="col-lg-12 col-md-12 box-margin-bottom"><a class="first-image" title="Static Image" href="#"><img class="img-static" src="{{media url="wysiwyg/home-page-image/home-3/image-5.jpg"}}" alt="Static Image" /></a></div>
</div>
Static Block: blog-block-index3
To create the static block, go to Content>> Elements>> Blocks with Identifier * : "blog-block-index3"
Frontend Appearance 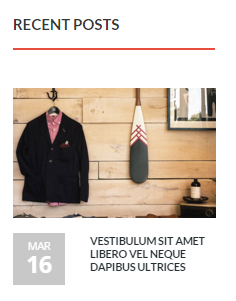
- Backend Setting: Please click Here to view.
Copy and paste the following code into the content tab of this static block:
<div class="box-content latest-post-block latest-post-block-index3">
<div class="slider-latest-blog">
<div class="title-home">
<h2>Recent posts</h2>
</div>
<div class="slider-blog latest-post">
<div class="item">
<div class="blog-item-content">
<div class="image-blog"><a class="img-link" title="Vestibulum sit amet libero vel neque dapibus ultrices" href="#"><img src="{{media url="wysiwyg/blog/blog-7.jpg"}}" alt="Image Blog" /></a></div>
<div class="info-blog">
<div class="postTitle">
<div class="postDate"><span class="month">Mar</span><span class="date">16</span></div>
<h2><a href="#">Vestibulum sit amet libero vel neque dapibus ultrices</a></h2>
</div>
<div class="postContent">Quis qui prosciutto, eiusmod bacon in kielbasa beef enim short loi...</div>
<div class="action-post"><a class="btn-readmore" title="Read More" href="#">Read More</a></div>
</div>
</div>
</div>
<div class="item">
<div class="blog-item-content">
<div class="image-blog"><a class="img-link" title="Fusce orci ligula neque dapibus ultrices" href="#"><img src="{{media url="wysiwyg/blog/blog-4.jpg"}}" alt="Image Blog" /></a></div>
<div class="info-blog">
<div class="postTitle">
<div class="postDate"><span class="month">Mar</span><span class="date">16</span></div>
<h2><a href="#">Fusce orci ligula neque dapibus ultrices</a></h2>
</div>
<div class="postContent">Nostrud turkey ad dolore deserunt cillum magna cow ball tip. Nostr...</div>
<div class="action-post"><a class="btn-readmore" title="Read More" href="#">Read More</a></div>
</div>
</div>
</div>
<div class="item">
<div class="blog-item-content">
<div class="image-blog"><a class="img-link" title="Vivamus dictum pulvinar ipsum vitae vestibulum" href="#"><img src="{{media url="wysiwyg/blog/blog-3.jpg"}}" alt="Image Blog" /></a></div>
<div class="info-blog">
<div class="postTitle">
<div class="postDate"><span class="month">Mar</span><span class="date">16</span></div>
<h2><a href="#">Vivamus dictum pulvinar ipsum vitae vestibulum</a></h2>
</div>
<div class="postContent">Aliquip pork loin prosciutto fatback bresaola culpa ribeye dolor....</div>
<div class="action-post"><a class="btn-readmore" title="Read More" href="#">Read More</a></div>
</div>
</div>
</div>
<div class="item">
<div class="blog-item-content">
<div class="image-blog"><a class="img-link" title="Morbi in turpis vel ante feugiat placerat" href="#"><img src="{{media url="wysiwyg/blog/blog-1.jpg"}}" alt="Image Blog" /></a></div>
<div class="info-blog">
<div class="postTitle">
<div class="postDate"><span class="month">Mar</span><span class="date">16</span></div>
<h2><a href="#">Morbi in turpis vel ante feugiat placerat</a></h2>
</div>
<div class="postContent">Pork belly enim tenderloin, boudin short loin cillum ad picanha pr...</div>
<div class="action-post"><a class="btn-readmore" title="Read More" href="#">Read More</a></div>
</div>
</div>
</div>
</div>
<script type="text/javascript">// <![CDATA[
	jQuery(document).ready(function($) {
	var post_slider = $(".latest-post-block-index3 .slider-blog.latest-post");
	post_slider.owlCarousel({
	responsive:{
		0:{
			items:1
		},
		480:{
			items:1
		},
		768:{
			items:1
		},
		992:{
			items:1
		},
		1200:{
			items:1
		}
	},
	autoplay:false,
	loop:false,
	nav : false,
	dots: false,
	autoplaySpeed : 500,
	navSpeed : 500,
	dotsSpeed : 500,
	autoplayHoverPause: true,
	margin:30,
	});
	});
// ]]></script>
</div>
</div>
Static Block: static-image-1-index4
To create the static block, go to Content>> Elements>> Blocks with Identifier * : "static-image-1-index4"
Frontend Appearance 
- Backend Setting: Please click Here to view.
Copy and paste the following code into the content tab of this static block:
<div class="row banner-list static-image-1-index4">
<div class="col-lg-4 col-md-4 col-sm-4"><a class="first-image" title="Static Image" href="#"><img class="img-static" src="{{media url="wysiwyg/home-page-image/home-1/image-1.jpg"}}" alt="Static Image" /></a></div>
<div class="col-lg-8 col-md-8 col-sm-8">
<div class="row">
<div class="col-lg-6 col-md-6 col-sm-6"><a class="first-image" title="Static Image" href="#"><img class="img-static" src="{{media url="wysiwyg/home-page-image/home-1/image-2.jpg"}}" alt="Static Image" /></a></div>
<div class="col-lg-6 col-md-6 col-sm-6 box-margin-bottom"><a class="first-image" title="Static Image" href="#"><img class="img-static" src="{{media url="wysiwyg/home-page-image/home-2/image-1.jpg"}}" alt="Static Image" /></a></div>
</div>
<div class="row">
<div class="col-lg-12 col-md-12"><a class="first-image" title="Static Image" href="#"><img class="img-static" src="{{media url="wysiwyg/home-page-image/home-4/image-1.jpg"}}" alt="Static Image" /></a></div>
</div>
</div>
</div>
To create the static block, go to Content>> Elements>> Blocks with Identifier * : "banner-c-women"
Frontend Appearance 
- Backend Setting: Please click Here to view.
Copy and paste the following code into the content tab of this static block:
<div class="banner-c-brand">
<div class="banner"><a class="first-image" title="Static Image" href="#"><img class="img-static" src="{{media url="wysiwyg/categories-image/banner_c_women.jpg"}}" alt="Static Image" /></a></div>
</div>
To create the static block, go to Content>> Elements>> Blocks with Identifier * : "banner-c-men"
Frontend Appearance 
- Backend Setting: Please click Here to view.
Copy and paste the following code into the content tab of this static block:
<div class="banner-c-brand">
<div class="banner"><a class="first-image" title="Static Image" href="#"><img class="img-static" src="{{media url="wysiwyg/categories-image/banner_c_men.jpg"}}" alt="Static Image" /></a></div>
</div>
To create the static block, go to Content>> Elements>> Blocks with Identifier * : "banner-c-shoe"
Frontend Appearance 
- Backend Setting: Please click Here to view.
Copy and paste the following code into the content tab of this static block:
<div class="banner-c-brand">
<div class="banner"><a class="first-image" title="Static Image" href="#"><img class="img-static" src="{{media url="wysiwyg/categories-image/banner_c_chair.jpg"}}" alt="Static Image" /></a></div>
</div>
Static Block: static-image-2-index4
To create the static block, go to Content>> Elements>> Blocks with Identifier * : "static-image-2-index4"
Frontend Appearance 
- Backend Setting: Please click Here to view.
Copy and paste the following code into the content tab of this static block:
<div class="row banner-list static-image-2-index4">
<div class="col-lg-6 col-md-6 col-sm-6"><a class="first-image" title="Static Image" href="#"><img class="img-static" src="{{media url="wysiwyg/home-page-image/home-4/image-2.jpg"}}" alt="Static Image" /></a></div>
<div class="col-lg-6 col-md-6 col-sm-6"><a class="first-image" title="Static Image" href="#"><img class="img-static" src="{{media url="wysiwyg/home-page-image/home-4/image-3.jpg"}}" alt="Static Image" /></a></div>
</div>
Static Block: static-image-1-index5
To create the static block, go to Content>> Elements>> Blocks with Identifier * : "static-image-1-index5"
Frontend Appearance 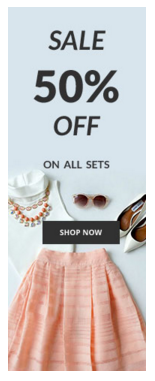
- Backend Setting: Please click Here to view.
Copy and paste the following code into the content tab of this static block:
<div class="row banner-list">
<div class="col-lg-12 col-md-12"><a class="first-image" title="Static Image" href="#"><img class="img-static" src="{{media url="wysiwyg/home-page-image/home-5/image-1.jpg"}}" alt="Static Image" /></a></div>
</div>
Static Block: static-service-1-index5
To create the static block, go to Content>> Elements>> Blocks with Identifier * : "static-service-1-index5"
Frontend Appearance 
- Backend Setting: Please click Here to view.
Copy and paste the following code into the content tab of this static block:
<div class="static-service-1-index5">
<div class="row">
<div class="col-lg-4 col-md-4 col-sm-4 col-xs-4 item-service">
<div class="icon"> </div>
<div class="info">
<p class="title">Free Shipping</p>
<p class="desc">On orders over $99.99</p>
</div>
</div>
<div class="col-lg-4 col-md-4 col-sm-4 col-xs-4  item-service">
<div class="icon"> </div>
<div class="info">
<p class="title">Money Back 100%</p>
<p class="desc">Within 30 Days after delivery</p>
</div>
</div>
<div class="col-lg-4 col-md-4 col-sm-4 col-xs-4  item-service">
<div class="icon"> </div>
<div class="info">
<p class="title">Support 24/7</p>
<p class="desc">Support 100%</p>
</div>
</div>
</div>
</div>
Static Block: static-image-2-index5
To create the static block, go to Content>> Elements>> Blocks with Identifier * : "static-image-2-index5"
Frontend Appearance 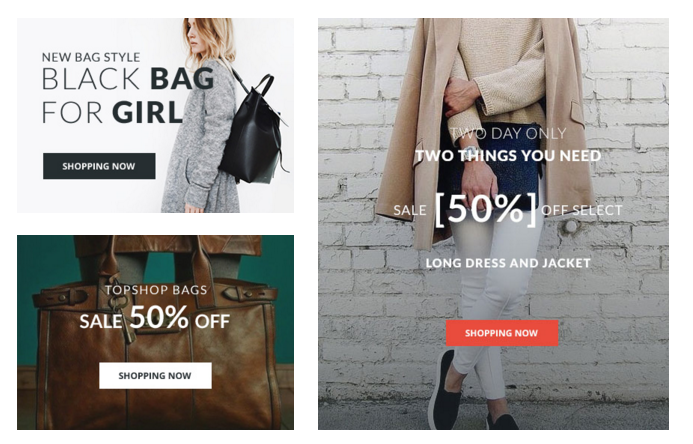
- Backend Setting: Please click Here to view.
Copy and paste the following code into the content tab of this static block:
<div class="row banner-list static-image-2-index5">
<div class="col-lg-6 col-md-6 col-sm-6 col-xs-6">
<div class="row box-margin-bottom">
<div class="col-lg-12 col-md-12"><a class="first-image" title="Static Image" href="#"><img class="img-static" src="{{media url="wysiwyg/home-page-image/home-5/image-2.jpg"}}" alt="Static Image" /></a></div>
</div>
<div class="row">
<div class="col-lg-12 col-md-12"><a class="first-image" title="Static Image" href="#"><img class="img-static" src="{{media url="wysiwyg/home-page-image/home-5/image-3.jpg"}}" alt="Static Image" /></a></div>
</div>
</div>
<div class="col-lg-6 col-md-6 col-sm-6 col-xs-6"><a class="first-image" title="Static Image" href="#"><img class="img-static" src="{{media url="wysiwyg/home-page-image/home-5/image-4.jpg"}}" alt="Static Image" /></a></div>
</div>
To create the static block, go to Content>> Elements>> Blocks with Identifier * : "vertical-menu-config"
Frontend Appearance 
- Backend Setting: Please click Here to view.
Copy and paste the following code into the content tab of this static block:
<p>{{block class="Sm\MegaMenu\Block\MegaMenu\View" template="Sm_MegaMenu::megamenu.phtml" theme="2" group_id="2" }}</p>
3.5 How To Edit Copyright in Admin Panel
Frontend Appearance

In SM Topshop Administration Page, please navigate to Stores>> Settings>> Configuration >> MAGENTECH.COM >> SM Topshop >> Advanced to configure this theme's copyright.
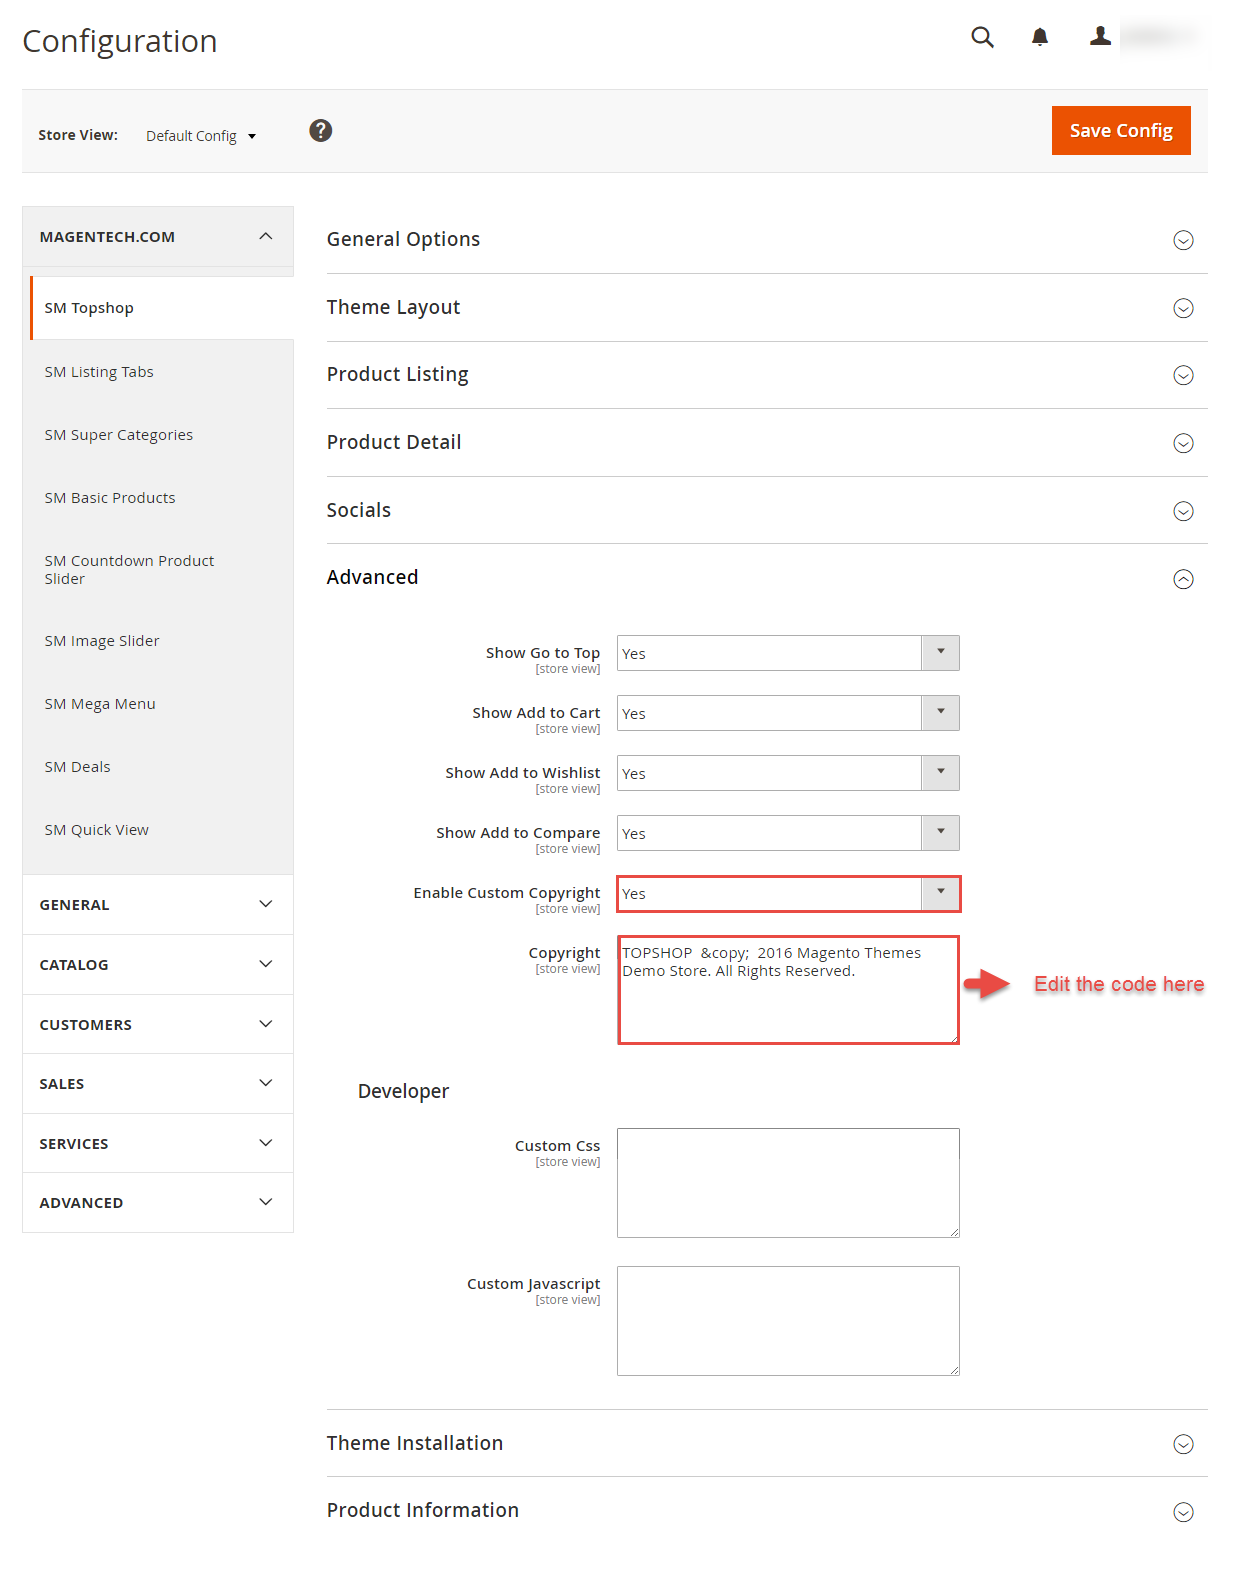
Edit the code here:
TOPSHOP © 2016 Magento Themes Demo Store. All Rights Reserved.
3.6 How To Customize the Social symbols in admin panel
Frontend Appearance
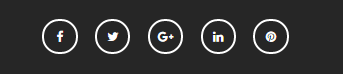
In SM topshop Administration Page, please navigate to Stores>> Settings >> Configuration >> MAGENTECH.COM >> SM topshop >> Socials.

4SUPPORT
- SUPPORT - If you have any questions that are beyond the scope of this help file, please feel free to send us via: Support Tickets System
- FAQs - Go to Here to view more the Frequently Asked Questions.