Documentation for Market Ultimate Prestashop Theme
Firstly, a huge thanks for purchasing this theme, your support is truly appreciated!
This document covers the installation and use of this theme, reveals some answers to common problems and issues. We encourage you to read throughout this document if you are experiencing any difficulties. If you have any questions that are beyond the scope of document, please feel free to contact us via our Support Tickets System.
Market PrestaShop Theme is fully compatible with Prestashop version 1.6.x, 1.7.x
There are two ways to install SP Market Theme
We provide Quickstart package for each theme which aims to ease the installation for users. It will help you save much time of installing and configuring if you plan to start your site from the beginning.
Please following steps below:
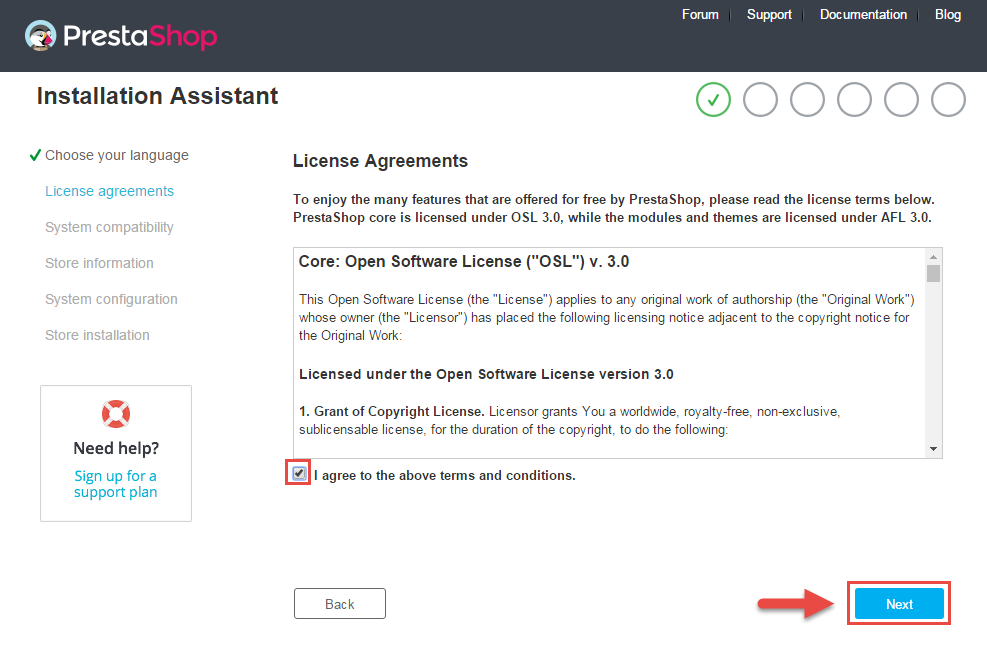
Please note: The installation language option will not affect your store language. By default PrestaShop is offered in English. You can install additional localization packages to change the store language.


Now add required information for your store: Shop name, Main activity, Country, Shop timezone and add the account info: first name, last name, email and password. Click “Next” to next step.

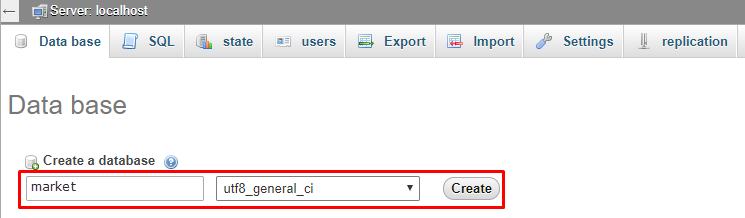
Enter your database in step 3, then click the “Test your database connection now!” button to make sure that the entered settings are correct. After that, click Next button.


Note: For security reasons you need to delete the install/ directory on your hosting server.
And finally, go to the Frontend or Backend as you want:

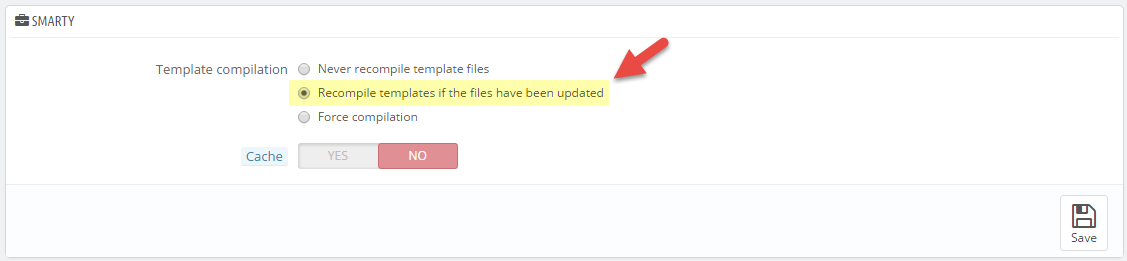
Note: Before installing theme, you must disable the cache. In your back office, please go to CONFIGURE >> Advanced Parameters >> Performance >> find “Cache” parameter >> Set “No” to disable cache >> Click “Save”.
1. Login to your Prestashop admin panel and navigate to IMPROVE >> Design >> Theme & Logo. At the top of the page click the Add a new theme button.

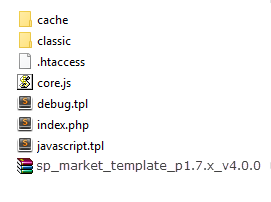
2. Navigate to “Import from your computer” >> choose the zip theme file as named “sp_market_template_p1.7.x_v5.1.0.zip” >> Save.

With either case, you must upload theme file in the "/themes" folder.
- Login to your Prestashop admin panel and navigate to IMPROVE >> Design >> Theme & Logo. At the top of the page click the Add a new theme button.
- Navigate to “Import from FTP” >> choose the zip theme file as named “sp_market_template_p1.7.x_v5.1.0.zip” >> Save.

3. When your choice is successfully validated , the new theme will be shown in the section named as Select a theme for your “[name]” shop . Then Click "Use this theme" button to replace your current theme with SP Market theme.

Note: After click button, your site may be broken. If your site was broken, please run this command: chown -R apache:apache sp_market
4. Click "Save" button and go to front-end and view your website.
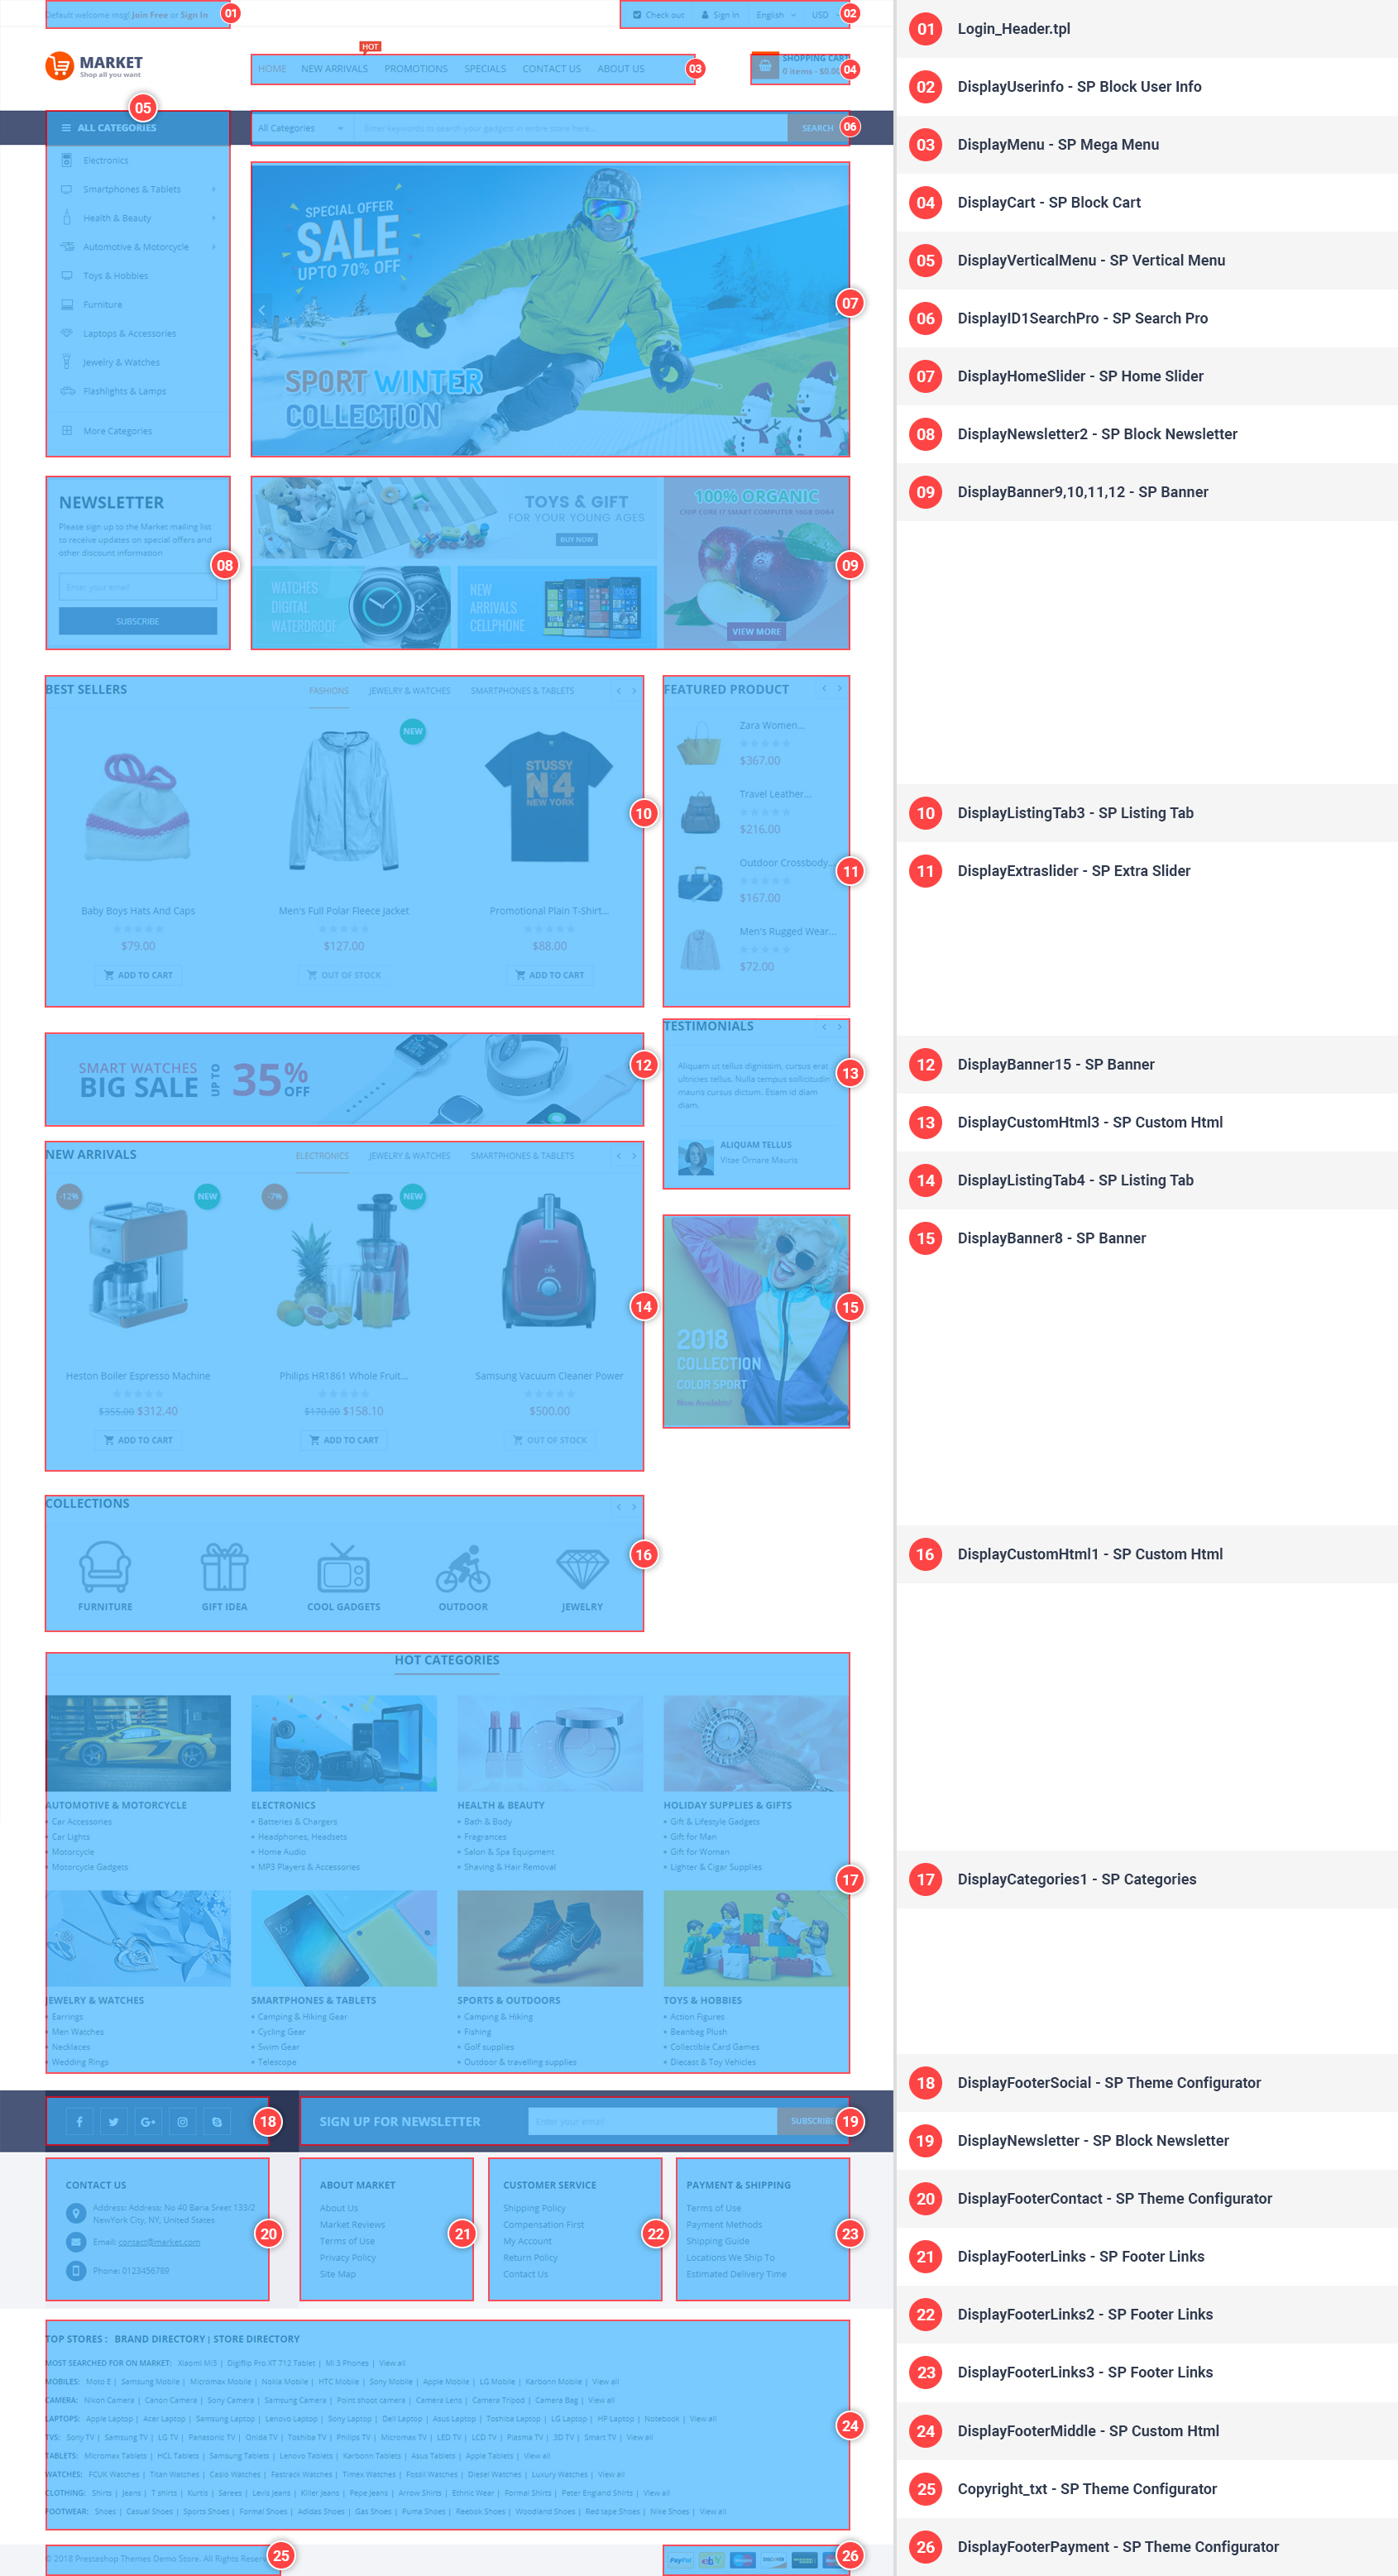
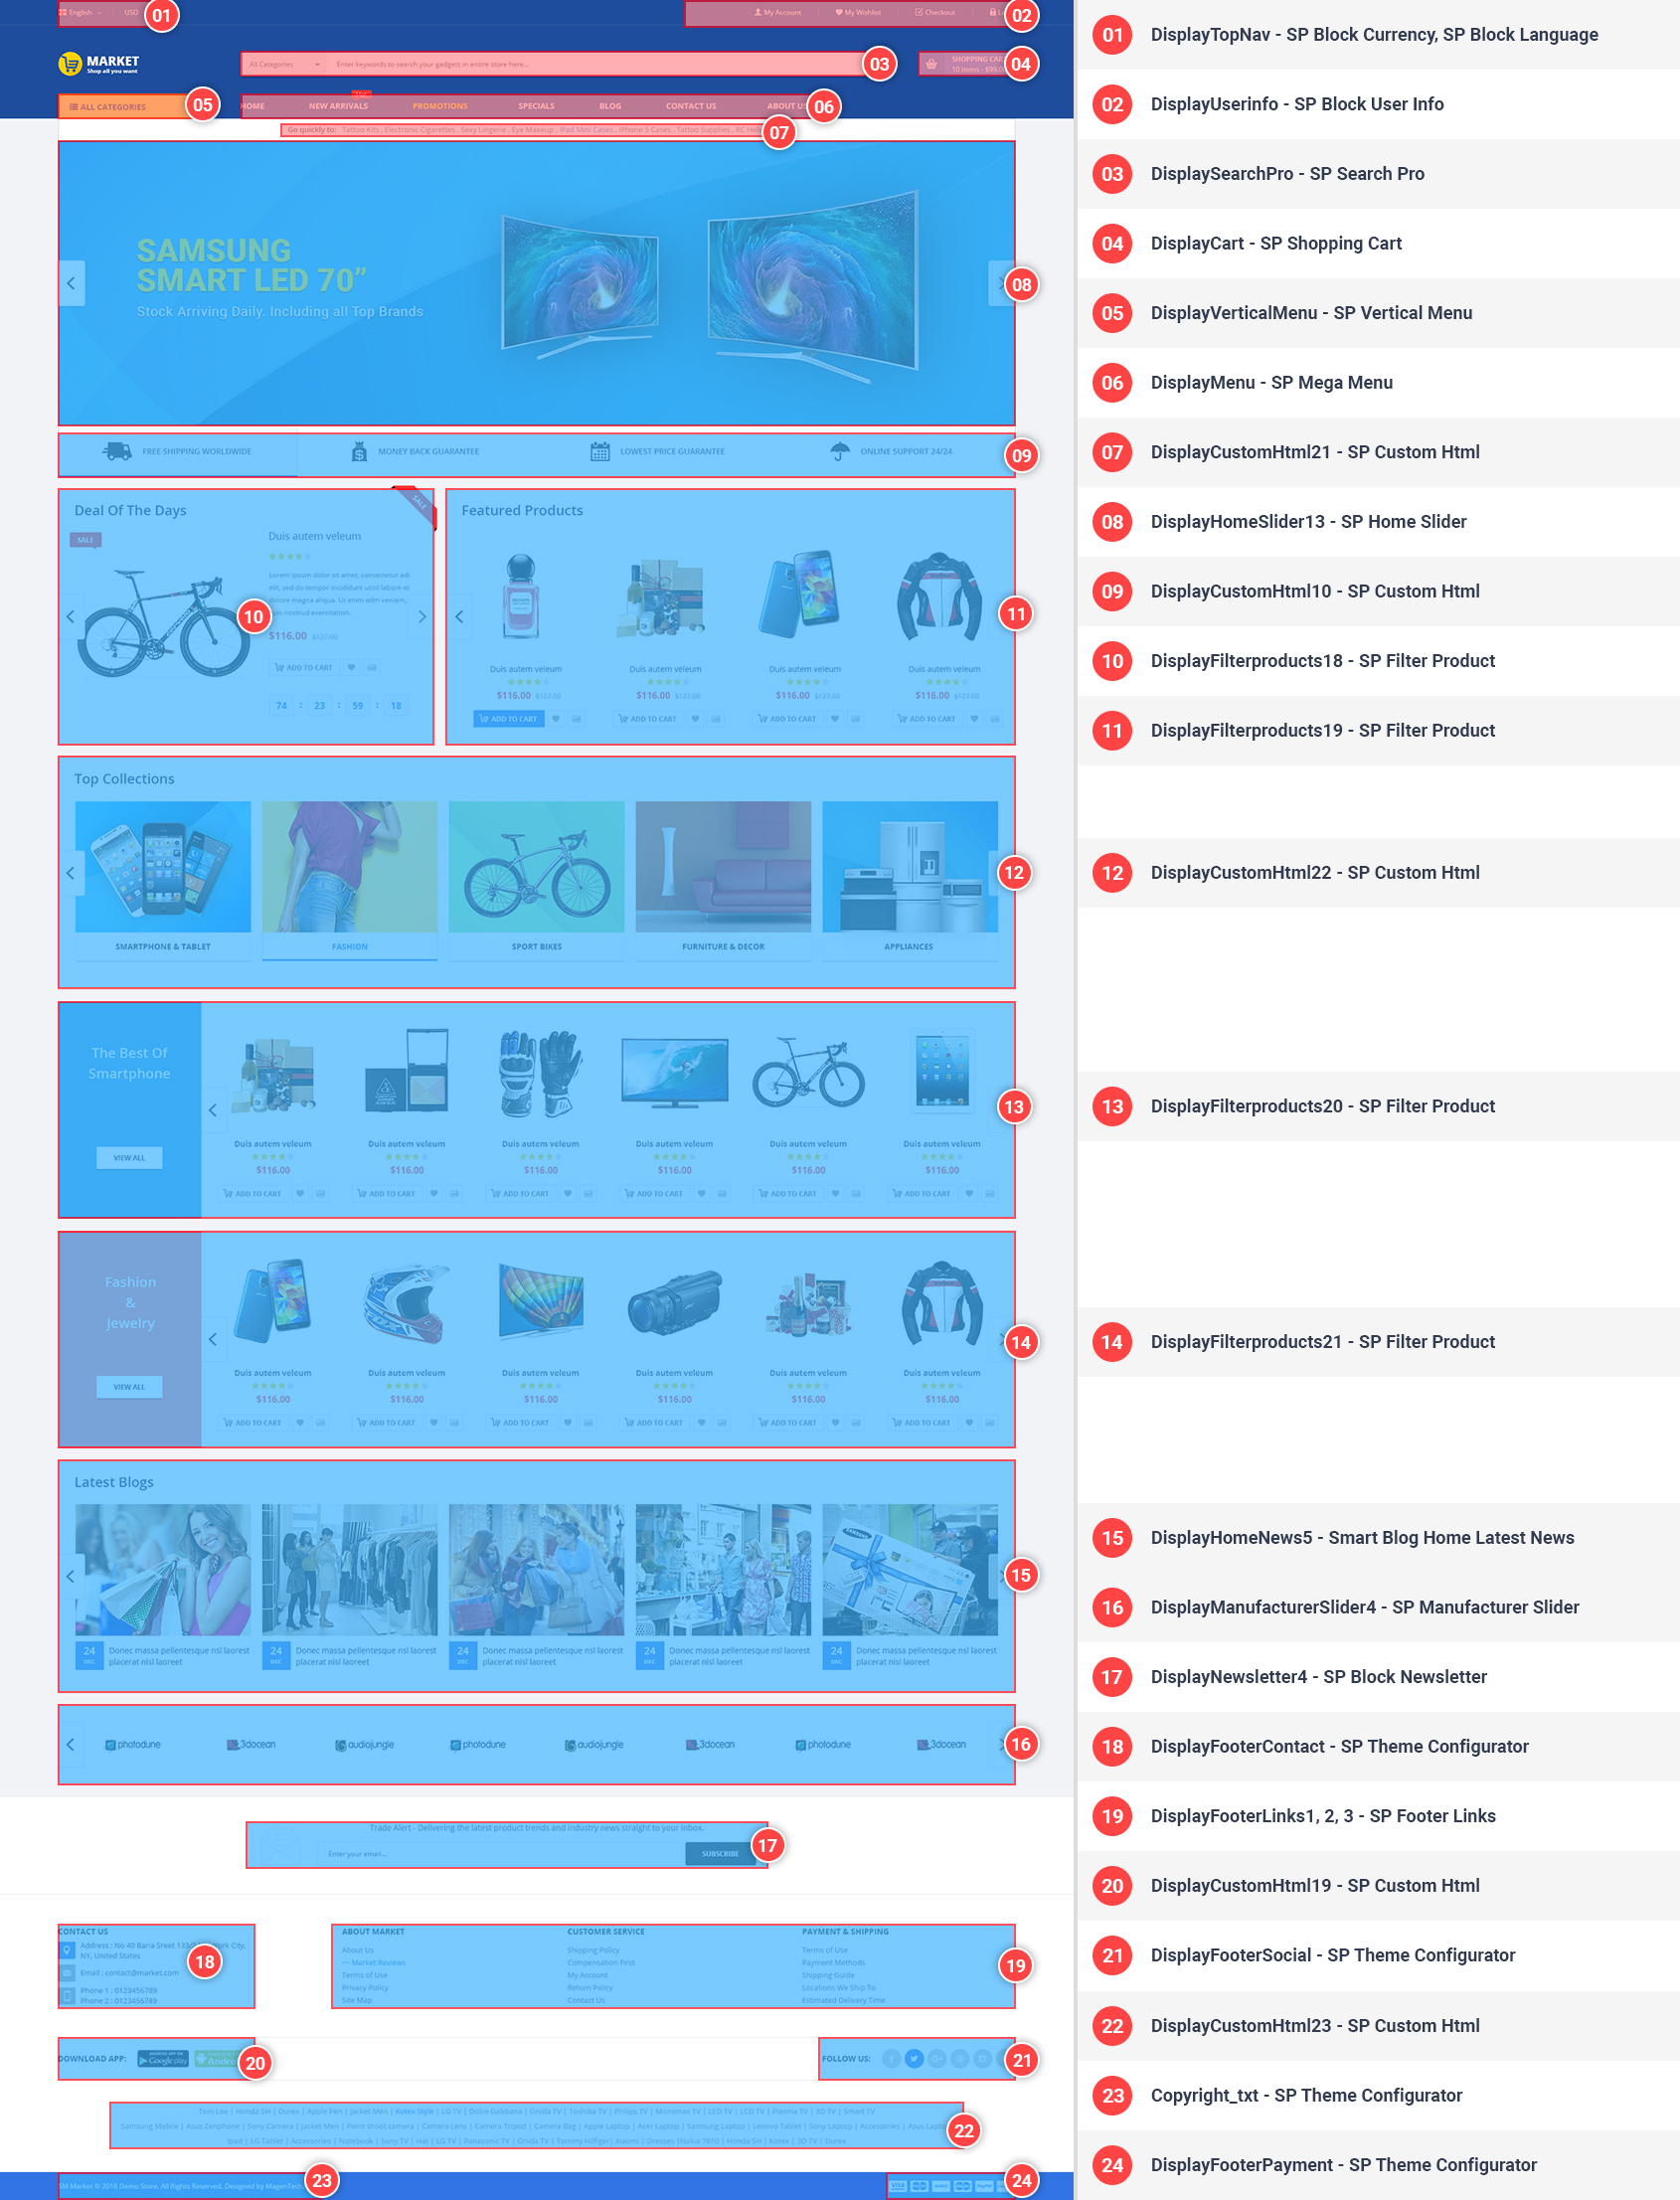
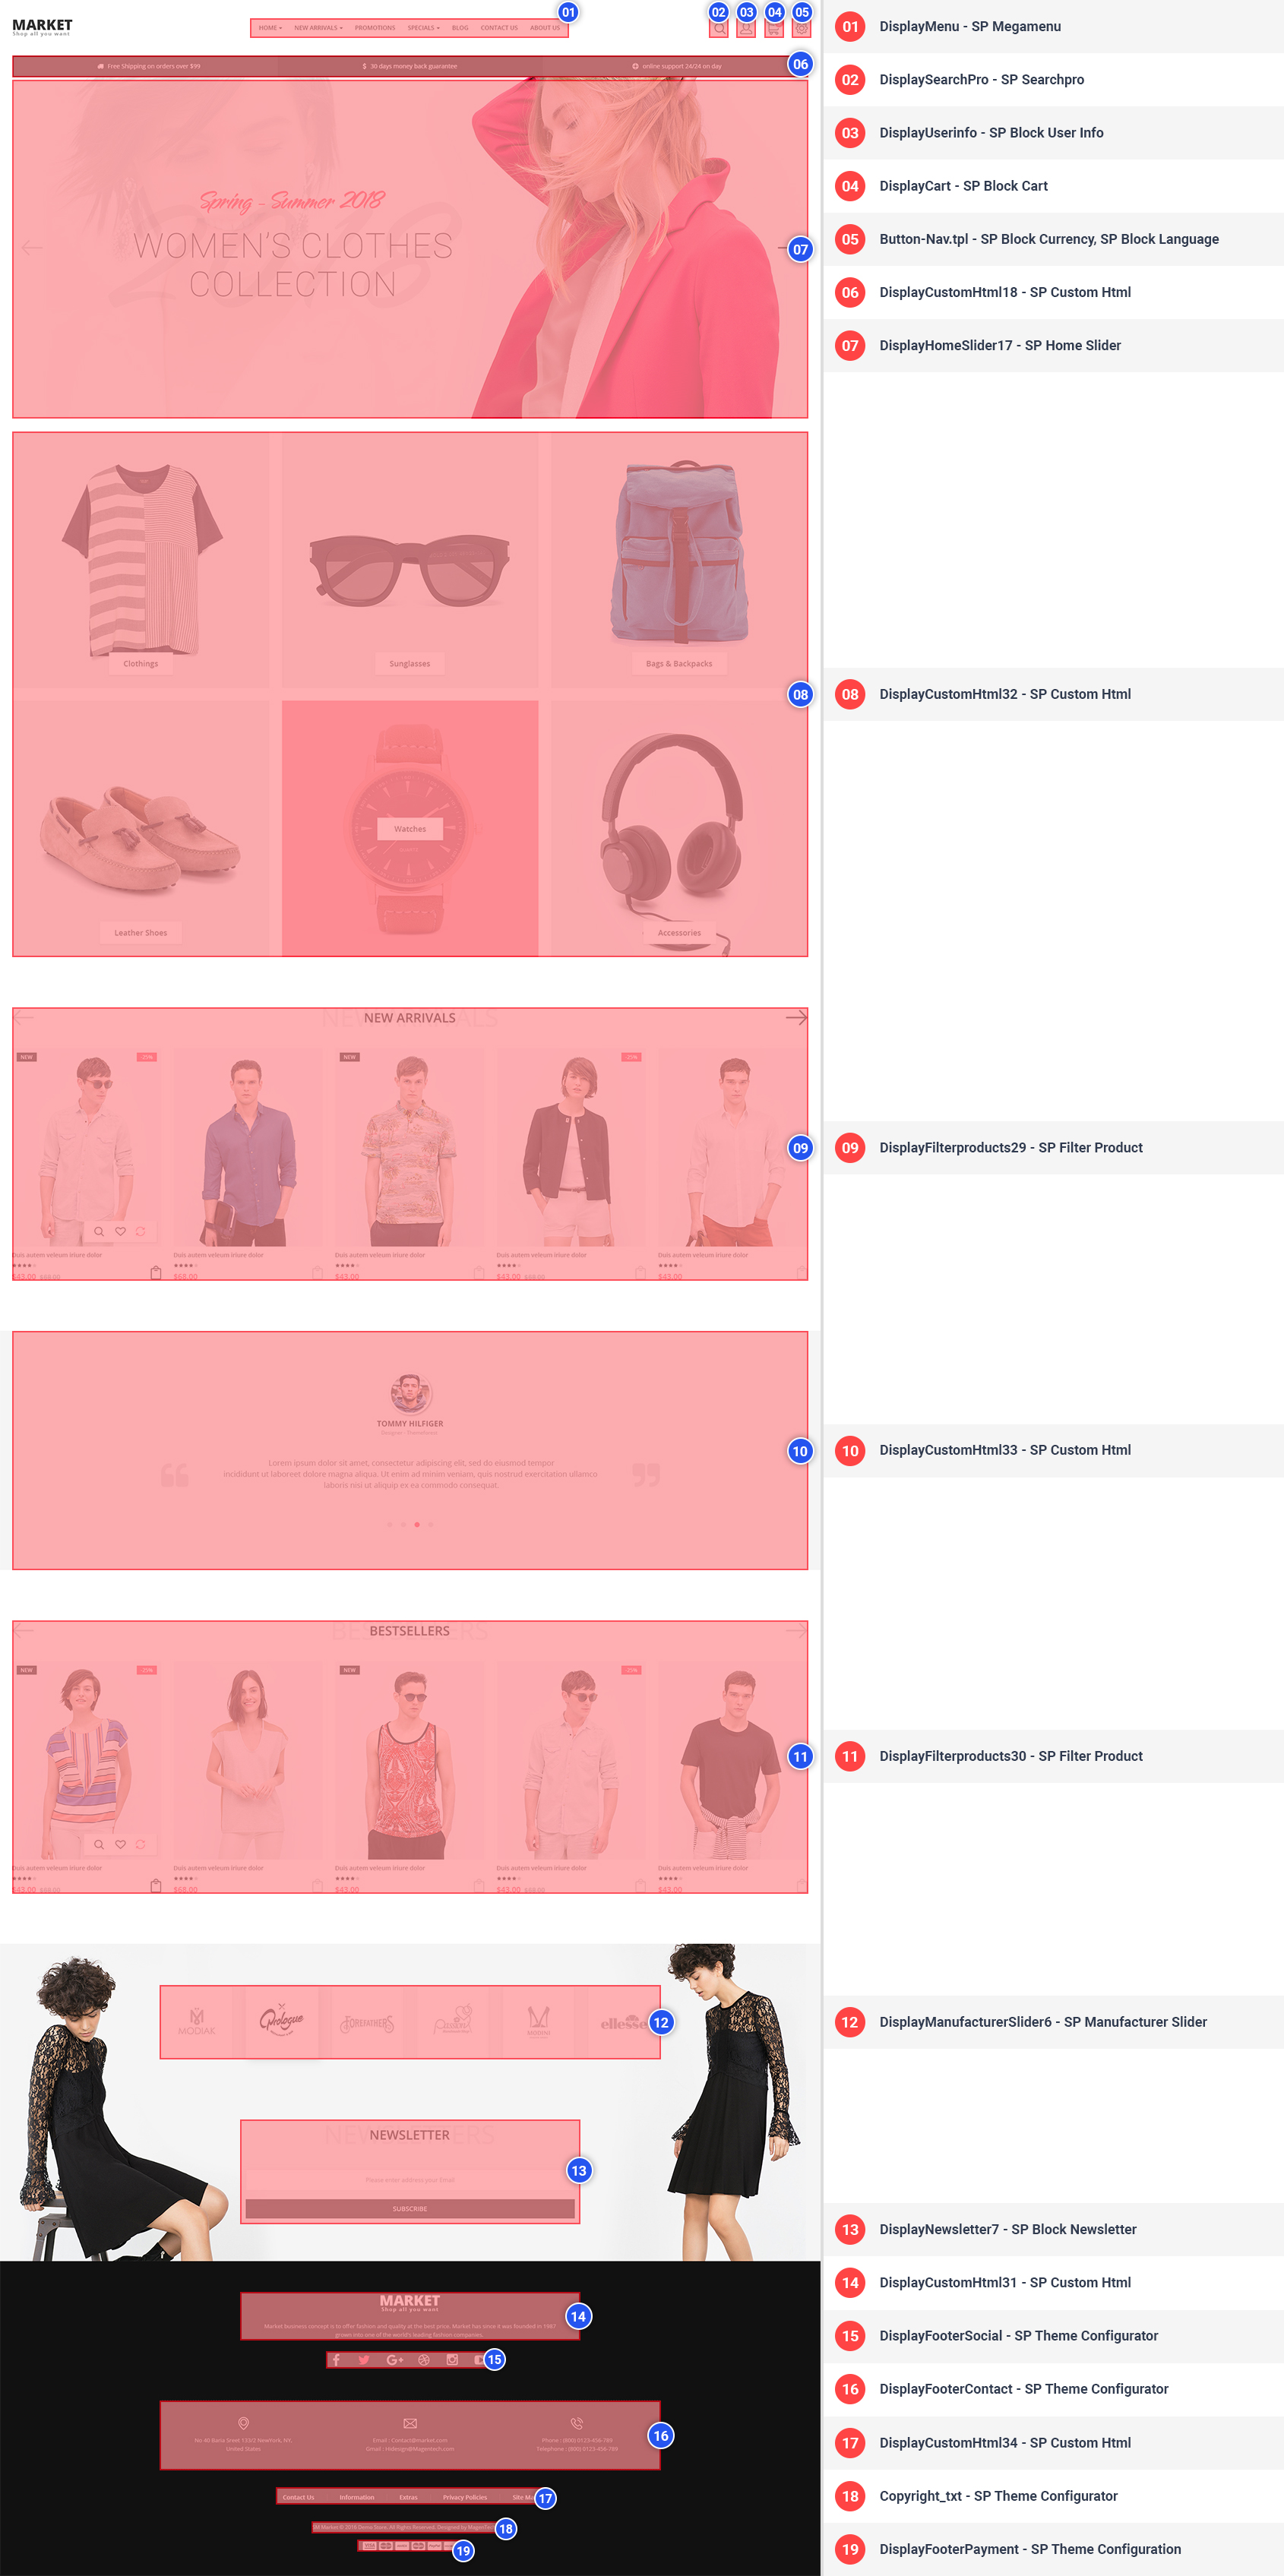
 Home Style 1
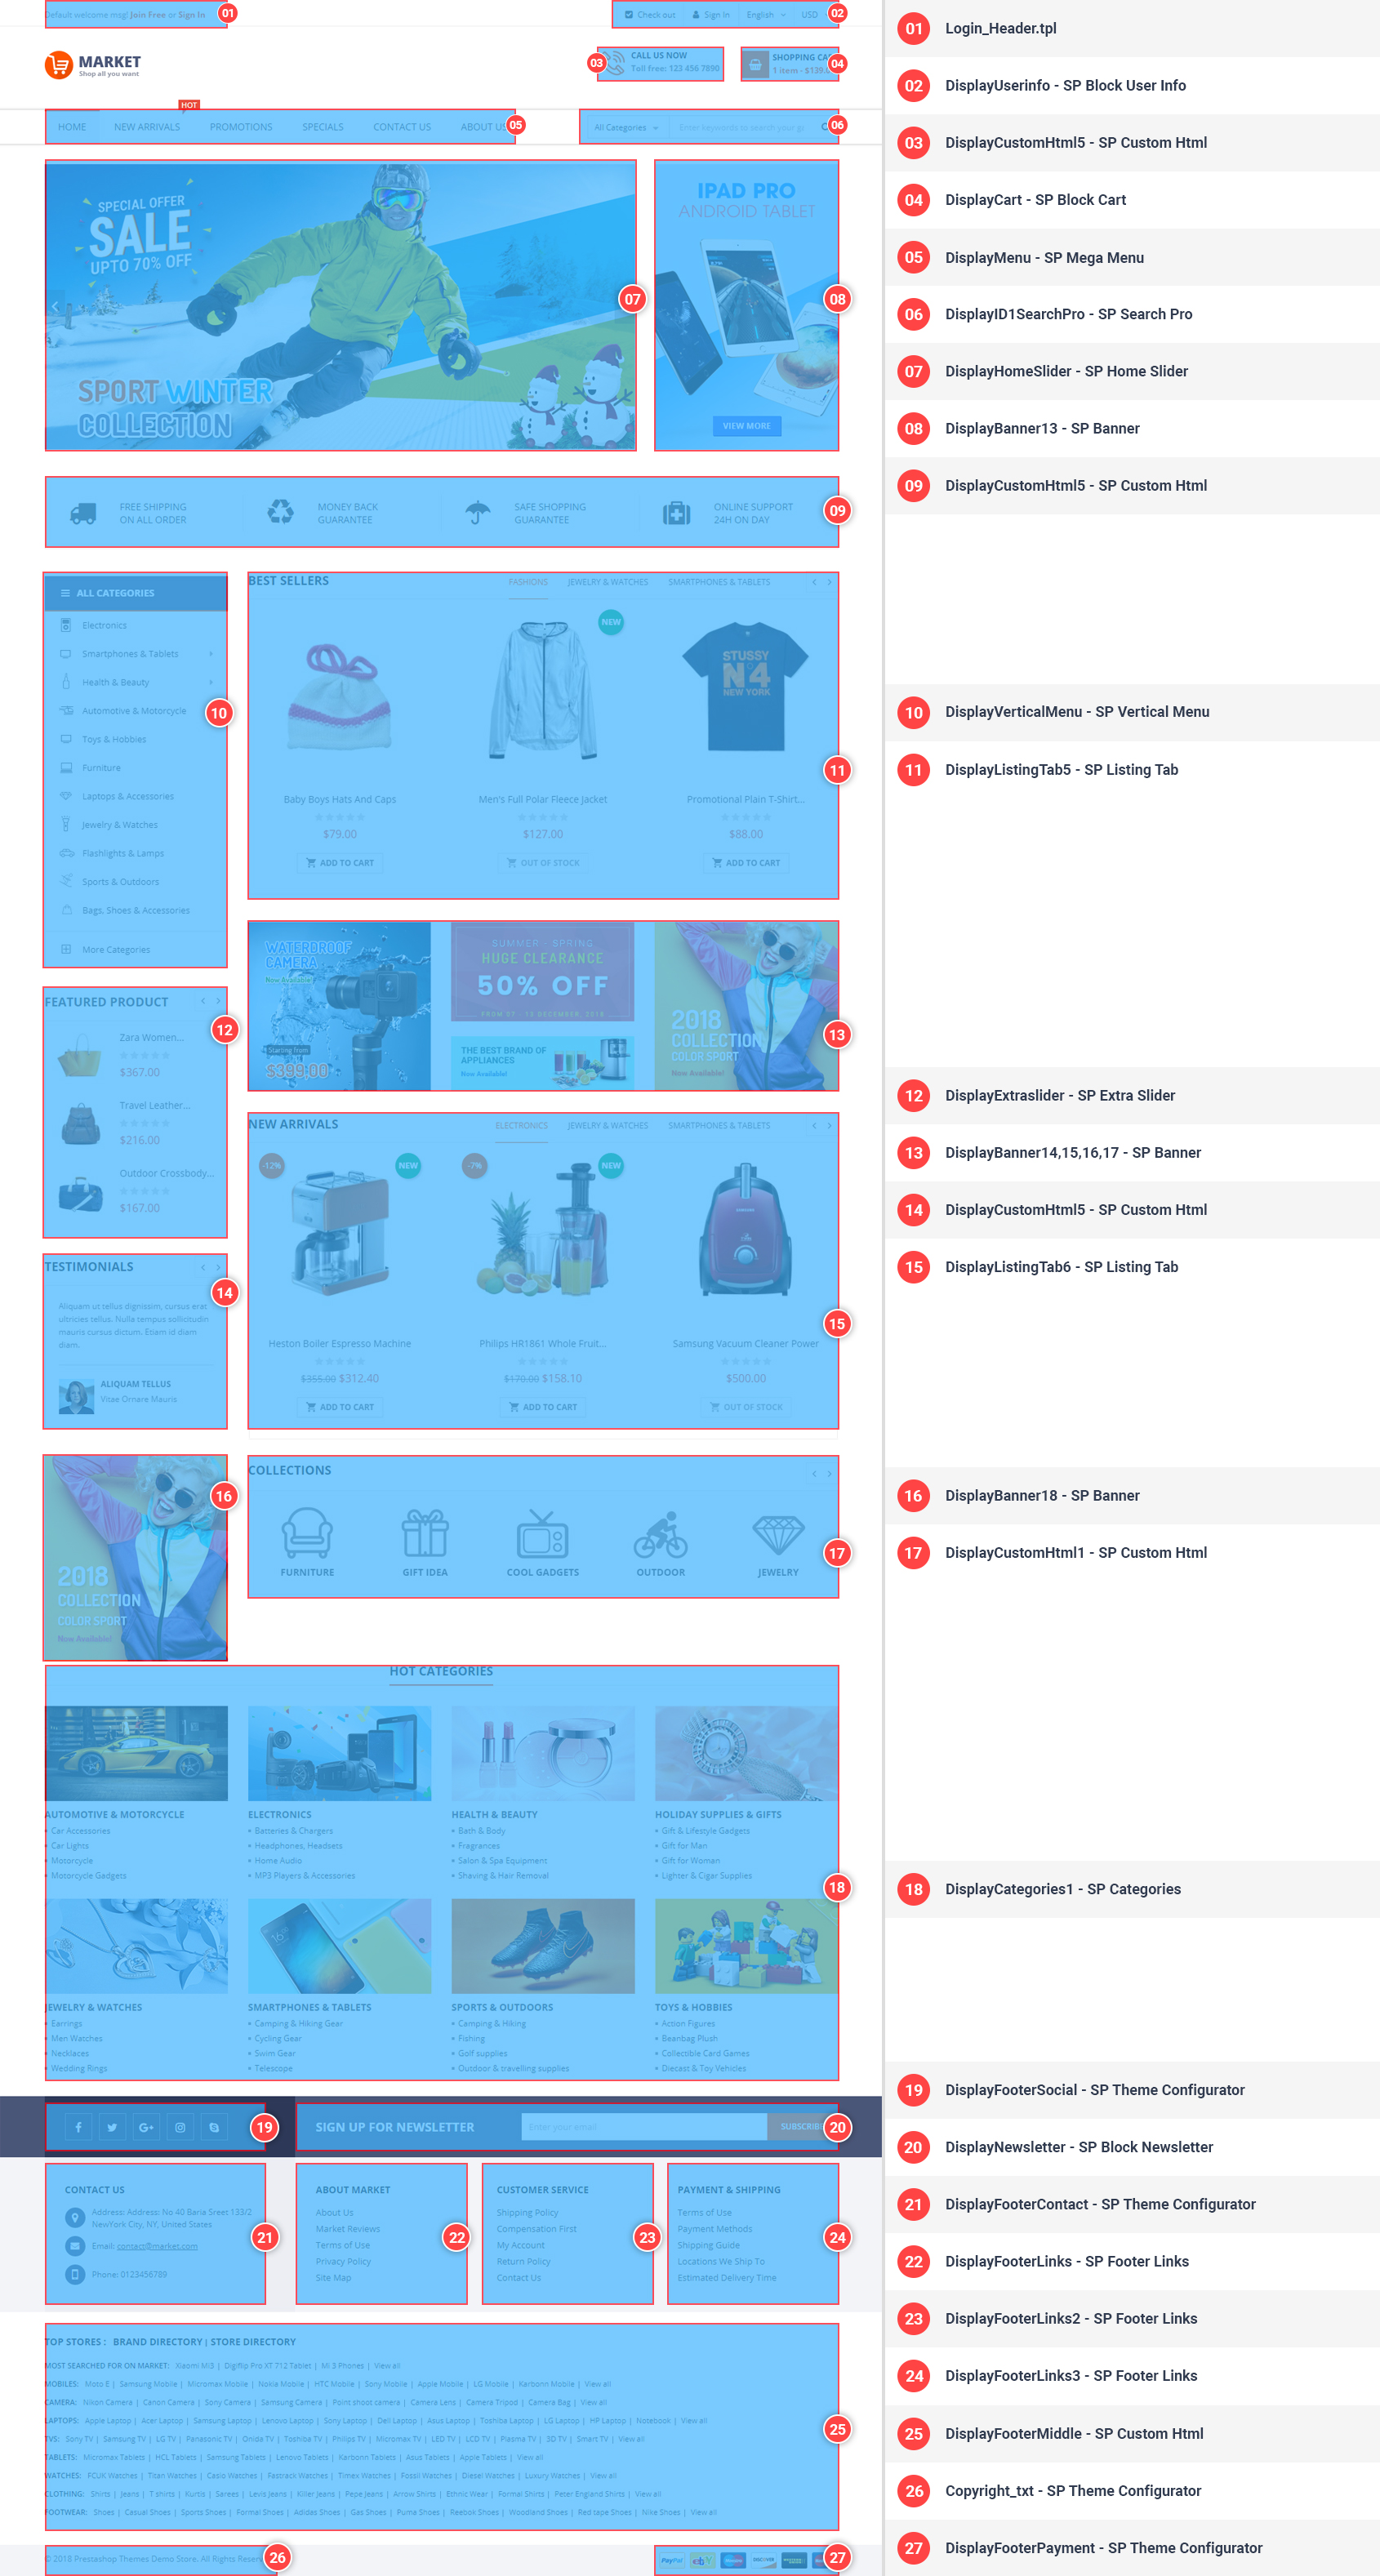
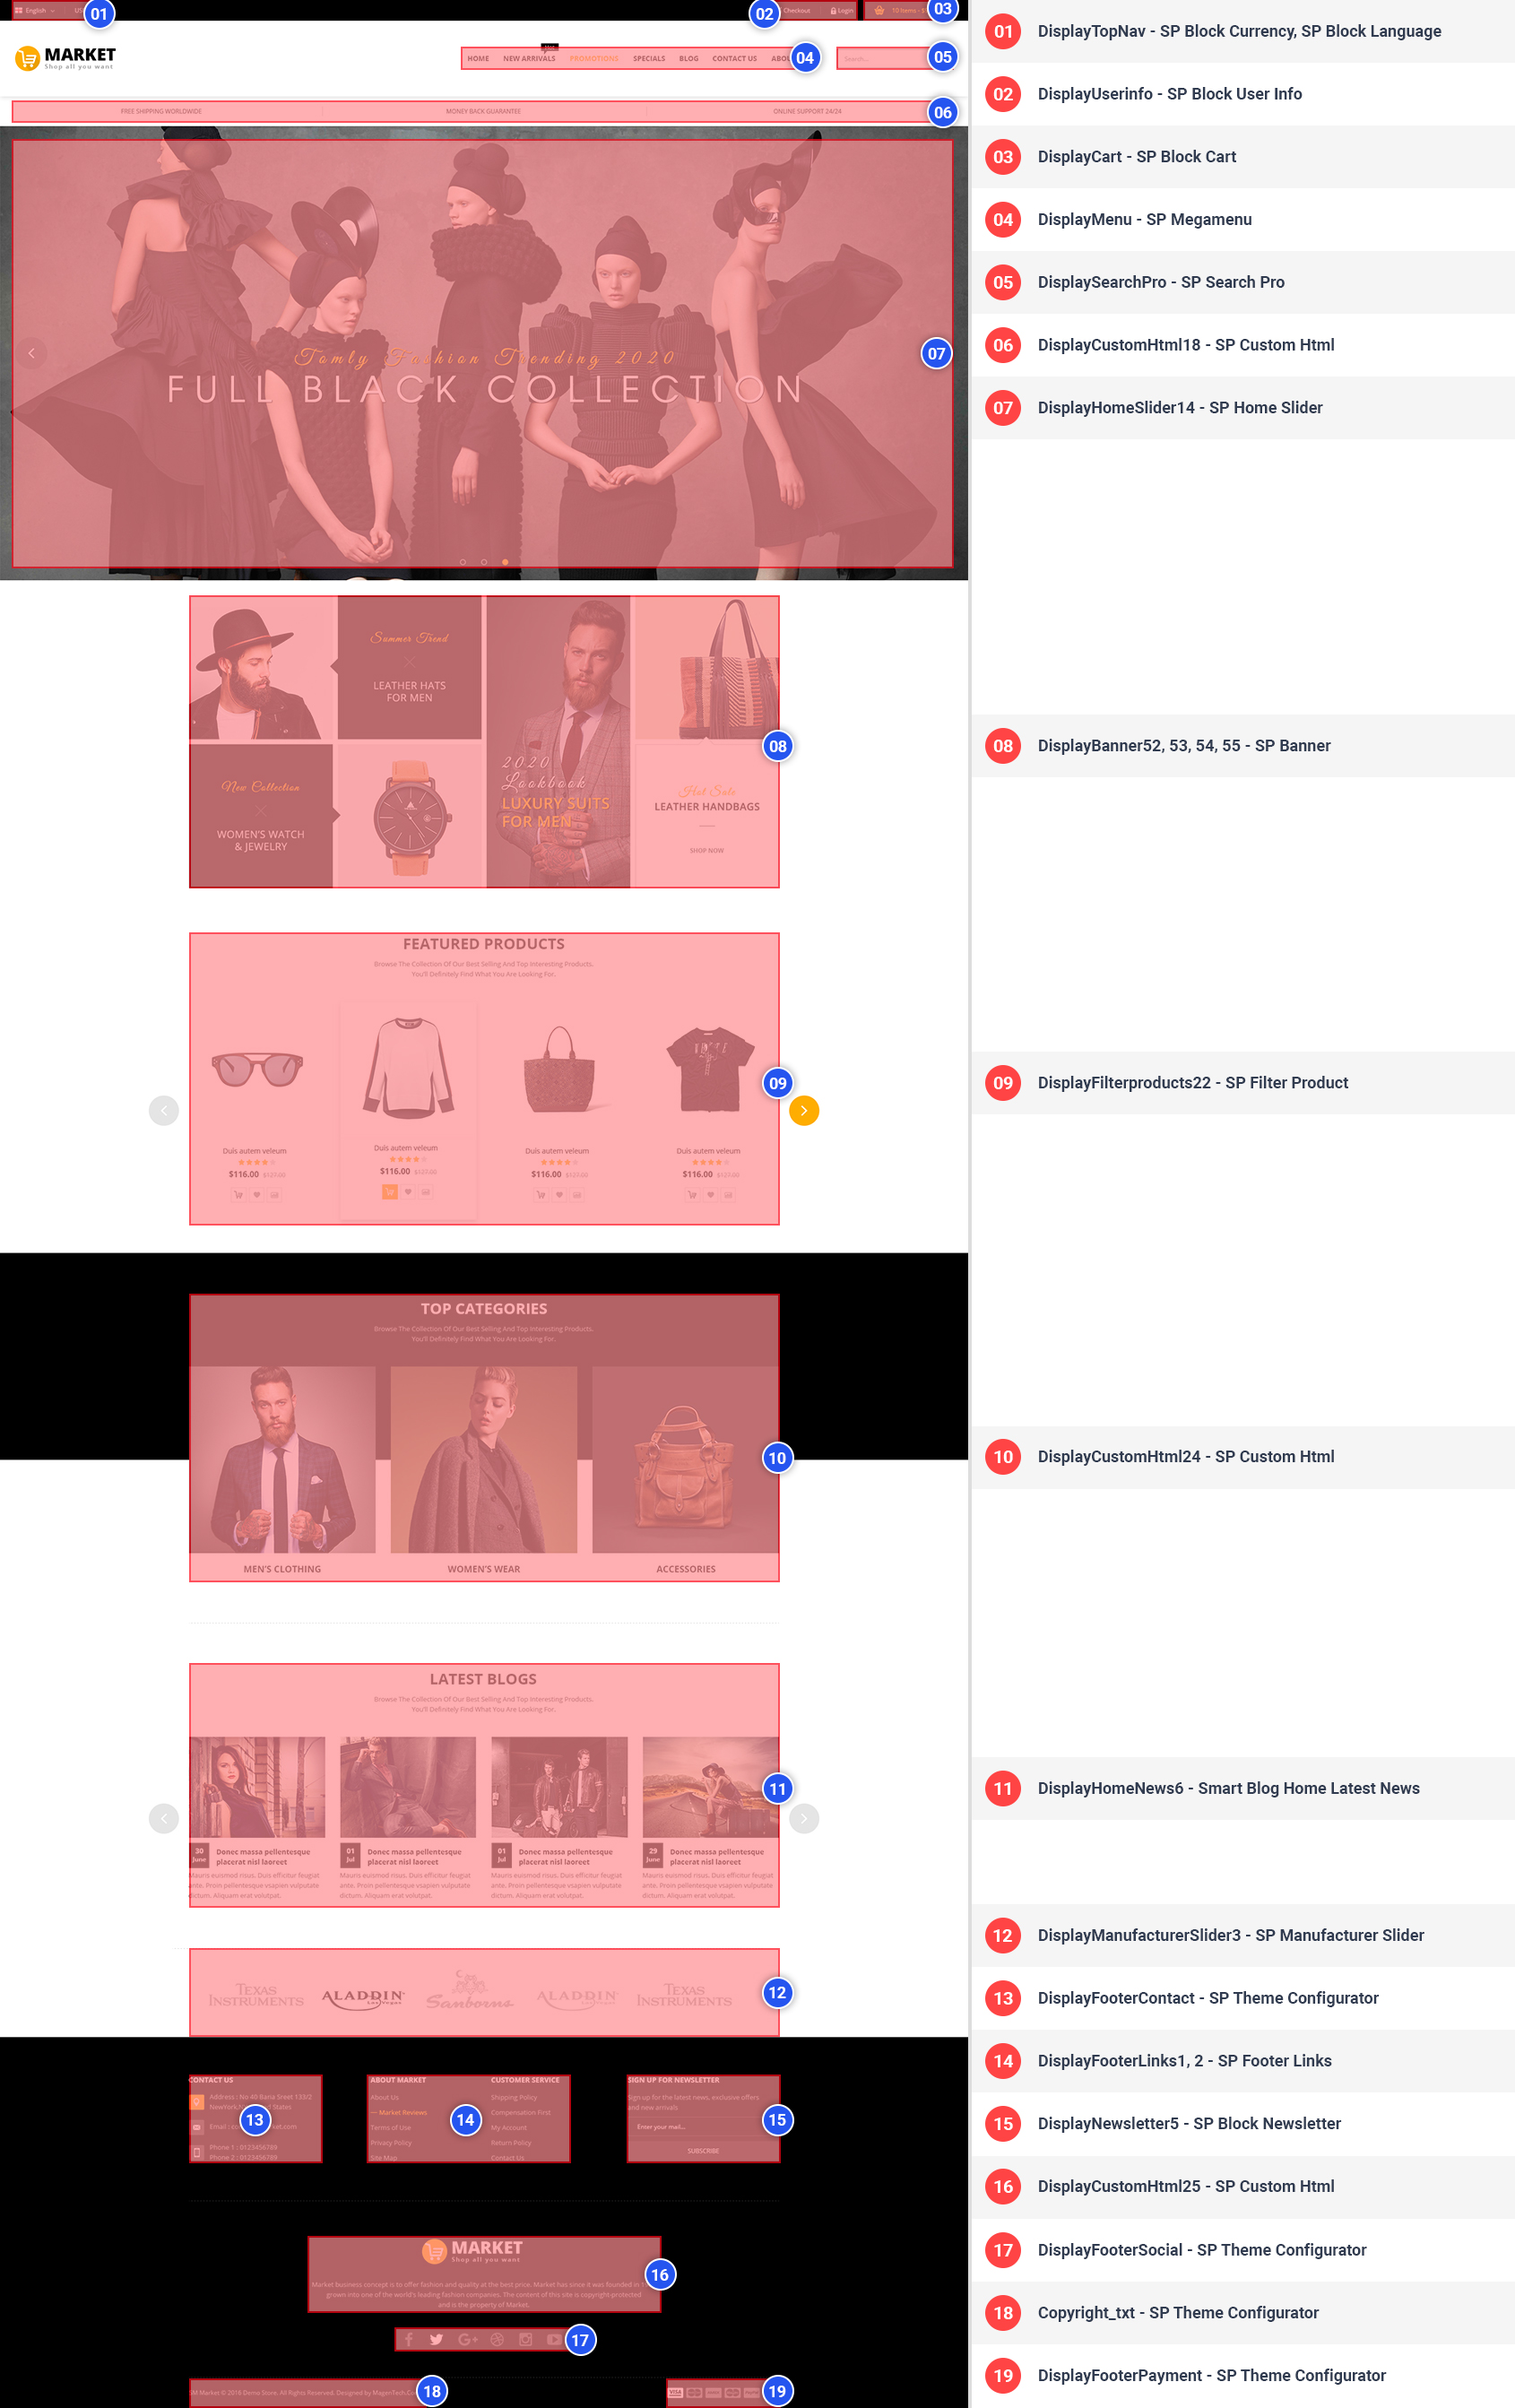
 Home Style 2
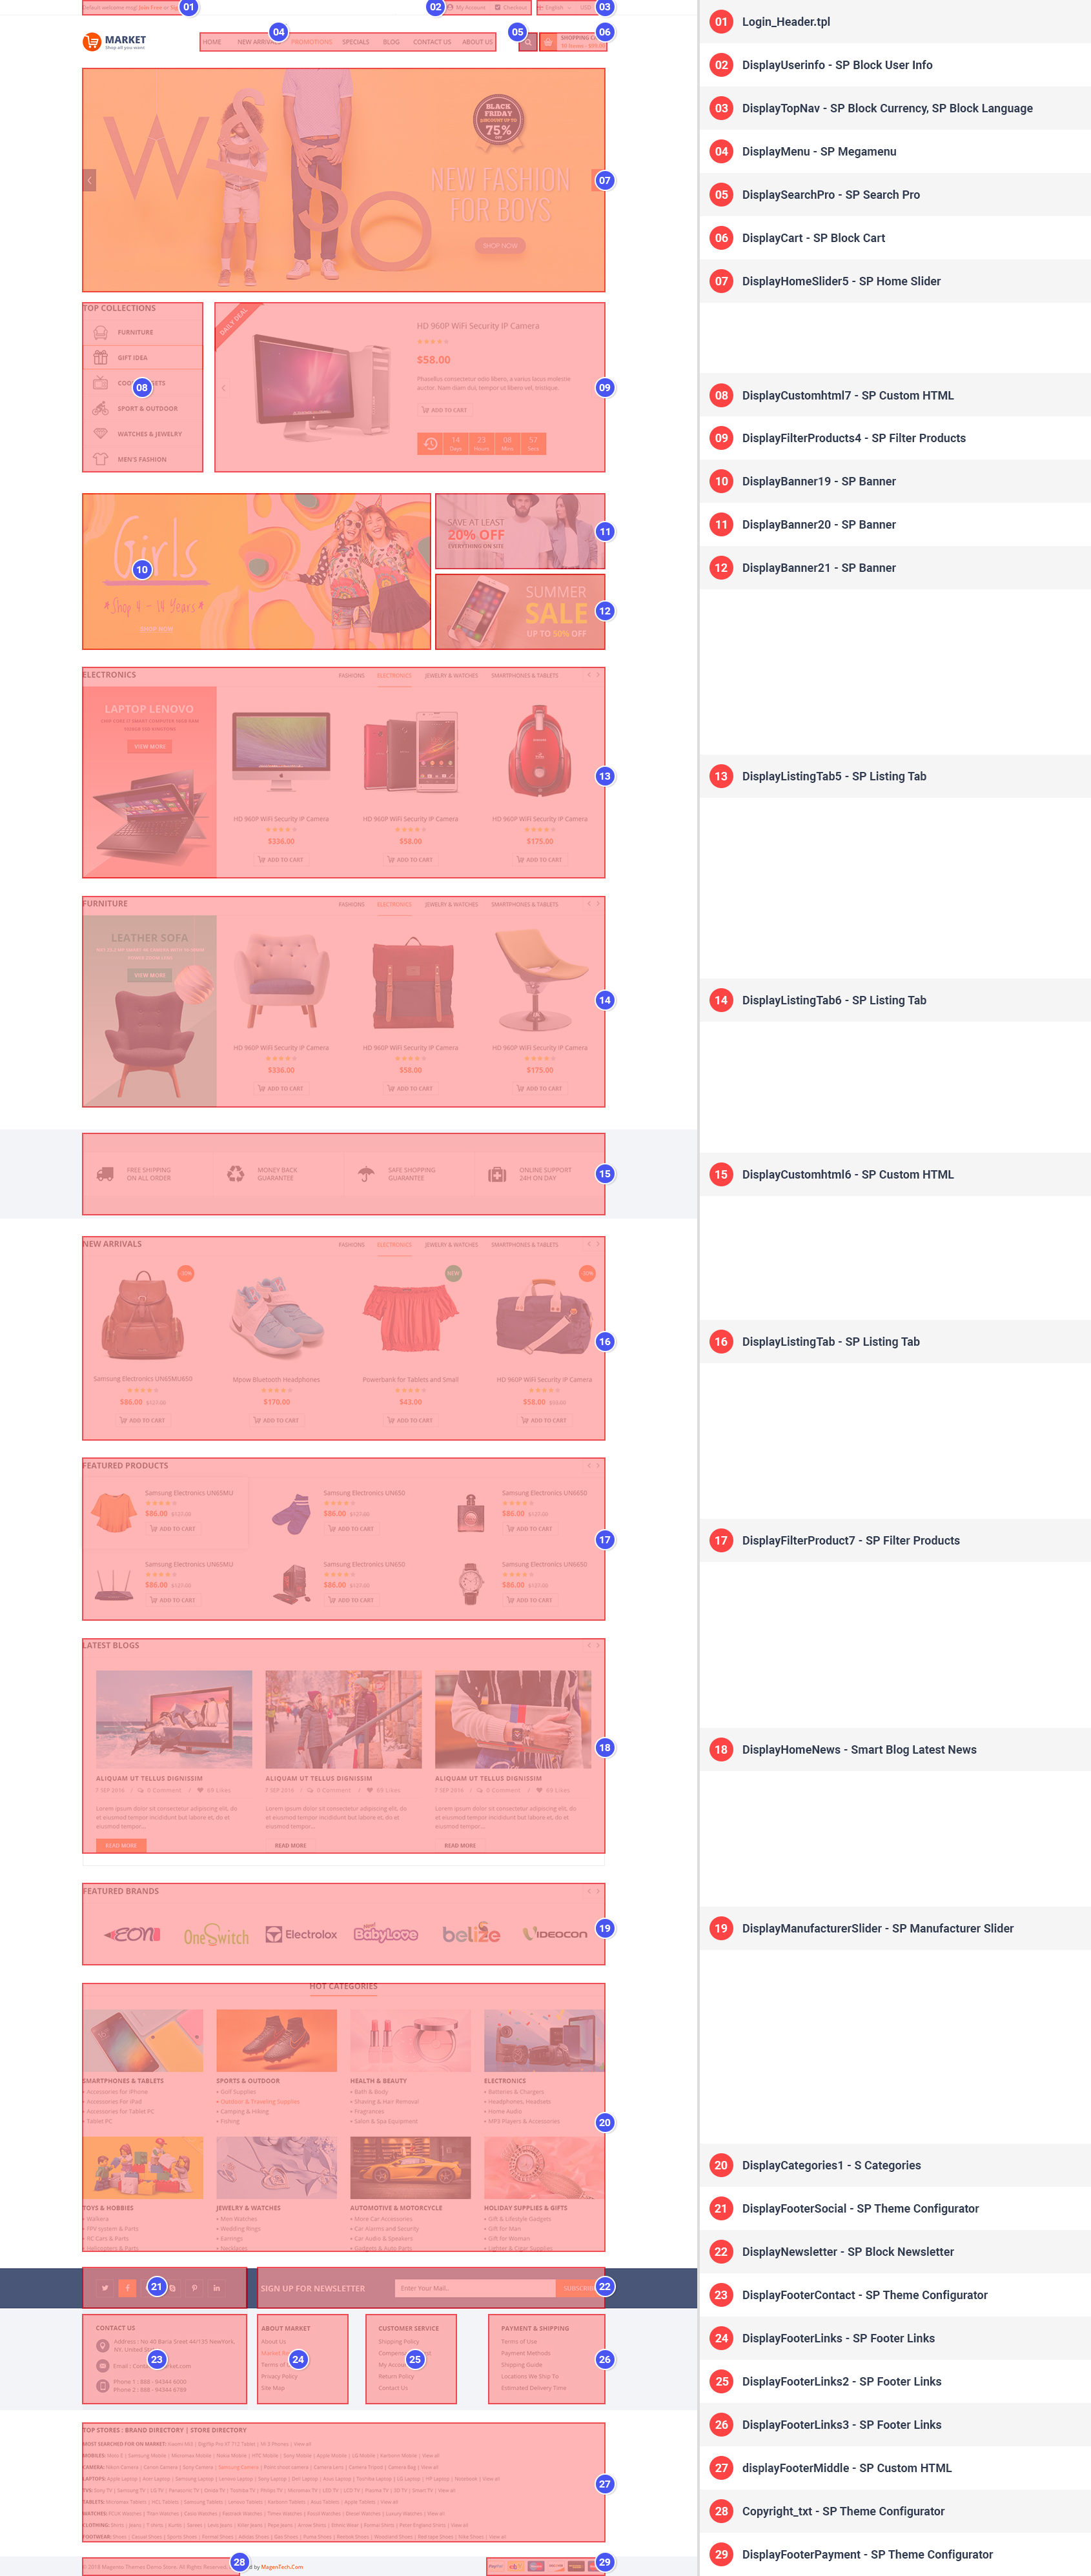
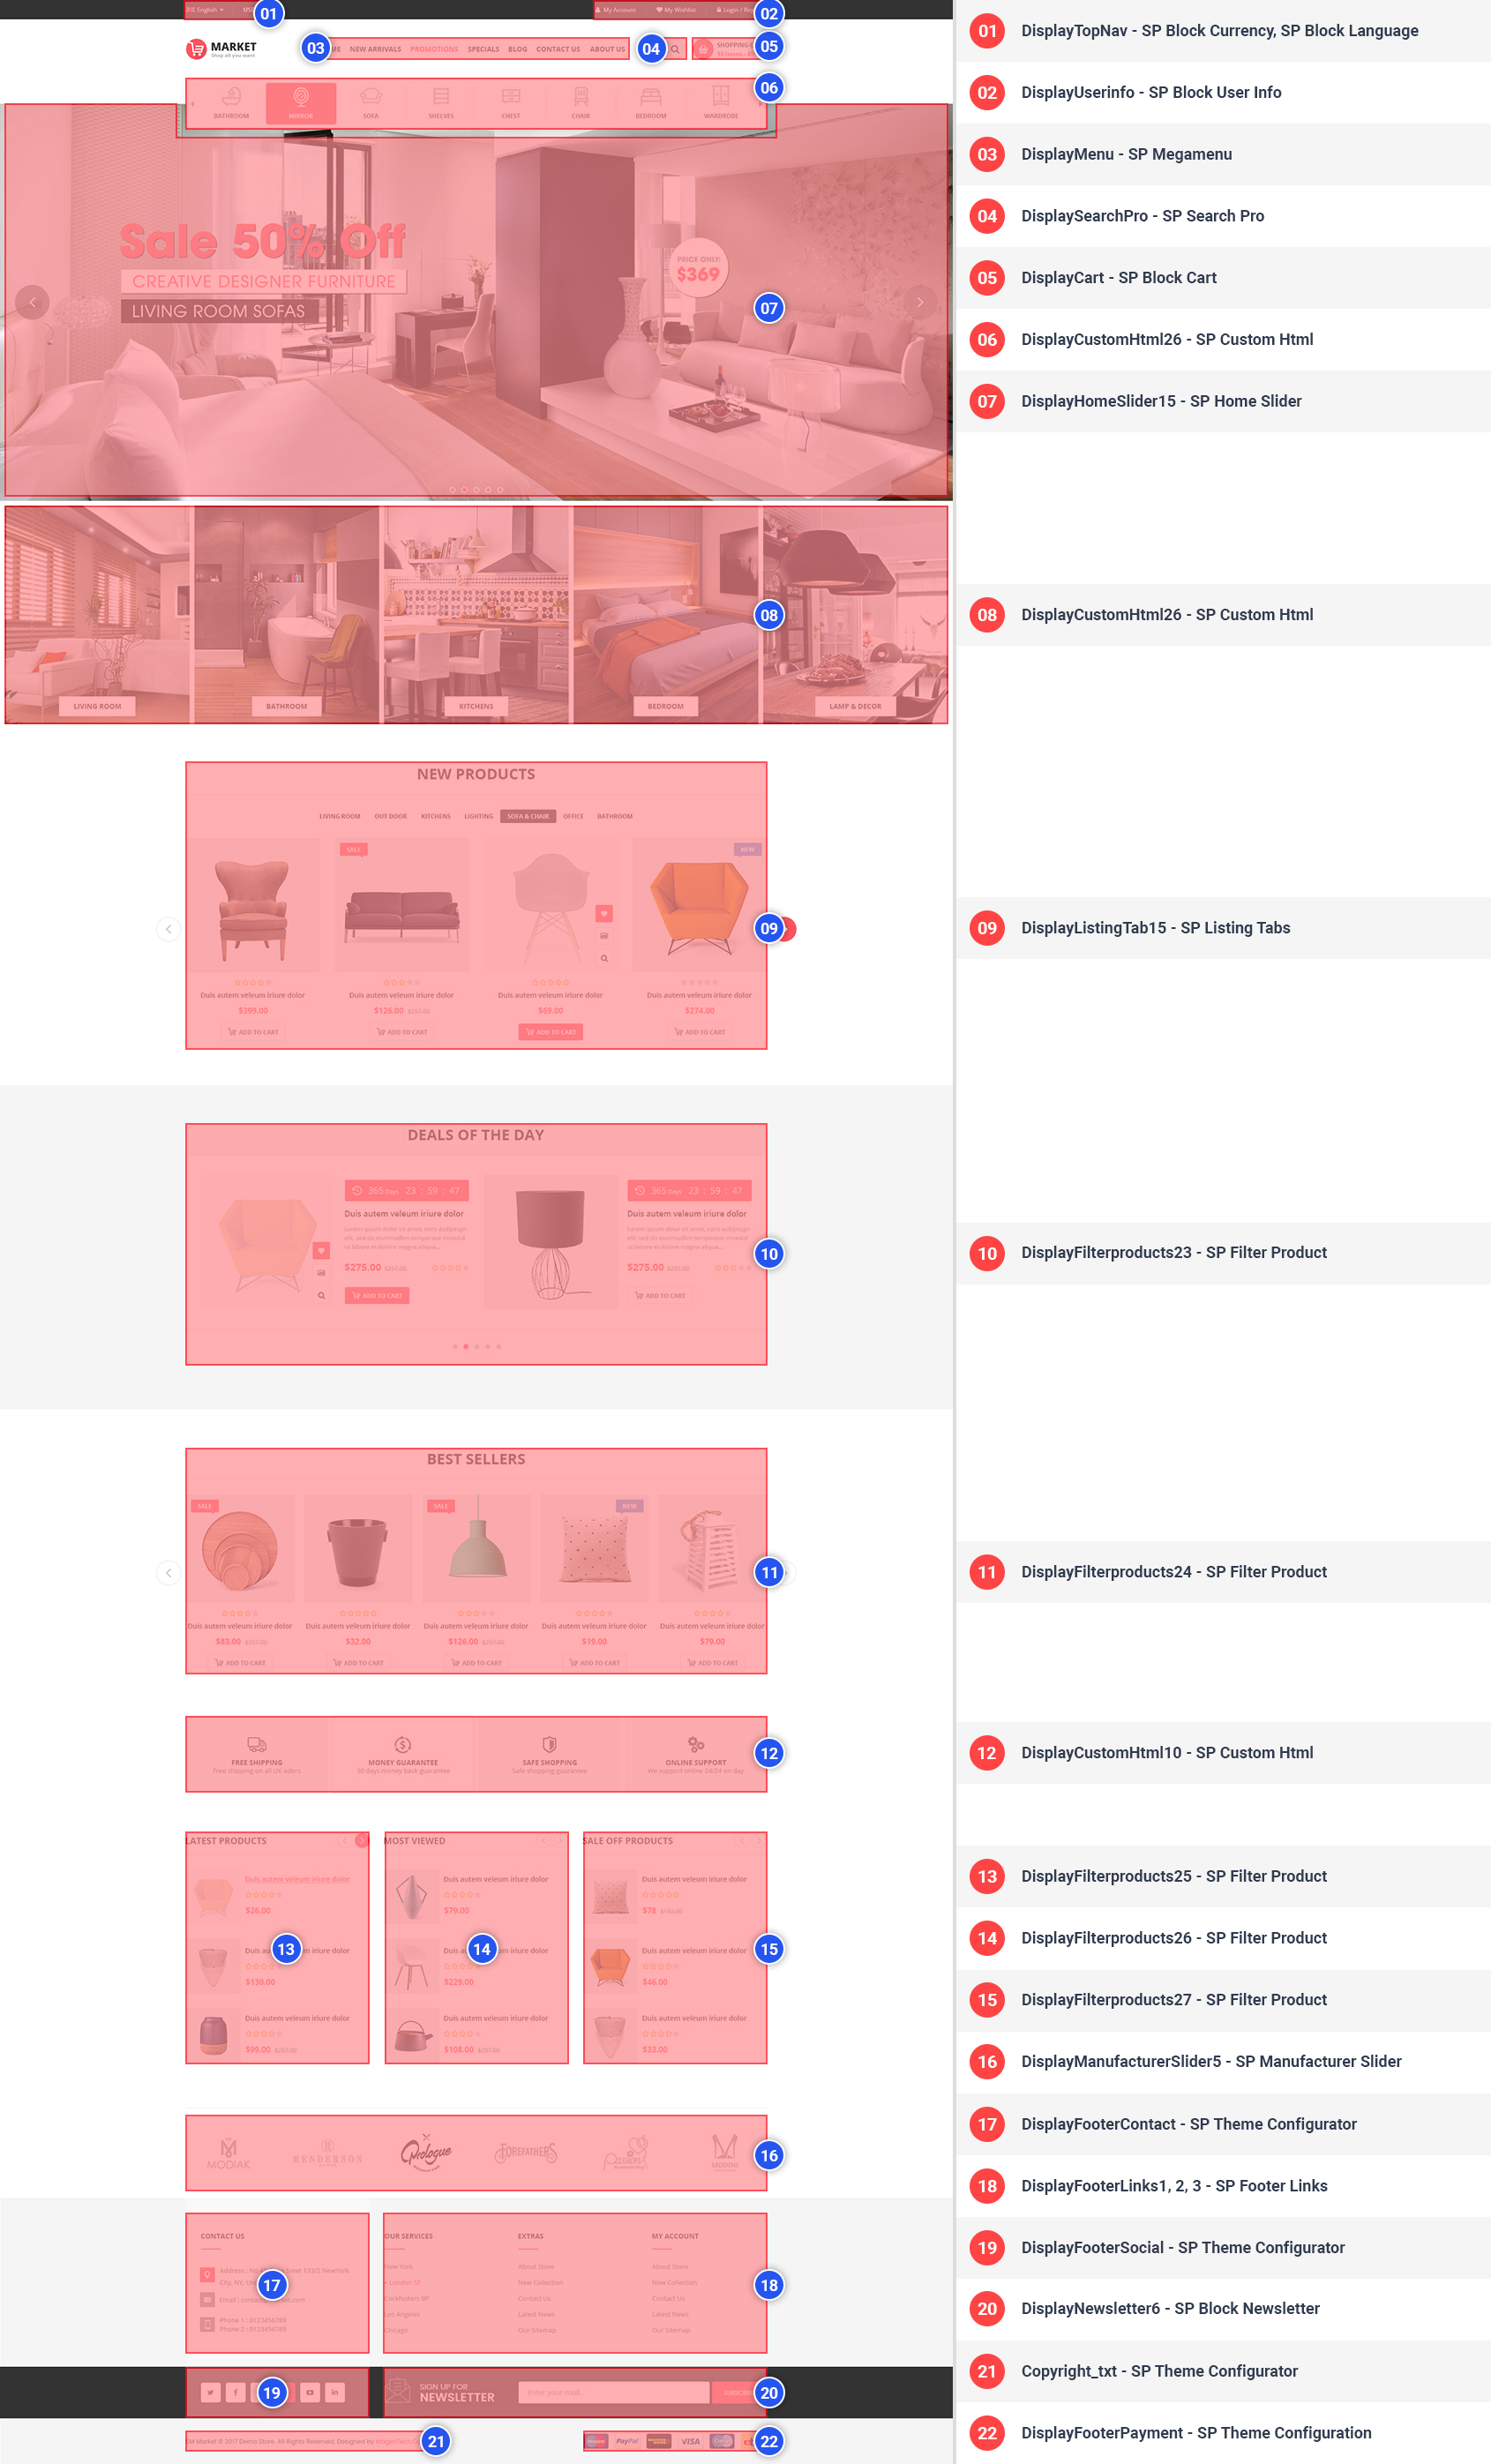
 Home Style 3
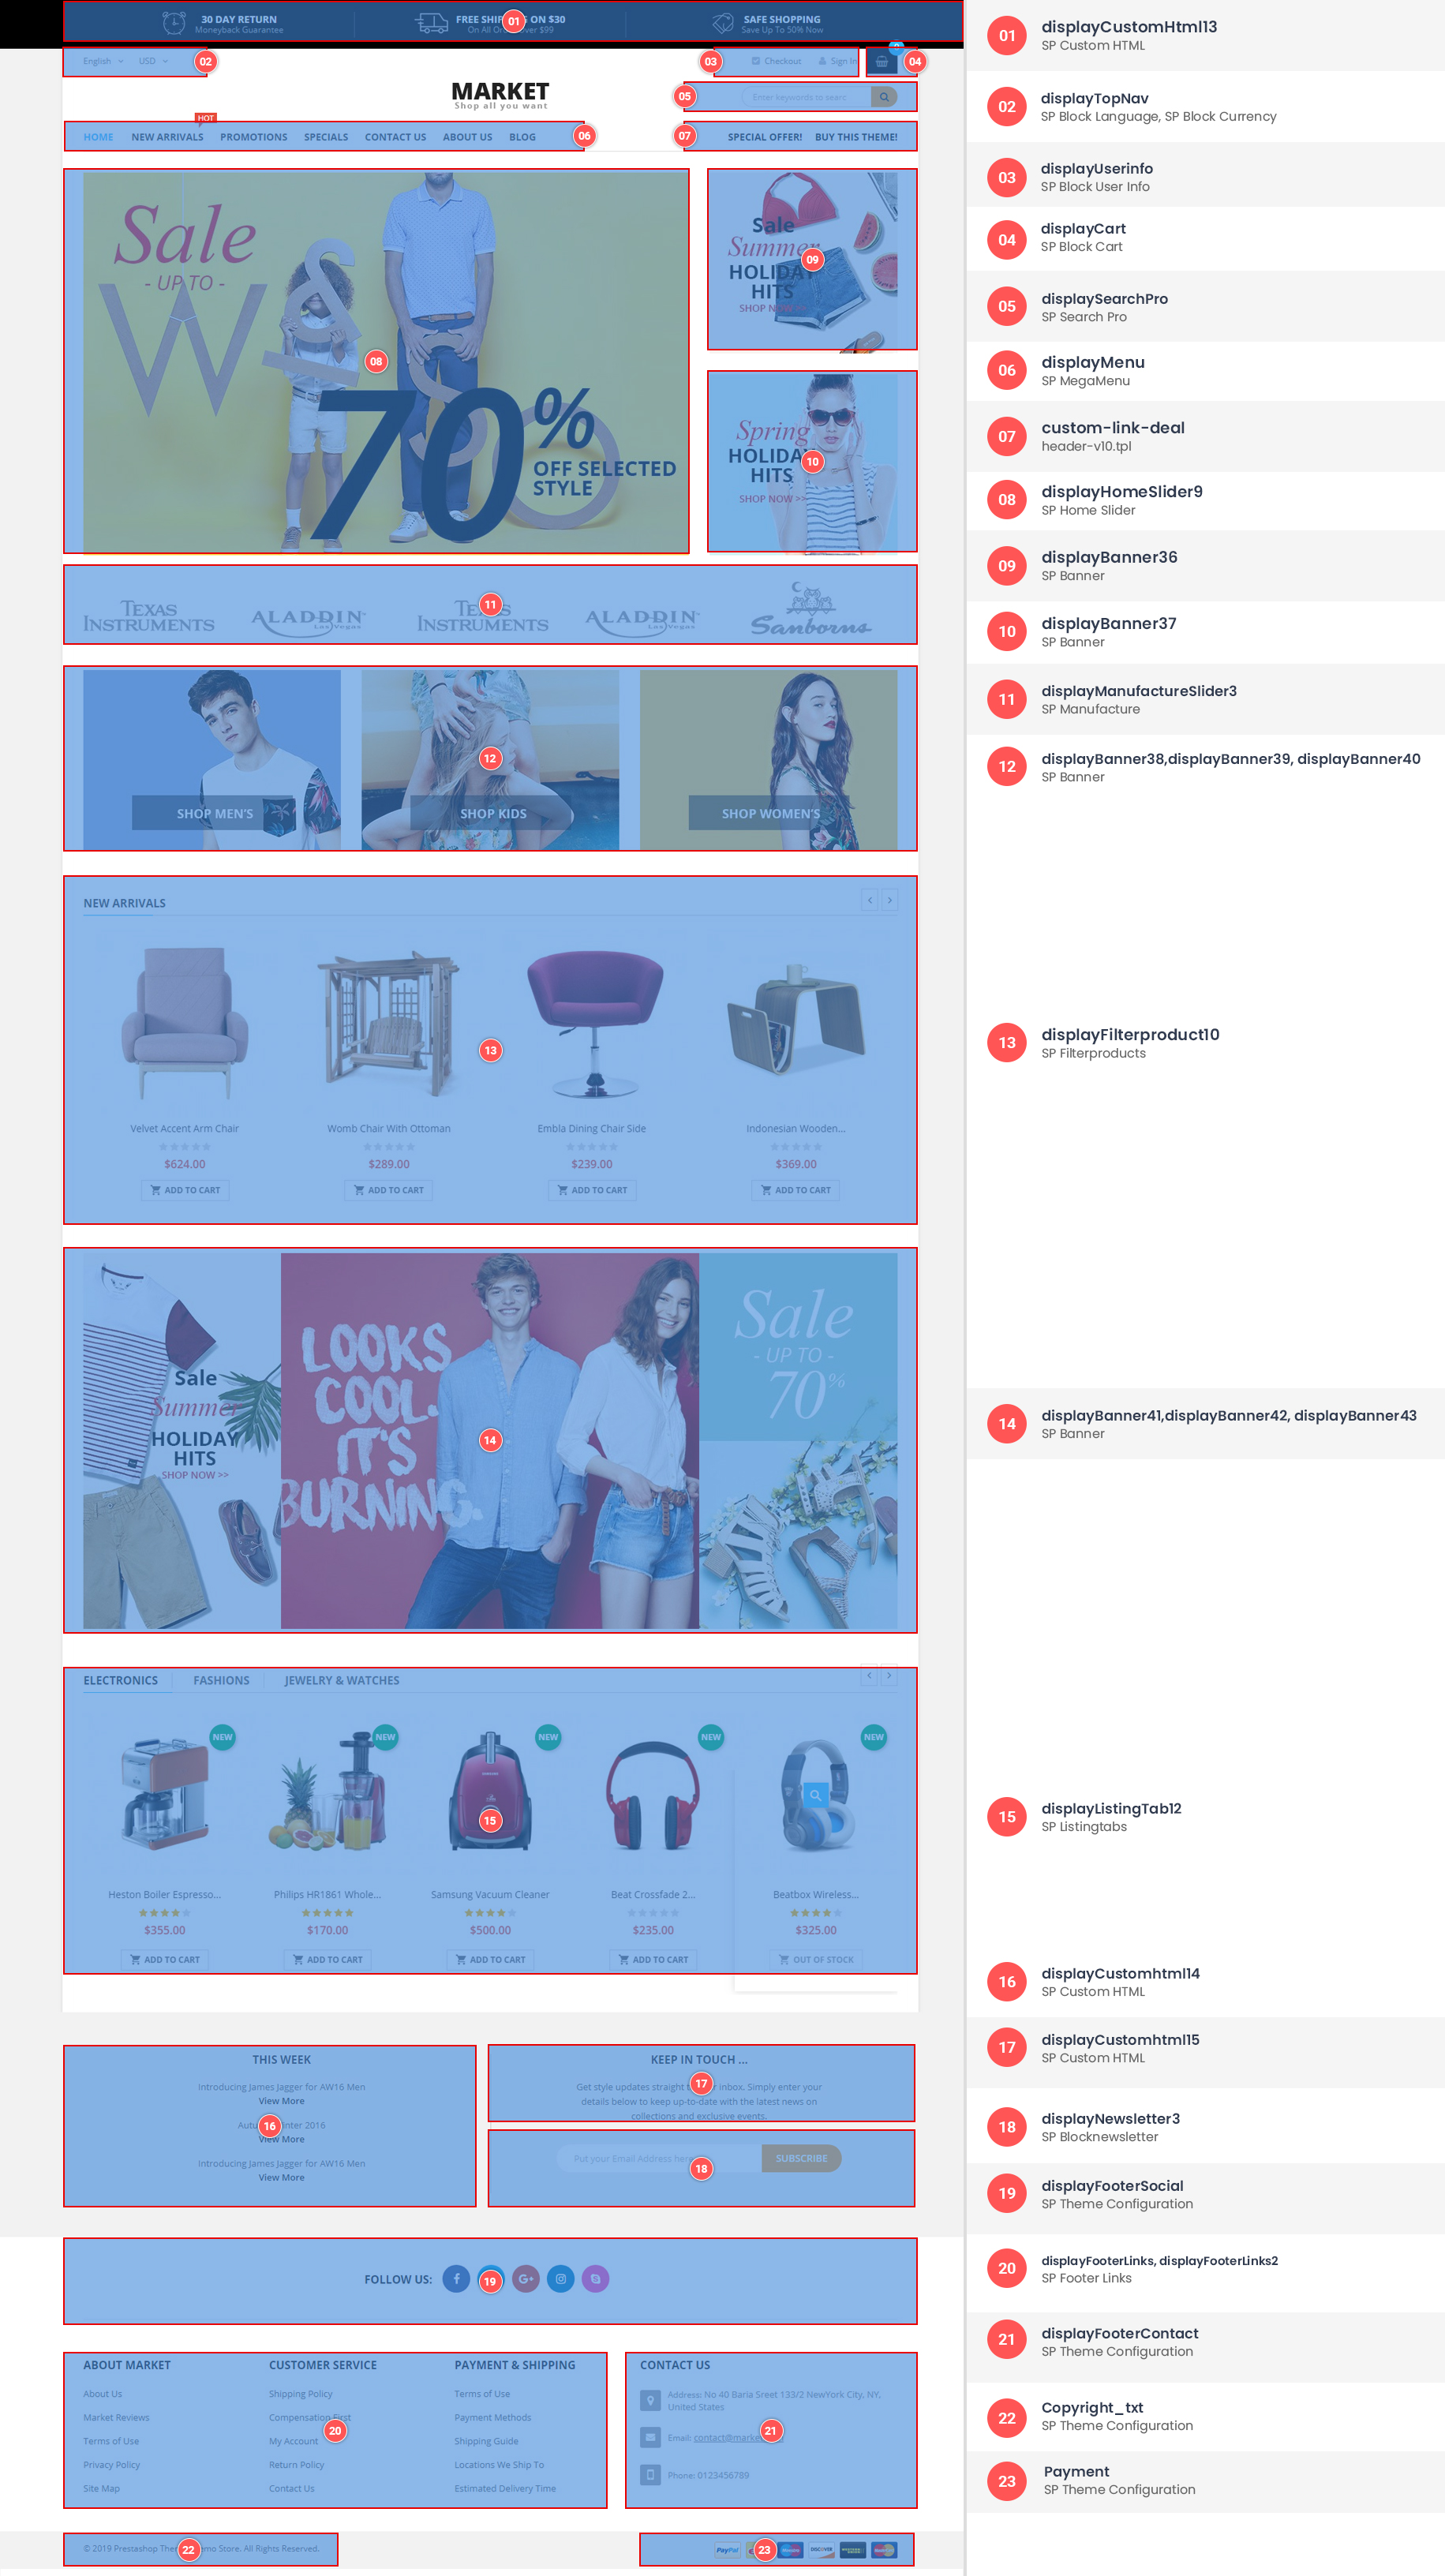
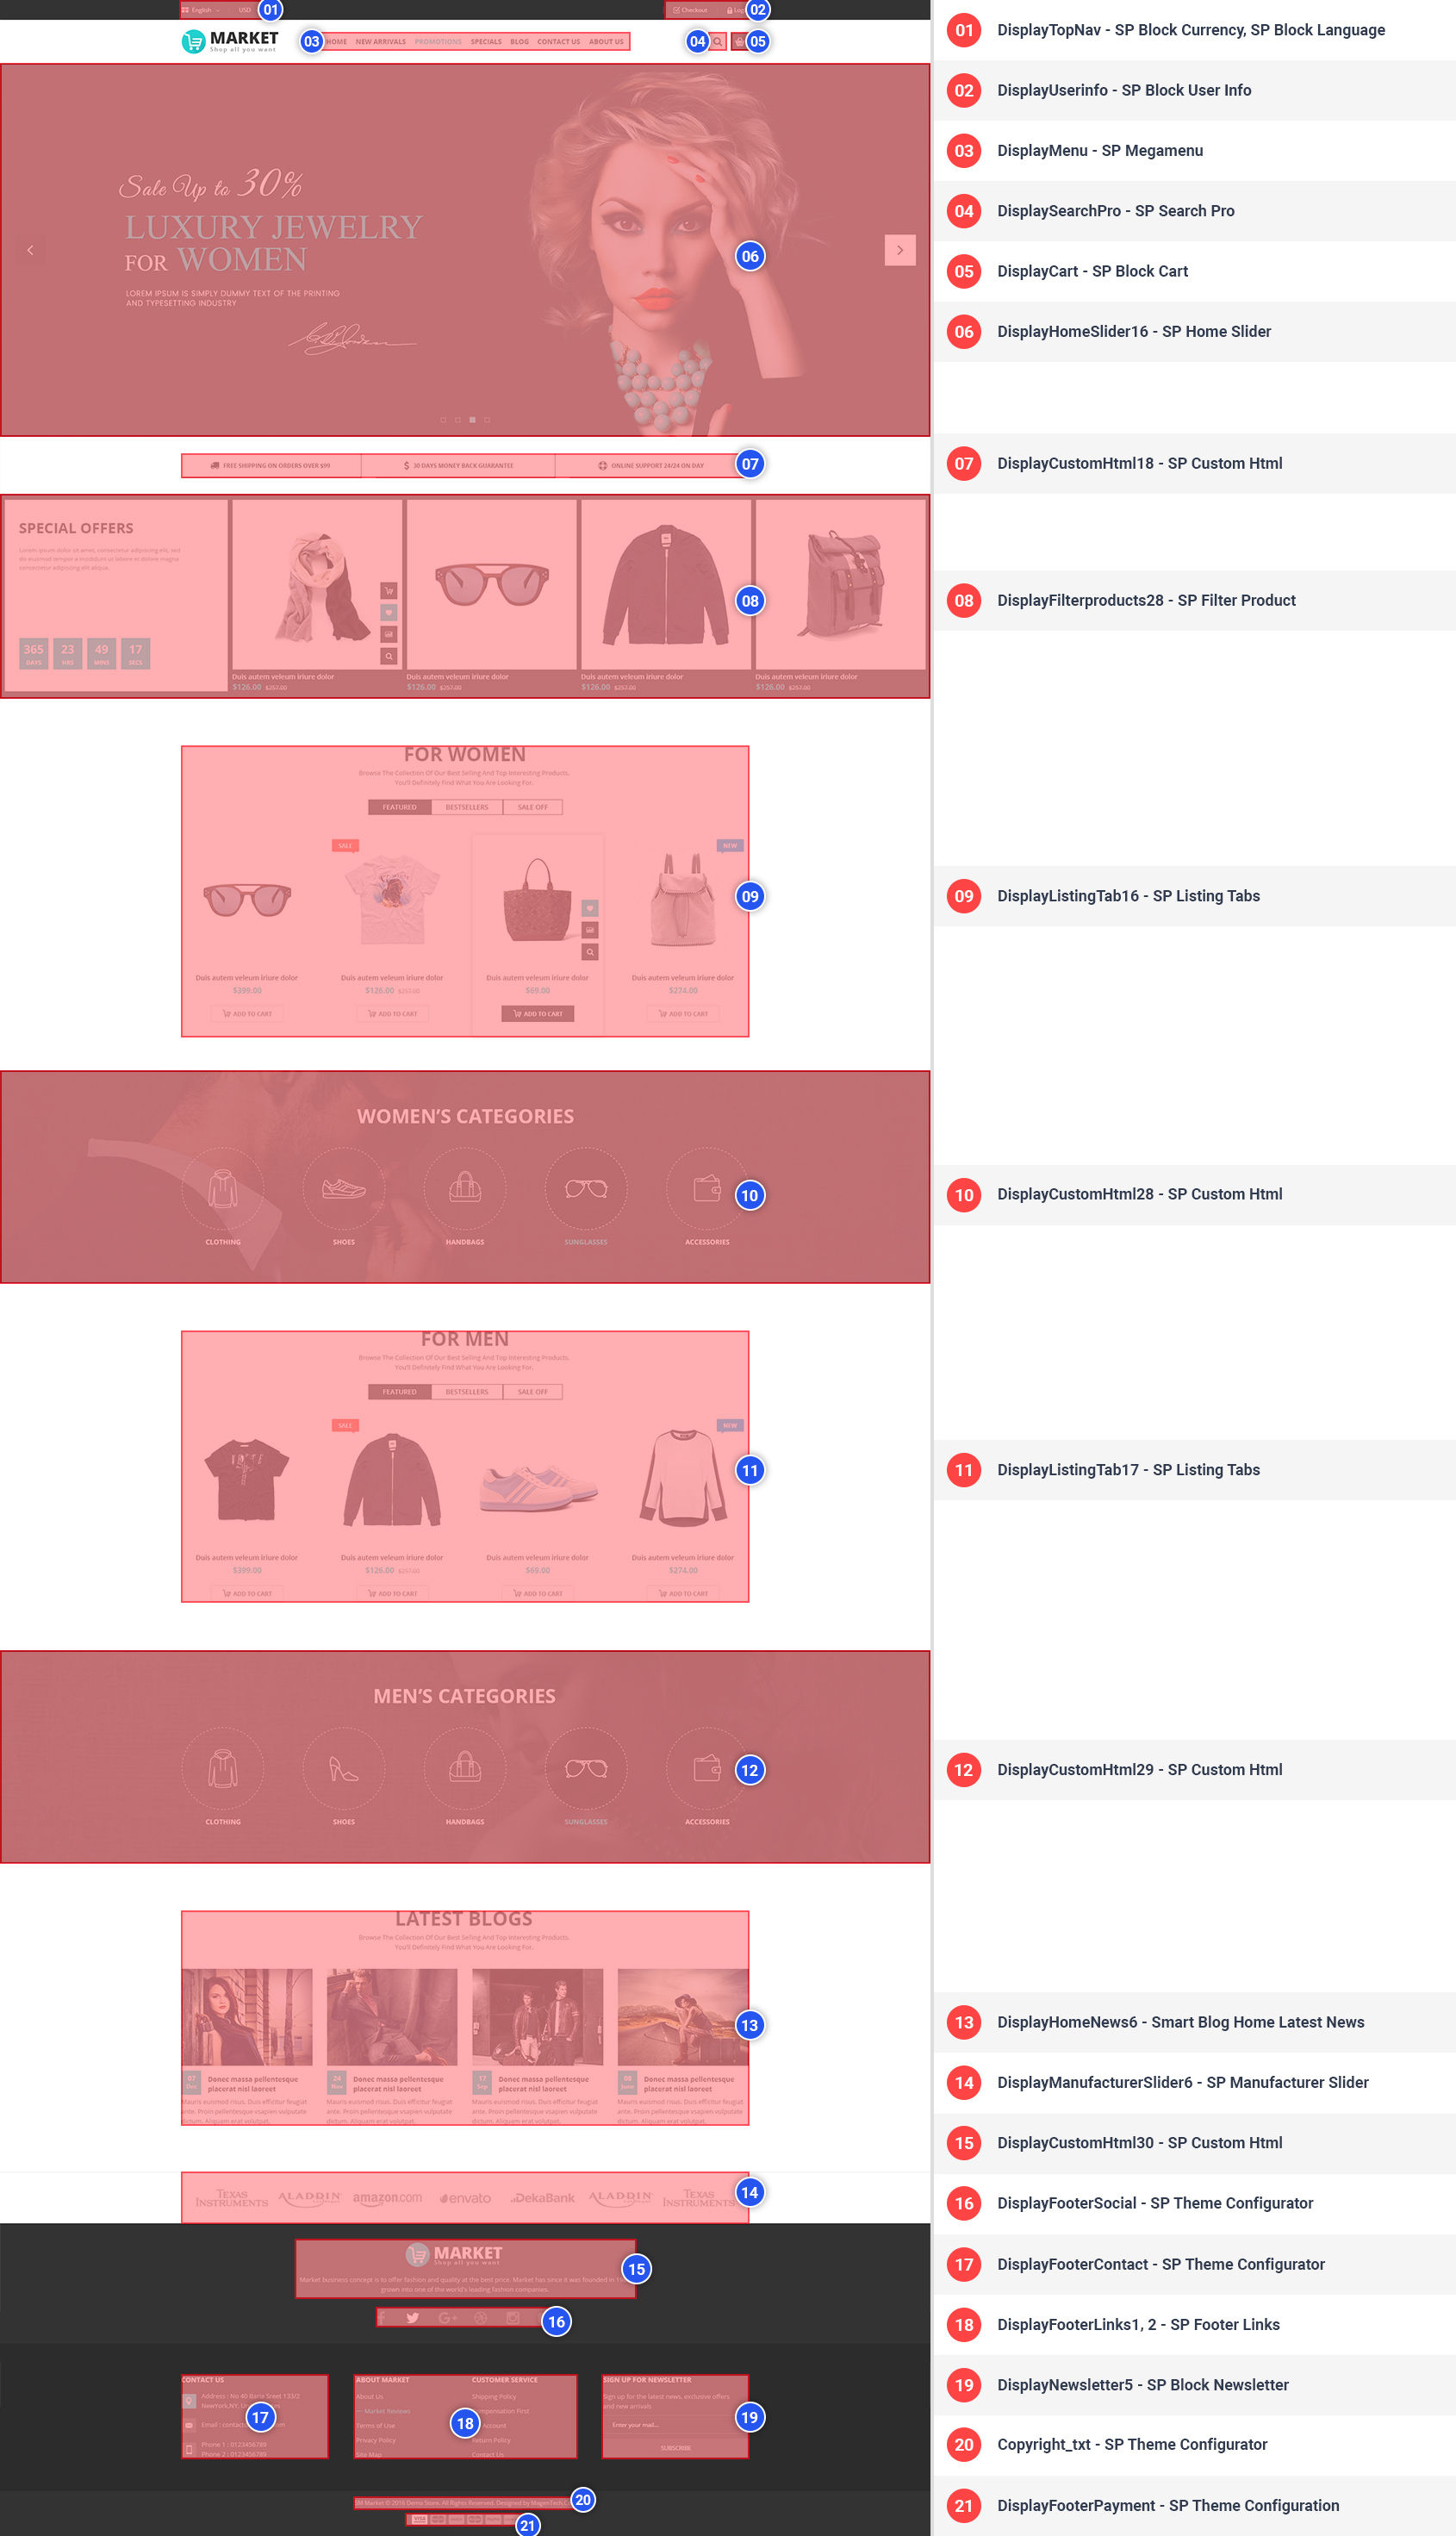
 Home Style 4
 Home Style 5
 Home Style 6
 Home Style 7
 Home Style 8
 Home Style 9
 Home Style 10
 Home Style 11
 Home Style 12
 Home Style 13
 Home Style 14
 Home Style 15
 Home Style 16
 Home Style 17
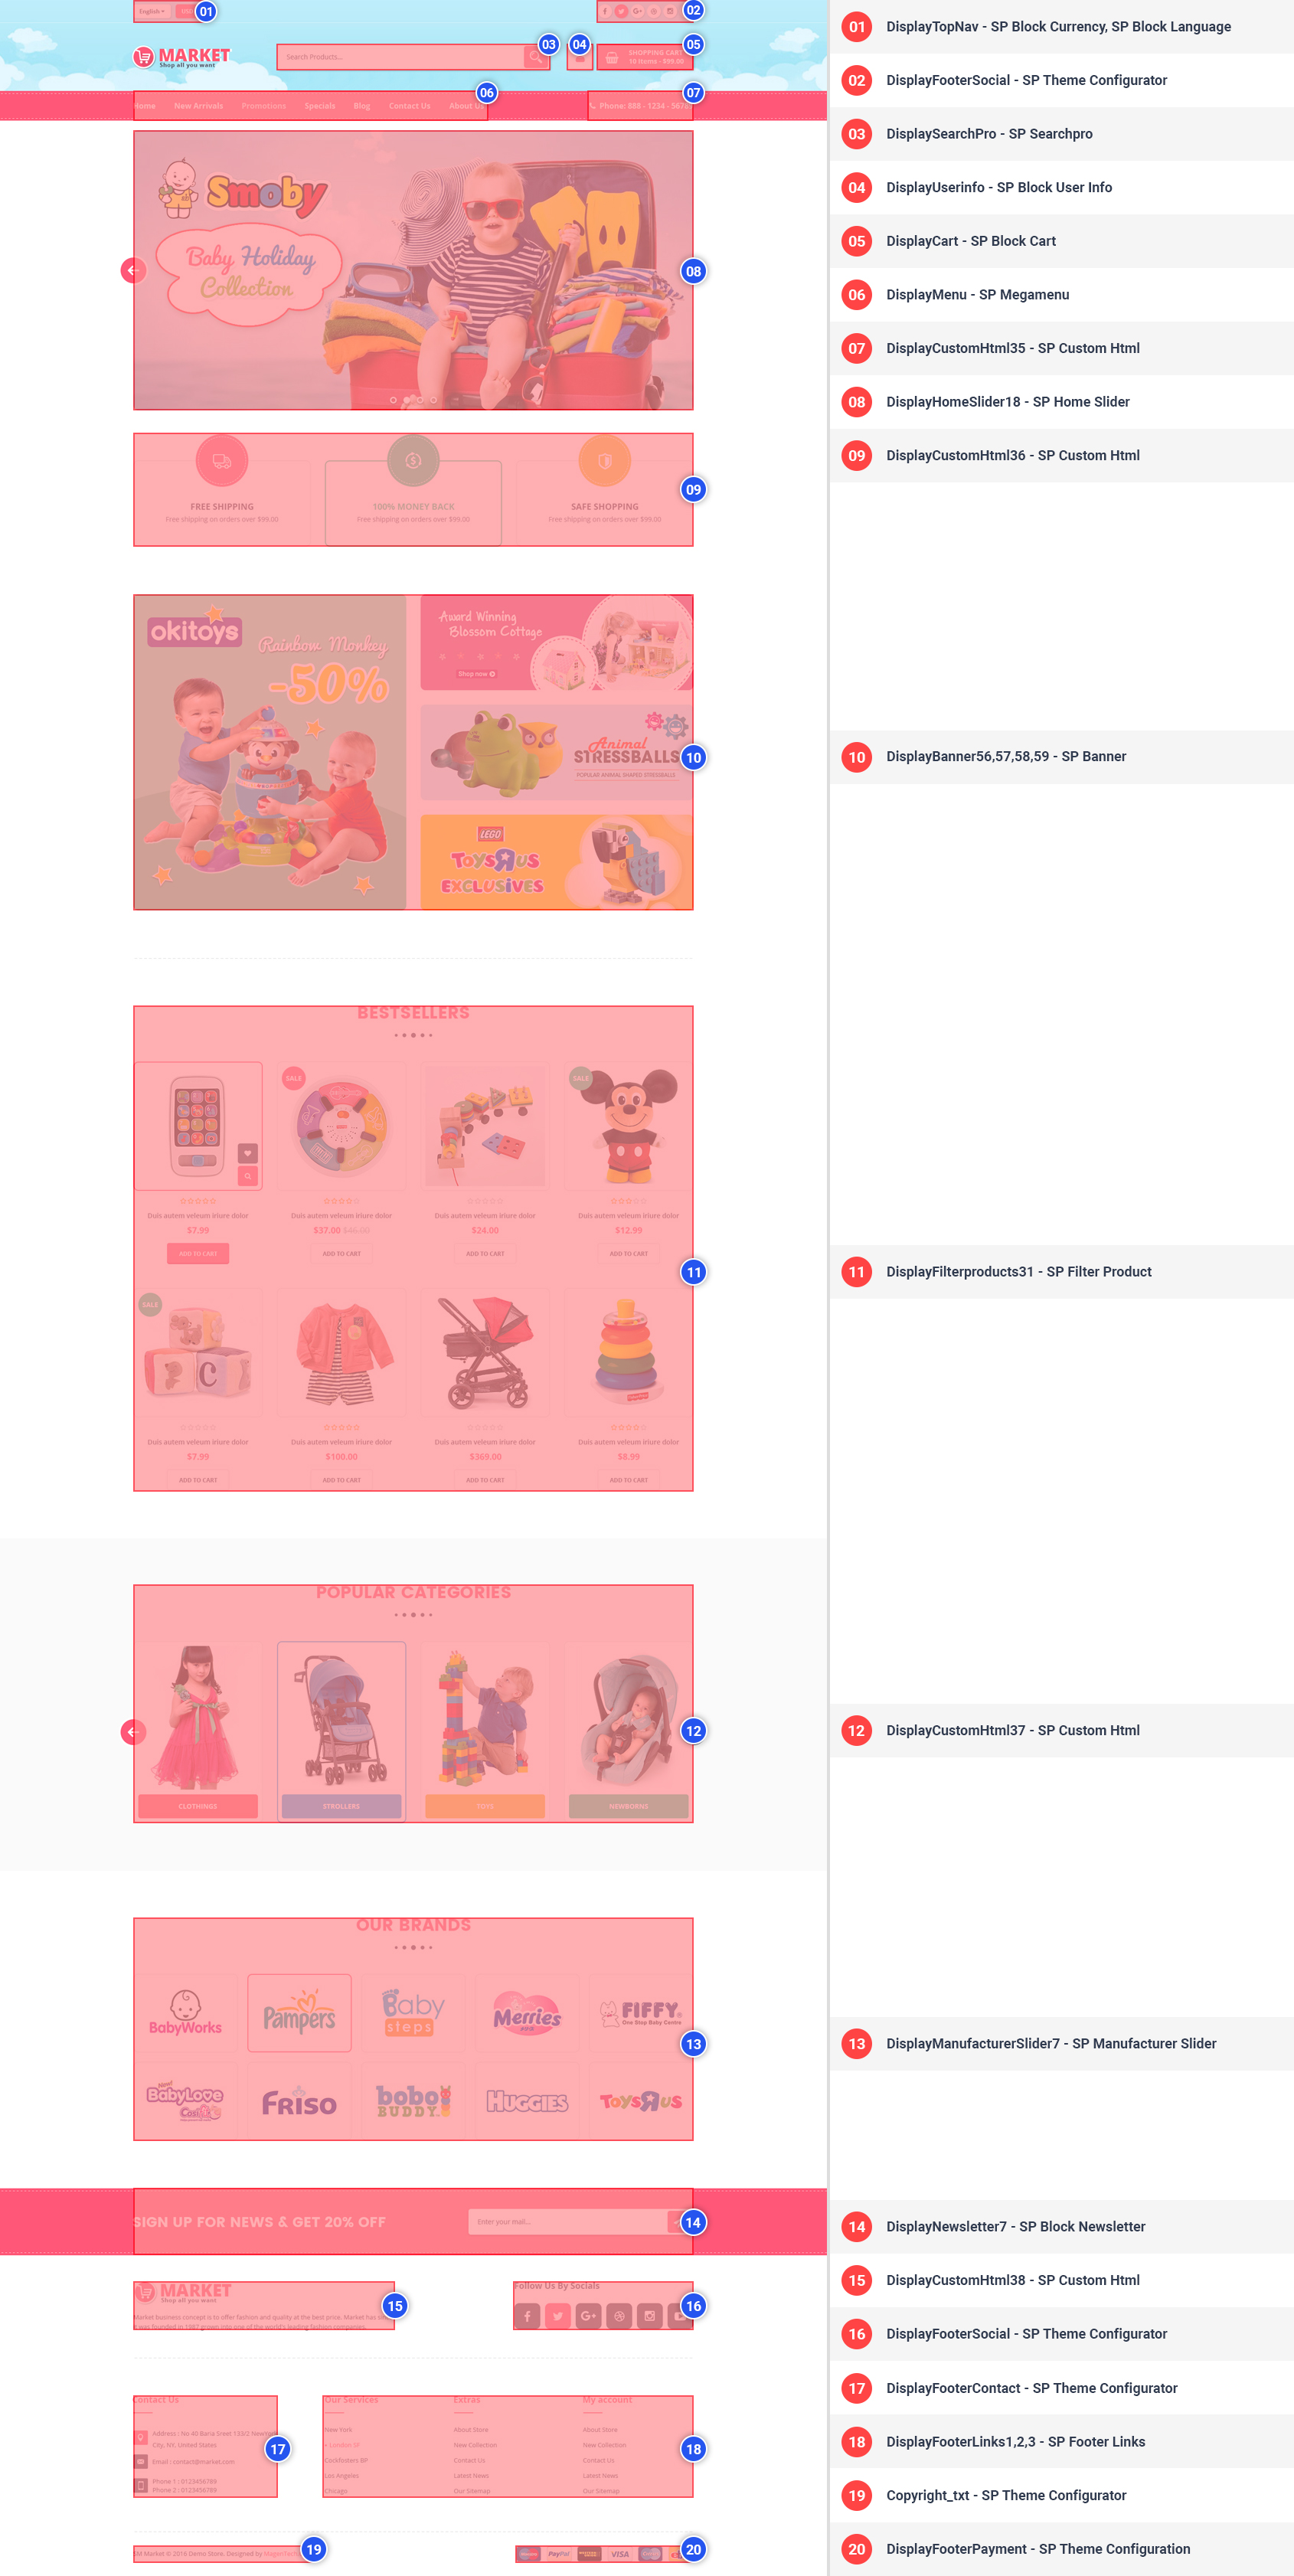
 Home Style 18
 Home Style 19
 Home Style 20
 Layout Mobile
Frontend Appearance:

Backend Settings:
Step 1: In the Prestashop Admin Panel, navigate to IMPROVE >> Modules >> Modules and Services >> look for “SP Newsletter Block” module.
Step 2: You could configure its settings like the illustration. You can Enable/Disable button "Enable Newsletter Popup" to Show/Hide popup.
Background image: You could override in folder "../themes/sp_market/assets/img/bg_popup.jpg"
a. SP Currencies Block
Frontend Appearance:

Backend Settings:
In the Prestashop Admin Panel, navigate to IMPROVE >> Modules >> Modules and Services >> Installed Modules look for “SP Currency Block” >> click “Enable” button to enable this module.
b. SP Languages Selector Block
Frontend Appearance:

Backend Settings:
In the Prestashop Admin Panel, navigate to IMPROVE >> Modules >> Modules and Services >> Installed Modules look for “SP Languages Selector Block >> click “Enable” button to enable this module.
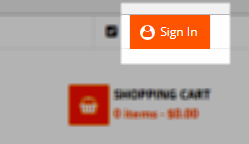
Sp Customer "Sign in" link
Frontend Appearance:
Backend Settings:
In the Prestashop Admin Panel, navigate to IMPROVE >> Modules >> Modules and Services >> Installed Modules look for “Sp Customer "Sign in" link” module >> click “Enable" button to enable this module.
SP Search Pro
Frontend Appearance:

Backend Settings:
Step 1: In the Prestashop Admin Panel, navigate to IMPROVE >> Modules >> Modules and Services >> Installed Modules look for “SP Search Pro” module >> click “Configure” button to configure.
Step 2: In the “SP Search Pro” configuration page, click  button in the right corner to “ADD NEW MODULE”.
Step 3: You could configure this module like the illustration.
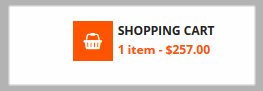
SP Shopping Cart
Frontend Appearance:
Backend Settings:
Step 1: In the Prestashop Admin Panel, navigate to IMPROVE >> Modules >> Modules and Services >> Installed Modules look for “ SP Shopping Cart module >> click “Configure” button to configure.
Step 2: You could configure this module like the illustration
SP Custom HTML
Frontend Appearance:

Backend Setting:
Step 1: In the Prestashop Admin Panel, navigate to IMPROVE >> Modules >> Modules and Services >> Installed Modules look for “SP Custom HTML module >> click “Configure” button to configure.
Step 2: In the “SP Custom HTML” configuration page, click button in the right corner to “ADD NEW MODULE”.
Step 3: You could configure this module like the illustration
Copy and paste the following code into the content:
<div class="custom-tag clearfix"><label>Top Search:</label>
<ul>
<li><a href="#">Tattoo Kits</a></li>
<li>,</li>
<li><a href="#">Electronic Cigarettes</a></li>
<li>,</li>
<li><a href="#">Sexy Lingerie </a></li>
<li>,</li>
<li><a href="#">Eye Makeup</a></li>
<li>,</li>
<li><a href="#">iPad Mini Cases </a></li>
<li>,</li>
<li><a href="#">Phone 5 Cases</a></li>
<li>,</li>
<li><a href="#">Tattoo Supplies </a></li>
<li>,</li>
<li><a href="#">RC Helicopters</a></li>
</ul>
</div>
SP Home Slider
Frontend Appearance:

Backend Settings:
Step 1: In the Prestashop Admin Panel, navigate to IMPROVE >> Modules >> Modules and Services >> Installed Modules look for “Sp slider for your homepage module >> click “Configure” button to configure.
Step 2: In the “SP Slider For Your Homepage” configuration page, click button in the right corner to “ADD NEW MODULE”.
Step 3: You could configure this module like the illustration
Step 4: In the last part named Slides List of this configuration page, click button in the right corner to add new slide and edit slide’s information as follows:
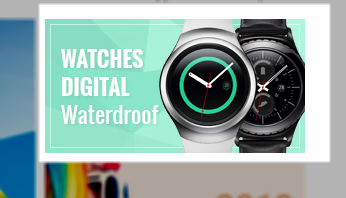
SP Banner
Frontend Appearance:
Backend Settings:
Step 1: In the Prestashop Admin Panel, navigate to IMPROVE >> Modules >> Modules and Services >> Installed Modules look for “SP Banner module.
Step 2: In the “SP Banner” configuration page, click button in the right corner to “ADD NEW MODULE”.
Step 3: You could configure this module like the illustration
Do the same with other banner.SP Custom HTML
Frontend Appearance:

Backend Setting:
Step 1: In the Prestashop Admin Panel, navigate to IMPROVE >> Modules >> Modules and Services >> Installed Modules look for “SP Custom HTML module >> click “Configure” button to configure.
Step 2: In the “SP Custom HTML” configuration page, click button in the right corner to “ADD NEW MODULE”.
Step 3: You could configure this module like the illustration
Copy and paste the following code into the content:
<div class="services-home">
<div class="banner-policy">
<div class="inner">
<div class="policy"><a title="90 days money back" href="#"><em class="fa fa-truck"></em><span>FREE SHIPPING<br />ON ALL ORDER</span></a></div>
<div class="policy"><a title="free shipping on all orders" href="#"><em class="fa fa-recycle"></em><span>Money Back<br />Guarantee</span></a></div>
<div class="policy"><a title="lowest price guarantee" href="#"><em class="fa fa-umbrella"></em><span>SAFE SHOPPING<br />GUARANTEE</span></a></div>
</div>
</div>
</div>
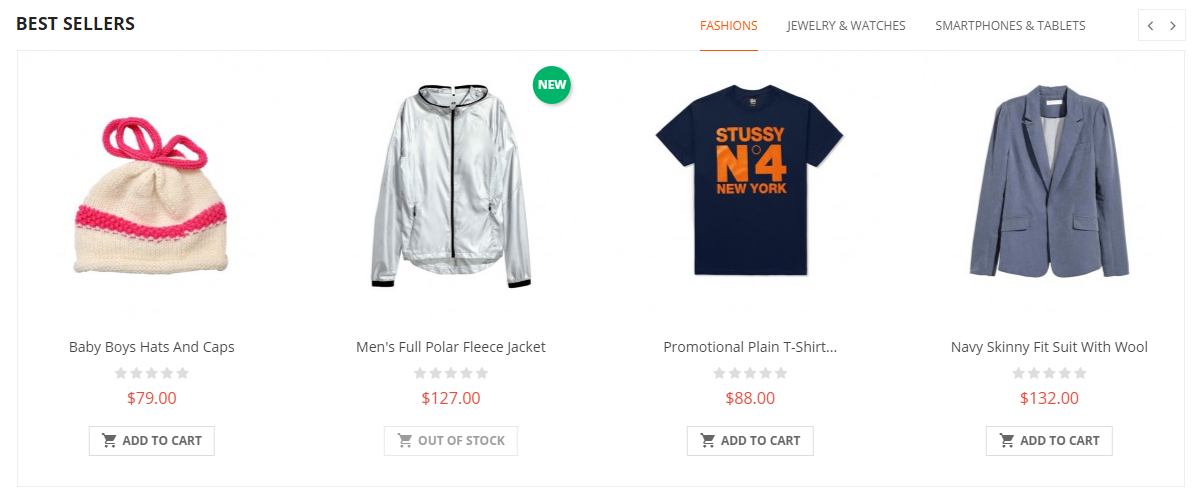
SP Listing Tab – BEST SELLERS
Frontend Appearance:
Backend Settings:
Step 1: In the Prestashop Admin Panel, navigate to IMPROVE >> Modules >> Modules and Services >> Installed Modules look for “SP Listing Tab module.
Step 2: In the “SP Listing Tab” configuration page, click button in the right corner to “ADD NEW MODULE”.
Step 3: You could configure this module like the illustration
SP Listing Tab – NEW ARRIVALS
Frontend Appearance:

Backend Settings:
Step 1: In the Prestashop Admin Panel, navigate to IMPROVE >> Modules >> Modules and Services >> Installed Modules look for “SP Listing Tab module.
Step 2: In the “SP Listing Tab” configuration page, click button in the right corner to “ADD NEW MODULE”.
Step 3: You could configure this module like the illustration
SP Custom HTML
Frontend Appearance:

Backend Setting:
Step 1: In the Prestashop Admin Panel, navigate to IMPROVE >> Modules >> Modules and Services >> Installed Modules look for “SP Custom HTML module >> click “Configure” button to configure.
Step 2: In the “SP Custom HTML” configuration page, click button in the right corner to “ADD NEW MODULE”.
Step 3: You could configure this module like the illustration
Copy and paste the following code into the content:
<div class="collection">
<div class="title-collections module-title"><span>COLLECTIONS</span></div>
<div class="scroll-container">
<div class="scroll-block">
<div class="item-table">
<div class="item item-table-cell">
<div class="item-inner"><a href="#" title="Collection Image"> <img src="/ytc_templates/prestashop/sp_marketv2/themes/sp_market2/assets/img/icon/item-1.png" alt="Collection Image" /><span>Furniture</span> </a></div>
</div>
<div class="item item-table-cell">
<div class="item-inner"><a href="#" title="Collection Image"> <img src="/ytc_templates/prestashop/sp_marketv2/themes/sp_market2/assets/img/icon/item-2.png" alt="Collection Image" /><span>GIFT IDEA</span> </a></div>
</div>
<div class="item item-table-cell">
<div class="item-inner"><a href="#" title="Collection Image"> <img src="/ytc_templates/prestashop/sp_marketv2/themes/sp_market2/assets/img/icon/item-3.png" alt="Collection Image" /><span>COOL GADGETS</span> </a></div>
</div>
<div class="item item-table-cell">
<div class="item-inner"><a href="#" title="Collection Image"> <img src="/ytc_templates/prestashop/sp_marketv2/themes/sp_market2/assets/img/icon/item-4.png" alt="Collection Image" /><span>OUTDOOR</span> </a></div>
</div>
<div class="item item-table-cell">
<div class="item-inner"><a href="#" title="Collection Image"> <img src="/ytc_templates/prestashop/sp_marketv2/themes/sp_market2/assets/img/icon/item-5.png" alt="Collection Image" /><span>Jewelry</span> </a></div>
</div>
<div class="item item-table-cell">
<div class="item-inner"><a href="#" title="Collection Image"> <img src="/ytc_templates/prestashop/sp_marketv2/themes/sp_market2/assets/img/icon/item-6.png" alt="Collection Image" /><span>Men's Fashion</span> </a></div>
</div>
</div>
</div>
</div>
</div>
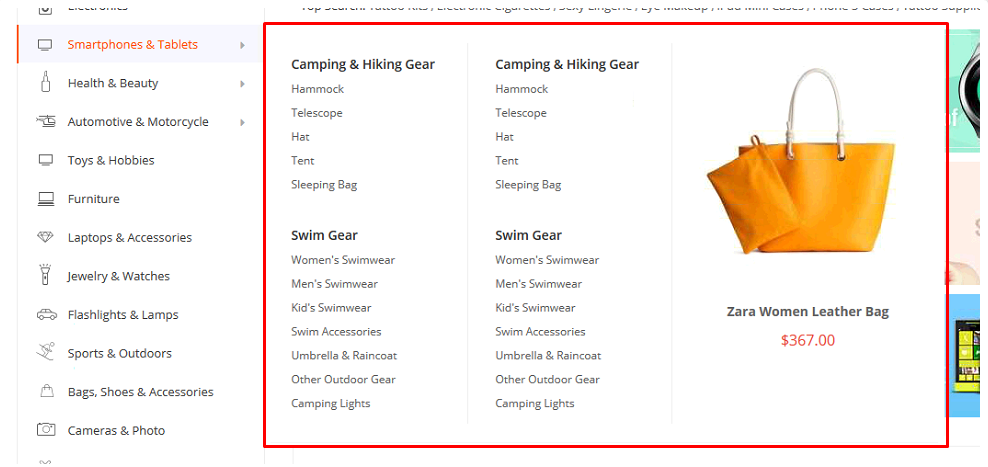
SP Categories
Frontend Appearance:

Backend Settings:
Step 1: In the Prestashop Admin Panel, navigate to IMPROVE >> Modules >> Modules and Services >> Installed Modules look for “SP Categories module.
Step 2: In the “SP Categories” configuration page, click button in the right corner to “ADD NEW MODULE”.
Step 3: You could configure this module like the illustration
Store information
Frontend Appearance:

Backend Settings:
Step 1: In the Prestashop Admin Panel, navigate to IMPROVE >> Modules >> Modules and Services >> Installed Modules look for “SP Theme Configuration module.
Step 2: In the SP Theme Settings, choose “Social” to configure the parameters in this section.

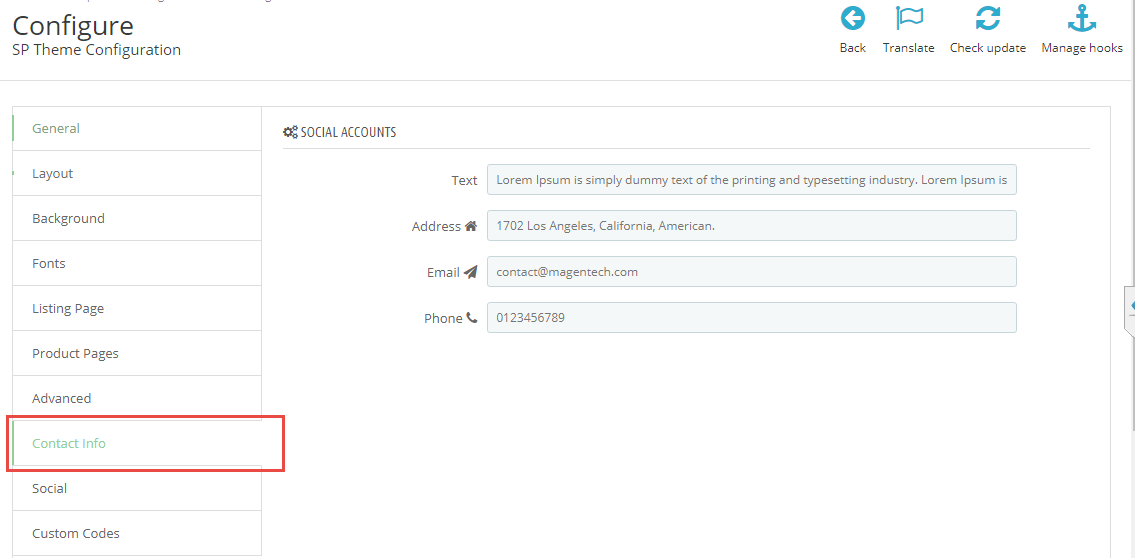
SP Theme Configurator – ABOUT US
Frontend Appearance:

Backend Settings:
Step 1: In the Prestashop Admin Panel, navigate to IMPROVE >> Modules >> Modules and Services >> Installed Modules look for “SP Theme Configuration module.
Step 2: In the SP Theme Settings, choose “Contact Info” to configure the parameters in this section.
INFORMATION
Frontend Appearance:

Backend Settings:
Step 1: In the Prestashop Admin Panel, navigate to IMPROVE >> Modules >> Modules and Services >> Installed Modules look for “SP Footer Links module >> click “Configure” button to configure.
Step 2: In the “SP Footer Links” configuration page, click button in the right corner to “ADD NEW MODULE”.
Step 3: You could configure this module like the illustration
Do the same with FooterLinks1, FooterLinks2SP Custom HTML
Frontend Appearance:

Backend Setting:
Step 1: In the Prestashop Admin Panel, navigate to IMPROVE >> Modules >> Modules and Services >> Installed Modules look for “SP Custom HTML module >> click “Configure” button to configure.
Step 2: In the “SP Custom HTML” configuration page, click button in the right corner to “ADD NEW MODULE”.
Step 3: You could configure this module like the illustration
Copy and paste the following code into the content:
<div class="footer-toplinks">
<div class="topstore"><label>Top Stores : </label>
<ul>
<li><a href="#">Brand Directory</a></li>
<li class="last"><a href="#">Store Directory</a></li>
</ul>
</div>
<div class="toplinks">
<div class="links"><label>MOST SEARCHED FOR ON MARKET:</label>
<ul>
<li><a href="#">Xiaomi Mi3</a></li>
<li><a href="#">Digiflip Pro XT 712 Tablet</a></li>
<li><a href="#">Mi 3 Phones</a></li>
<li class="last"><a href="#">View all</a></li>
</ul>
</div>
<div class="links"><label>MOBILES:</label>
<ul>
<li><a href="#">Moto E</a></li>
<li><a href="#">Samsung Mobile</a></li>
<li><a href="#">Micromax Mobile</a></li>
<li><a href="#">Nokia Mobile</a></li>
<li><a href="#">HTC Mobile</a></li>
<li><a href="#">Sony Mobile</a></li>
<li><a href="#">Apple Mobile</a></li>
<li><a href="#">LG Mobile</a></li>
<li><a href="#">Karbonn Mobile</a></li>
<li class="last"><a href="#">View all</a></li>
</ul>
</div>
<div class="links"><label>CAMERA:</label>
<ul>
<li><a href="#">Nikon Camera</a></li>
<li><a href="#">Canon Camera</a></li>
<li><a href="#">Sony Camera</a></li>
<li><a href="#">Samsung Camera</a></li>
<li><a href="#">Point shoot camera</a></li>
<li><a href="#">Camera Lens</a></li>
<li><a href="#">Camera Tripod</a></li>
<li><a href="#">Camera Bag</a></li>
<li class="last"><a href="#">View all</a></li>
</ul>
</div>
<div class="links"><label>LAPTOPS:</label>
<ul>
<li><a href="#">Apple Laptop</a></li>
<li><a href="#">Acer Laptop</a></li>
<li><a href="#">Samsung Laptop</a></li>
<li><a href="#">Lenovo Laptop</a></li>
<li><a href="#">Sony Laptop</a></li>
<li><a href="#">Dell Laptop</a></li>
<li><a href="#">Asus Laptop</a></li>
<li><a href="#">Toshiba Laptop</a></li>
<li><a href="#">LG Laptop</a></li>
<li><a href="#">HP Laptop</a></li>
<li><a href="#">Notebook</a></li>
<li class="last"><a href="#">View all</a></li>
</ul>
</div>
<div class="links"><label>TVS:</label>
<ul>
<li><a href="#">Sony TV</a></li>
<li><a href="#">Samsung TV</a></li>
<li><a href="#">LG TV</a></li>
<li><a href="#">Panasonic TV</a></li>
<li><a href="#">Onida TV</a></li>
<li><a href="#">Toshiba TV</a></li>
<li><a href="#">Philips TV</a></li>
<li><a href="#">Micromax TV</a></li>
<li><a href="#">LED TV</a></li>
<li><a href="#">LCD TV</a></li>
<li><a href="#">Plasma TV</a></li>
<li><a href="#">3D TV</a></li>
<li><a href="#">Smart TV</a></li>
<li class="last"><a href="#">View all</a></li>
</ul>
</div>
<div class="links"><label>TABLETS:</label>
<ul>
<li><a href="#">Micromax Tablets</a></li>
<li><a href="#">HCL Tablets</a></li>
<li><a href="#">Samsung Tablets</a></li>
<li><a href="#">Lenovo Tablets</a></li>
<li><a href="#">Karbonn Tablets</a></li>
<li><a href="#">Asus Tablets</a></li>
<li><a href="#">Apple Tablets</a></li>
<li class="last"><a href="#">View all</a></li>
</ul>
</div>
<div class="links"><label>WATCHES:</label>
<ul>
<li><a href="#">FCUK Watches</a></li>
<li><a href="#">Titan Watches</a></li>
<li><a href="#">Casio Watches</a></li>
<li><a href="#">Fastrack Watches</a></li>
<li><a href="#">Timex Watches</a></li>
<li><a href="#">Fossil Watches</a></li>
<li><a href="#">Diesel Watches</a></li>
<li><a href="#">Luxury Watches</a></li>
<li class="last"><a href="#">View all</a></li>
</ul>
</div>
<div class="links"><label>CLOTHING:</label>
<ul>
<li><a href="#">Shirts</a></li>
<li><a href="#">Jeans</a></li>
<li><a href="#">T shirts</a></li>
<li><a href="#">Kurtis</a></li>
<li><a href="#">Sarees</a></li>
<li><a href="#">Levis Jeans</a></li>
<li><a href="#">Killer Jeans</a></li>
<li><a href="#">Pepe Jeans</a></li>
<li><a href="#">Arrow Shirts</a></li>
<li><a href="#">Ethnic Wear</a></li>
<li><a href="#">Formal Shirts</a></li>
<li><a href="#">Peter England Shirts</a></li>
<li class="last"><a href="#">View all</a></li>
</ul>
</div>
<div class="links"><label>FOOTWEAR:</label>
<ul>
<li><a href="#">Shoes</a></li>
<li><a href="#">Casual Shoes</a></li>
<li><a href="#">Sports Shoes</a></li>
<li><a href="#">Formal Shoes</a></li>
<li><a href="#">Adidas Shoes</a></li>
<li><a href="#">Gas Shoes</a></li>
<li><a href="#">Puma Shoes</a></li>
<li><a href="#">Reebok Shoes</a></li>
<li><a href="#">Woodland Shoes</a></li>
<li><a href="#">Red tape Shoes</a></li>
<li><a href="#">Nike Shoes </a></li>
<li class="last"><a href="#">View all</a></li>
</ul>
</div>
</div>
</div>>
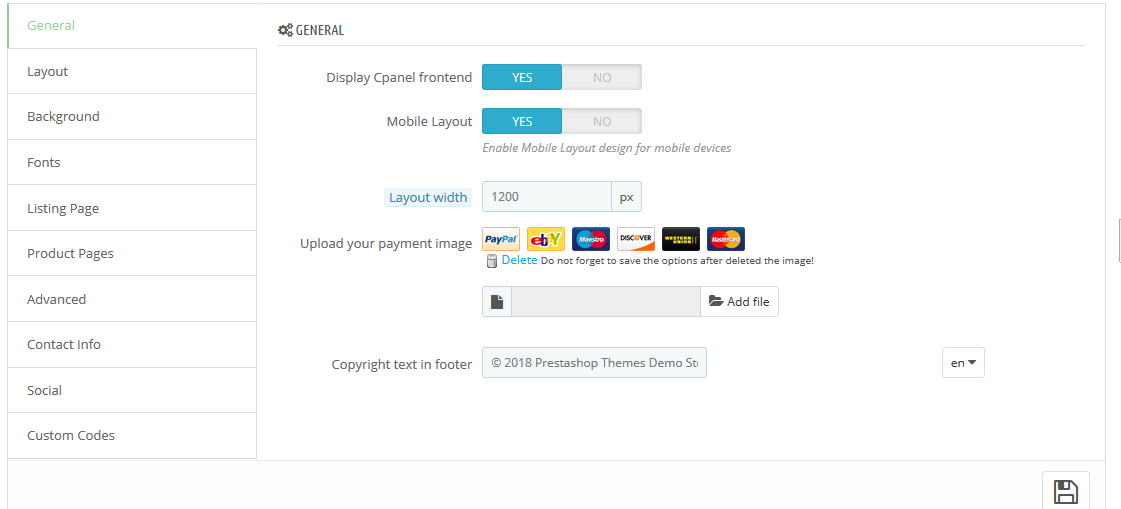
Frontend Appearance:

Backend Settings:
Step 1: In the Prestashop Admin Panel, navigate to IMPROVE >> Modules >> Modules and Services >> Installed Modules look for “SP Theme Configuration module.
Step 2: In the SP Theme Settings, choose “General” to configure the parameters in this section.

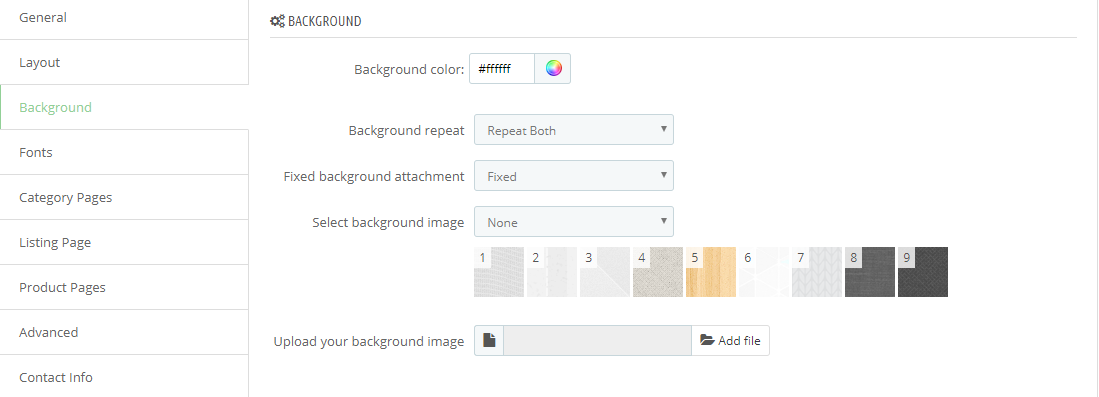
In your Prestashop Admin Dashboard, navigate to IMPROVE >> Modules >> Modules and Services >> go to Installed modules section, search for “SP Theme Configuration” module then click on Configure.
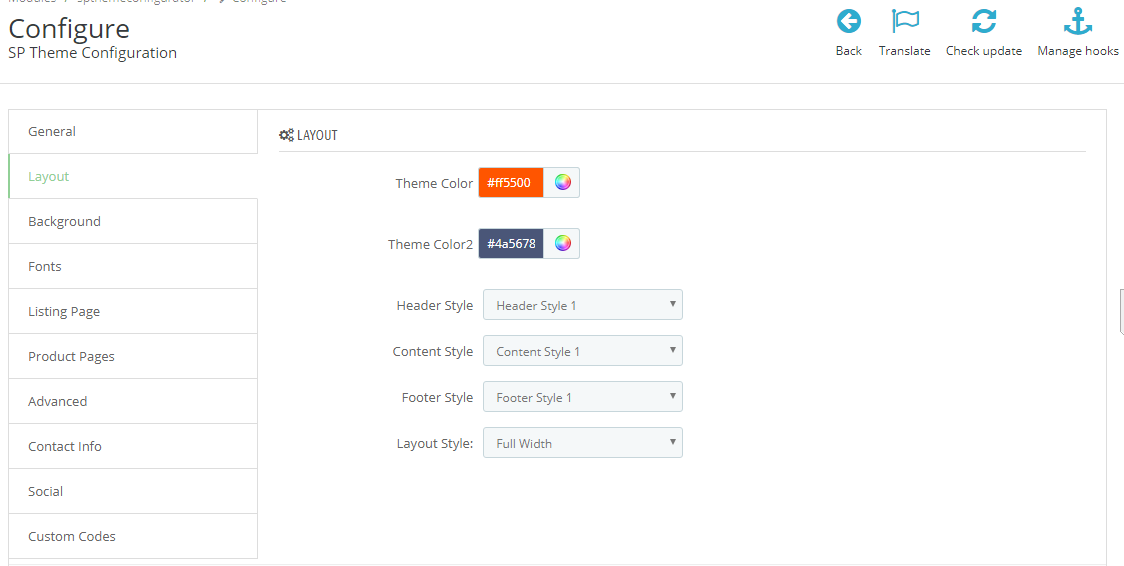
In the SP Theme Configuration, choose “Background” to configure the parameters in this section. After finishing, you could go to the front-end to view the changes.
In the SP Theme Configuration, choose “Fonts” to configure the parameters in this section. After finishing, you could go to the front-end to view the changes.
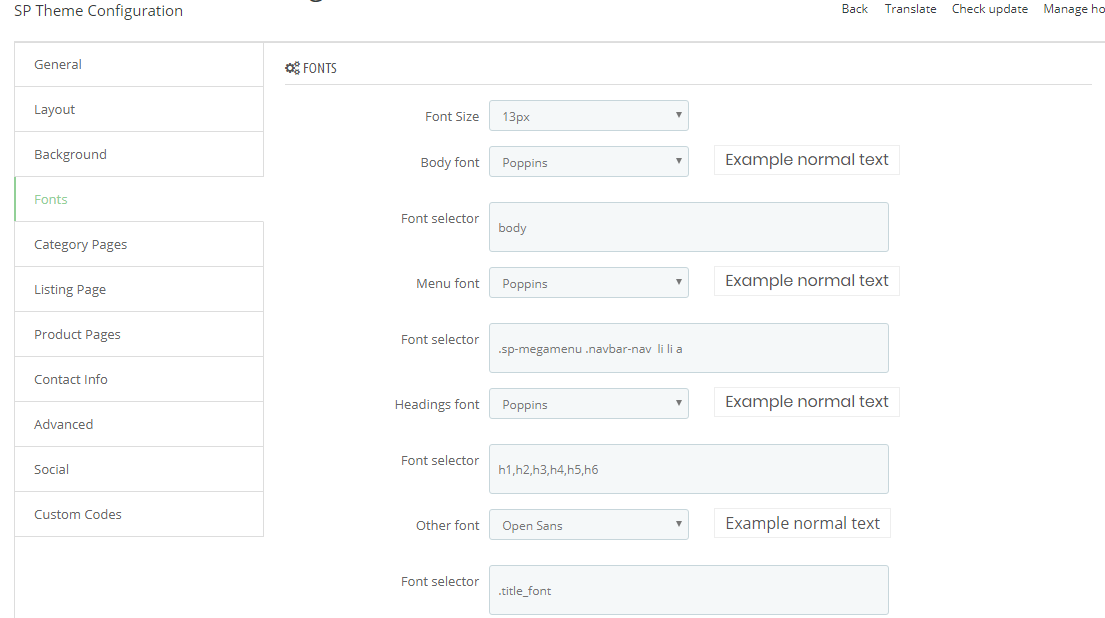
Note: Please copy and paste the following line into Font Selector tab:
1.
body, h5.product-name, .price-box, #attributes .attribute_list select, h1.product_name2.
.sp-megamenu .navbar-nav li li a3.
h1,h2,h3,h4,h5,h6,.content_sortPagiBar_top label, .content_sortPagiBar_bottom label,.content_sortPagiBar_top div.selector span, .content_sortPagiBar_bottom div.selector span4.
.title_font
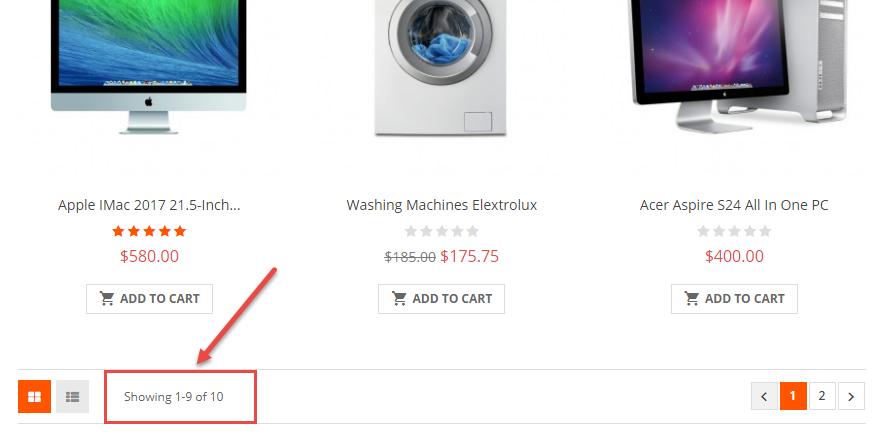
In the SP Theme Configuration, choose “Listing Pages” to configure the parameters in this section. After finishing, you could go to the front-end to view the changes.
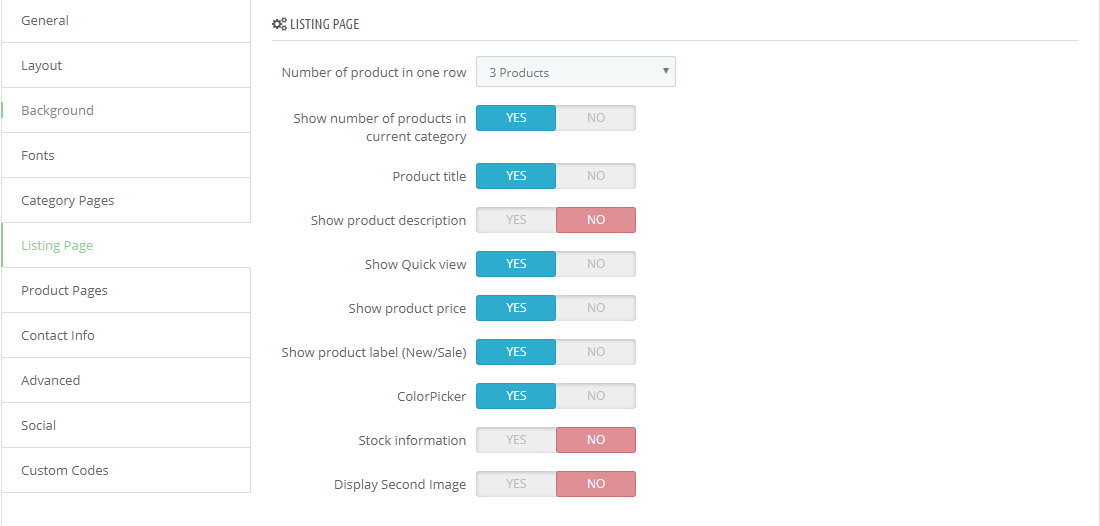
Display product number on Listing Page (Show/Hide)
Frontend Appearance:
Display product title on Listing Page (Show/Hide)
Frontend Appearance:

Display product short description on Listing Page (Show/Hide)
Frontend Appearance:

Display button Quickview on Listing Page (Show/Hide)
Frontend Appearance:

Display product price on Listing Page (Show/Hide)
Frontend Appearance:

Display product price on Listing Page (Show/Hide)
Frontend Appearance:

In the SP Theme Configuration, choose “Product Pages” to configure the parameters in this section. After finishing, you could go to the front-end to view the changes.

-Horizontal Thumbnails
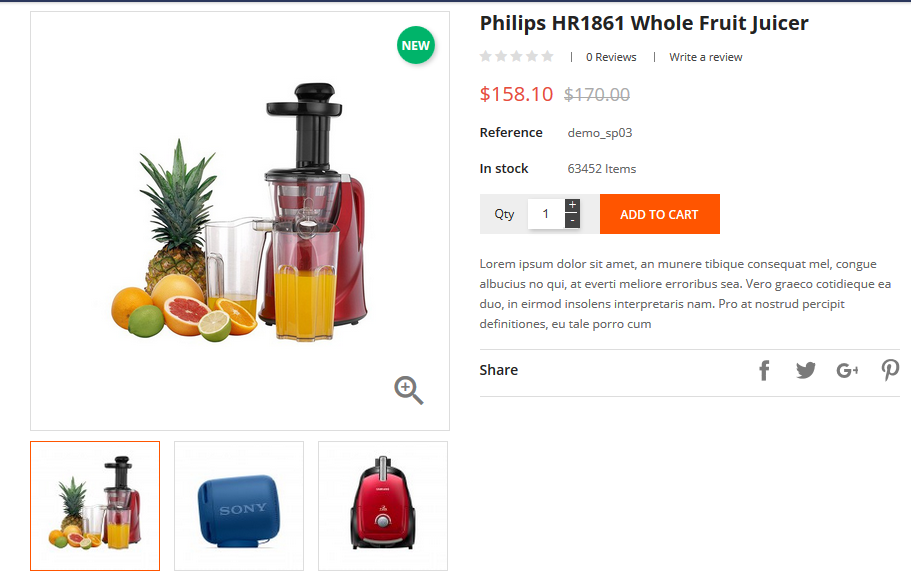
Number of thumbnails be displayed.
Backend Settings:

Show/Hide Product SKU.
Frontend Appearance:

Show/Hide Product Attribute.

Show/Hide Product Availability.
Frontend Appearance:

Show/Hide Share buttons.
Frontend Appearance:

Show/Hide Short Product Description.
Frontend Appearance:

In the SP Theme Configuration, choose "Custom Codes" to configure the parameters in this section. After finishing, you could go to the front-end to view the changes.
Frontend Appearance
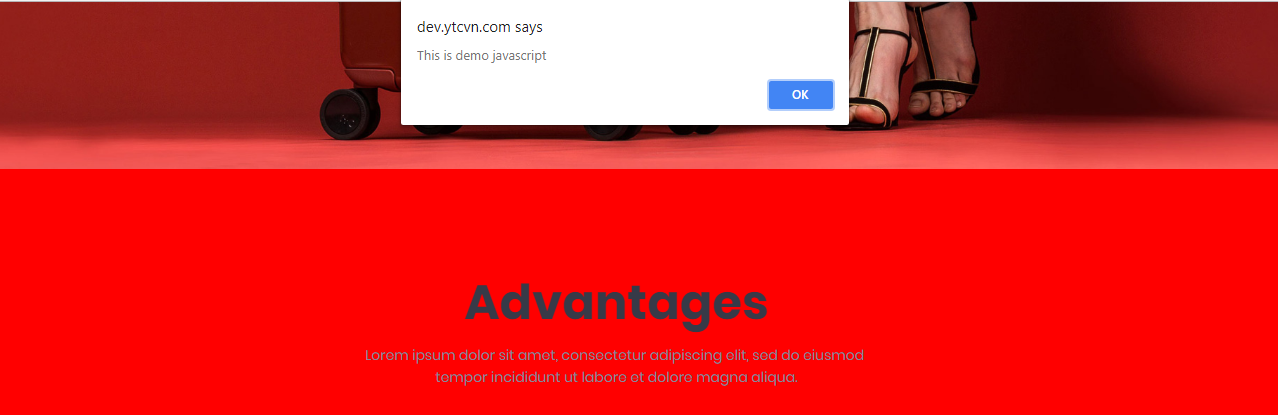
- You can input css or javascript.
Examples code css
body{
	background-color: red;
}
Examples code Javascript
alert('This is demo javascript');

- In the SP Theme Settings, choose “Advanced” to configure the parameters in this section. After finishing, you could go to the front-end to view the changes.
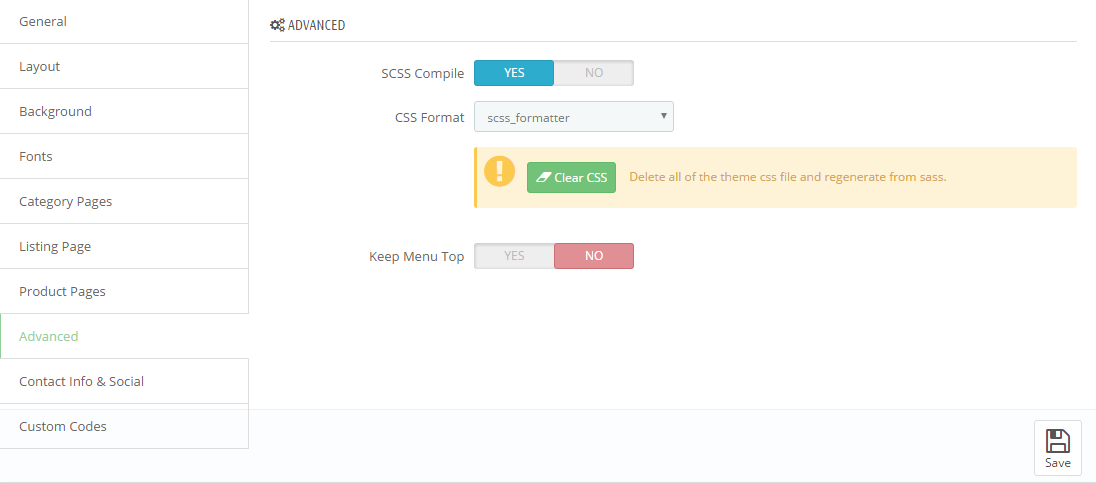
- Active: The system will automatically compile into CSS from SCSS when you refresh the website
Note: System will change css file theme-...css. Ex: theme-ff0000.css
Do not edit css file when active SCSS Compile
Css formatting after compile from sass.
There are two instances to edit css file via ftp.
1. SCSS Compile: Disable
- You can edit css file of modules.
Example: "../themes/sp_Market/modules/spcustomhtml/views/css/style.css"
- You can edit css file of theme.
Example:
+) "../themes/sp_Market/assets/css/theme-0083c1.css"
+) "../themes/sp_Market/assets/css/theme.css"
2. SCSS Compile: Enable
- You can edit css file of modules. (Sample as Disable)
Note: The system will generate css file "theme-0083c1.css, theme-{color code}.css"
Your changes to this file will be lost
- You must edit file "*.scss" in the folder "_dev/css"
Example: "../themes/sp_Market/_dev/css/themestyles/_content.scss"
Click Here to view documentation of SP MegaMenu module.
1. Navigate to IMPROVE >> Modules >> Modules and Services go to Installed modules section and look for SP Vertical >> Click the Configure button to access the module configuration page.
2. In the SP Vertical Panel, you could Add New Module by click on the button like the following image:

3. You could configure General Options then click "Save" or "Save and stay" button.

4. After, scroll down you could configure Menu Information as follows

5. Click Add New button to add items as you want.

6. Menu list of Mega Menu. You need to look at the menu list to configure easily.
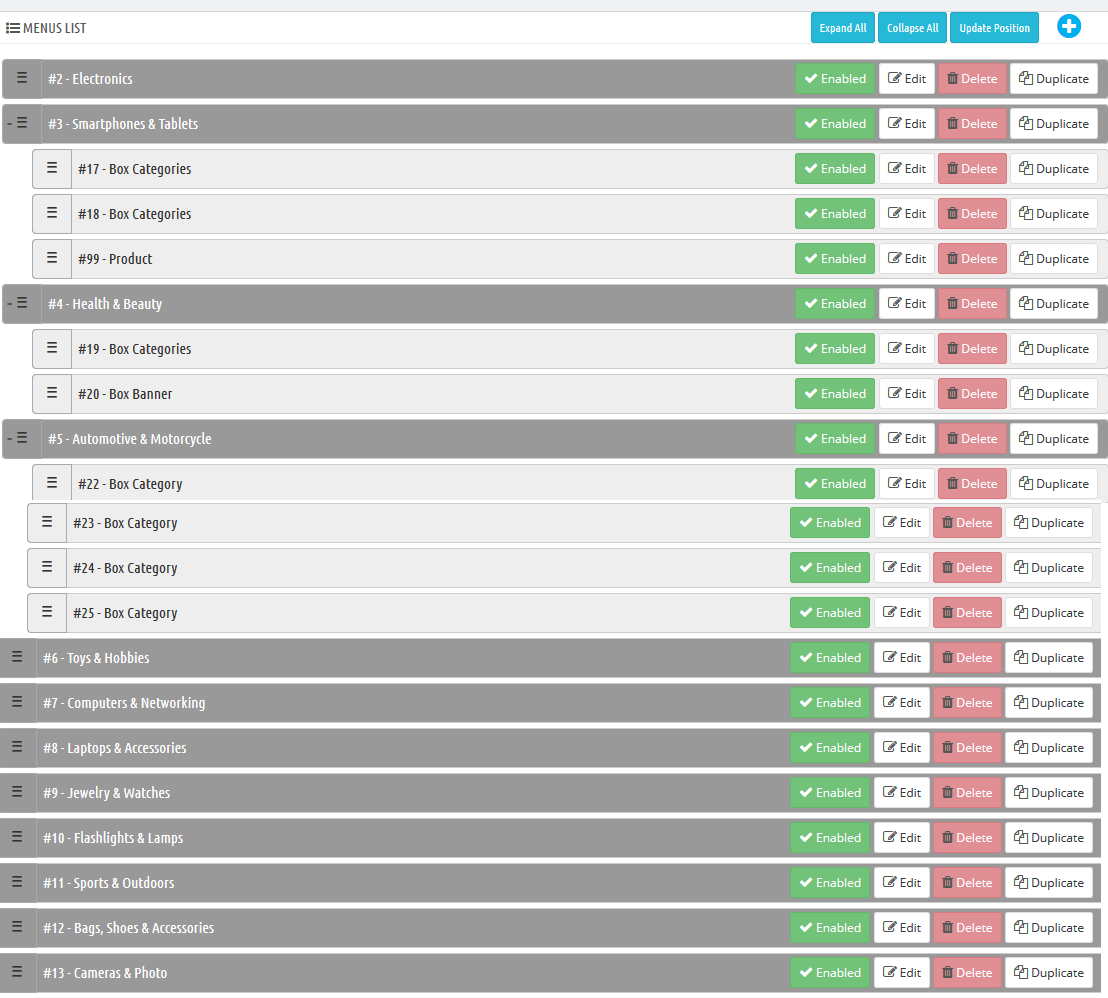
7. To configure each item, you need to click Edit button.

Backend Setting:
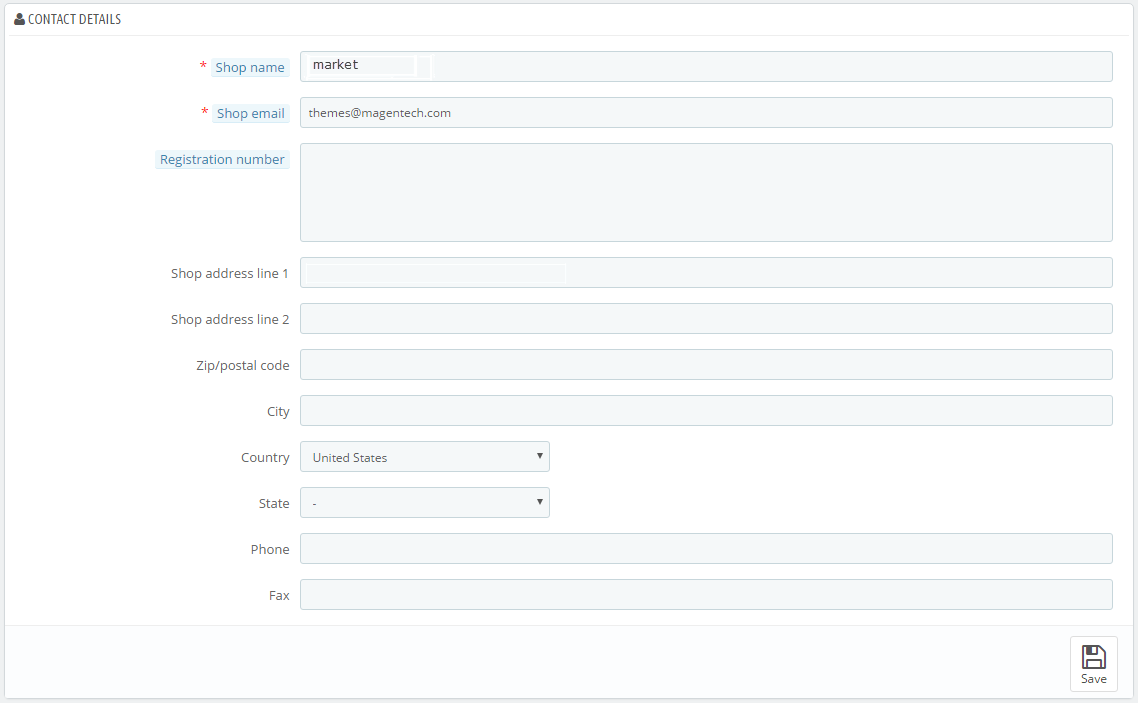
In the Prestashop Admin Panel, navigate to Shop Parameters >> Contact >> Tabs Stores >> Contact Details
Frontend Appearance:

Backend Setting:
Step 1: In the Prestashop Admin Panel, navigate to IMPROVE >> Design >> Pages
Step 2: In the “Pages” configuration page, click  button in the right corner to “ADD NEW”.
Step 3: You could add new cms page like the illustration
Copy and paste the following code into the content:
<div class="rte">
<div class="about-us">
<div class="row">
<div class="col-md-5 col-sm-12 box-left">
<div class="about-image"><img src="/themes/sp_market2/themes/sp_market2/assets/img/aboutus.jpg" alt="#" /></div>
</div>
<div class="col-md-7 col-sm-12 box-right">
<div class="about-text">
<h3 class="title-text">Welcome to SP Market</h3>
<p>Sed ut perspiciatis unde omnis iste natus error sit voluptatem accusantium doloremque laudantium, totam rem aperiam, eaque ipsa quae ab illo inventore veritatis et quasi architecto beatae vitae dicta sunt explicabo. Nemo enim ipsam voluptatem quia voluptas sit aspernatur aut odit aut fugit, sed quia consequuntur magni dolores eos qui ratione voluptatem sequi nesciunt.</p>
<p>Neque porro quisquam est, qui dolorem ipsum quia dolor sit amet, consectetur, adipisci velit, sed quia non numquam eius modi tempora incidunt ut labore et dolore magnam aliquam quaerat voluptatem. Ut enim ad minima veniam, quis nostrum exercitationem ullam corporis suscipit laboriosam, nisi ut aliquid ex ea commodi consequatur? Quis autem vel eum iure reprehenderit qui in ea voluptate velit esse quam nihil molestiae consequatur, vel illum qui dolorem eum fugiat quo voluptas nulla pariatur</p>
<p>Neque porro quisquam est, qui dolorem ipsum quia dolor sit amet, consectetur, adipisci velit, sed quia non numquam eius modi tempora incidunt ut labore et dolore magnam aliquam quaerat voluptatem. Ut enim ad minima veniam, quis nostrum exercitationem ullam corporis suscipit laboriosam, nisi ut aliquid ex ea commodi consequatur? Quis autem vel eum iure reprehenderit qui in ea voluptate velit esse quam nihil molestiae consequatur, vel illum qui dolorem eum fugiat quo voluptas nulla pariatur</p>
</div>
</div>
</div>
</div>
<div class="our-content">
<div class="row">
<div class="col-md-3 choose-us">
<div class="content">
<h5 class="title">Why choose us</h5>
<div class="panel-group" id="accordion">
<div class="panel panel-default">
<div class="panel-heading" id="headingOne">
<h4 class="panel-title"><i class="fa fa-check"></i><a class="collapsed" href="#collapseOne"> We provide the best products </a></h4>
</div>
<div id="collapseOne" class="panel-collapse collapse in">
<div class="panel-body">Lorem ipsum dolor sit amet, consectetur adipiscing elit, sed do eiusmod tempor incididunt ut labore et</div>
</div>
</div>
<div class="panel panel-default">
<div class="panel-heading" id="headingTwo">
<h4 class="panel-title"><i class="fa fa-check"></i><a class="collapsed" href="#collapseTwo"> We care about our customers </a></h4>
</div>
<div id="collapseTwo" class="panel-collapse collapse">
<div class="panel-body">Lorem ipsum dolor sit amet, consectetur adipiscing elit, sed do eiusmod tempor incididunt ut labore et</div>
</div>
</div>
<div class="panel panel-default">
<div class="panel-heading" id="headingThree">
<h4 class="panel-title"><i class="fa fa-check"></i><a class="collapsed" href="#collapseThree"> Labore et dolore magna aliqua </a></h4>
</div>
<div id="collapseThree" class="panel-collapse collapse">
<div class="panel-body">Lorem ipsum dolor sit amet, consectetur adipiscing elit, sed do eiusmod tempor incididunt ut labore et</div>
</div>
</div>
<div class="panel panel-default">
<div class="panel-heading" id="headingFour">
<h4 class="panel-title"><i class="fa fa-check"></i><a class="collapsed" href="#collapseFour"> Ut enim ad minim veniam </a></h4>
</div>
<div id="collapseFour" class="panel-collapse collapse">
<div class="panel-body">Lorem ipsum dolor sit amet, consectetur adipiscing elit, sed do eiusmod tempor incididunt ut labore et</div>
</div>
</div>
<div class="panel panel-default">
<div class="panel-heading" id="headingFive">
<h4 class="panel-title"><i class="fa fa-check"></i><a class="collapsed" href="#collapseFive"> Sed ut perspiciatis unde omnis </a></h4>
</div>
<div id="collapseFive" class="panel-collapse collapse">
<div class="panel-body">Lorem ipsum dolor sit amet, consectetur adipiscing elit, sed do eiusmod tempor incididunt ut labore et</div>
</div>
</div>
</div>
</div>
</div>
<div class="col-md-3 open-time">
<div class="content">
<h5 class="title">Open time</h5>
<ul>
<li><b>monday:</b><span>8:00 - 21:00</span></li>
<li><b>Tuesday:</b><span>8:00 - 21:00</span></li>
<li><b>Wednesday:</b><span>9:00 - 20:00</span></li>
<li><b>Thursday:</b><span>8:00 - 21:00</span></li>
<li><b>Friday:</b><span>10:00 - 18:00</span></li>
<li><b>Saturday:</b><span>11:00 - 17:00</span></li>
</ul>
<a href="#" class="about-button">get in touch</a></div>
</div>
<div class="col-md-6 customers">
<div class="content">
<h5 class="title">What customers say about us</h5>
<div class="owl-carousel">
<div class="item">
<div class="about-thumb"><img src="/themes/sp_market2/themes/sp_market2/assets/img/ourteam01.jpg" alt="image" class="img-circle" /></div>
<div class="about-content">
<h2 class="author">Katerina Huge</h2>
<span>Purschaser</span>
<p>“Lorem ipsum dolor sit amet, consectetur adipisicing elit. Eos, explicabo. Accusantium, maiores. Provident, illum et. Adipisci natus et eius quas obcaecati nostrum, quisquam illum nesciunt nulla fugit beatae expedita molestiae? Adipisci natus et eius quas obcaecati nostrum, quisquam illum nesciunt nulla fugit beatae expedita molestiae Adipisci natus et eius quas obcaecati nostrum"</p>
</div>
</div>
</div>
</div>
</div>
</div>
</div>
</div>
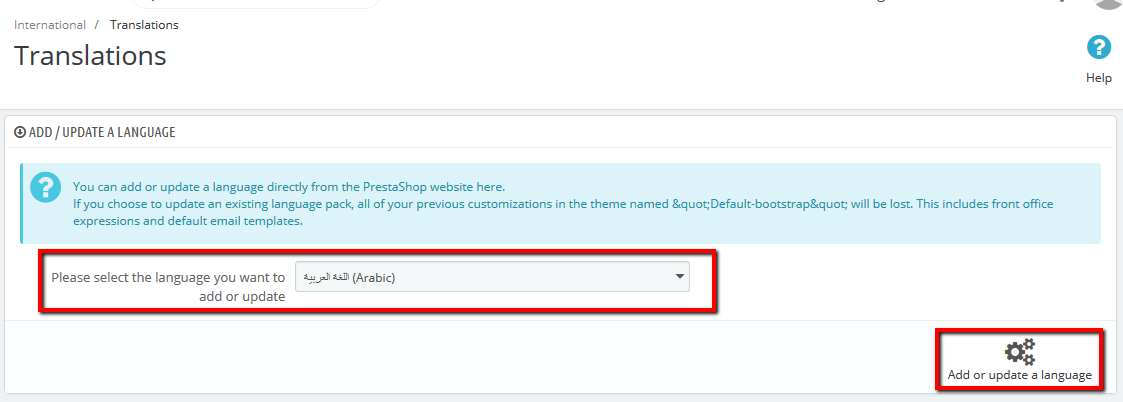
- In the Prestashop Admin Panel, navigate to IMPROVE >> International >> Translations

- At here, Scroll to block "ADD / UPDATE A LANGUAGE"
- Then, Select the language you want to add new, and click button "Add or update a language"
- In the Prestashop Admin Panel, navigate to IMPROVE >> International >> Translations (Same Add new Language)
- At here, Scroll to block "Export a Language"
- Then, Select Language and Your theme that you want Export, and click button "Export"

- In the Prestashop Admin Panel, navigate to IMPROVE >> International >> Translations (Same Add new Language)
- At here, Scroll to block "Import a language pack manually"
- Then, click button "Add file" and choose file language and select your theme, and click button "Import"

- In the Prestashop Admin Panel, navigate to IMPROVE >> International >> Localization, and choose tab "Languages"
- You can edit or delete language on your store

- If you want change language, click button "Edit".

- In the Prestashop Admin Panel, navigate to IMPROVE >> International >> Localization, and choose tab "Currencies"

- In the "Currencies" configuration page, click button  in the right corner to “ADD NEW”.
You could configure this module like the illustration
- In the Prestashop Admin Panel, navigate to IMPROVE >> International >> Translations (Same Add new Language)
- In the "Translations" configuration page, scroll to block "MODIFY TRANSLATIONS"
- Then click button "Modify"

- Here, you can translate the text in the theme.

- In the Prestashop Admin Panel, navigate to IMPROVE >> International >> Translations (Same Add new Language)
- In the "Translations" configuration page, scroll to block "MODIFY TRANSLATIONS"
- Then click button "Modify"

- Here, you can translate the text in the module.

SUPPORT - If you have any questions that are beyond the scope of this help file, please feel free to send us via:
Support Tickets System
FAQs - Go to
Here to view more the Frequently Asked Questions.